Thank you, from the BaitShop Boyz! |
Quick Tip for the Week |
Post Reply 
|
Page <1234> |
| Author | |
TasunkaWitko 
Administrator 

aka The Gipper Joined: 10 June 2003 Location: Chinook Montana Status: Offline Points: 14753 |
 Post Options Post Options
") Thanks(0) Thanks(0)
 Quote Reply Quote Reply
 Posted: 28 June 2006 at 07:21 Posted: 28 June 2006 at 07:21 |
|
5 jul 06
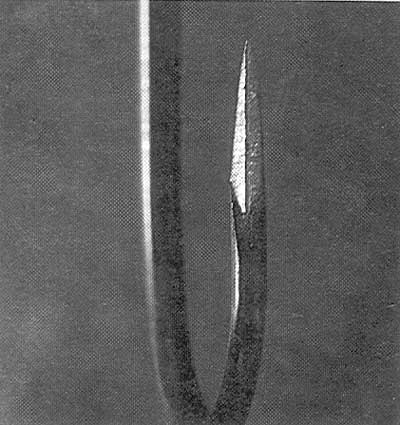
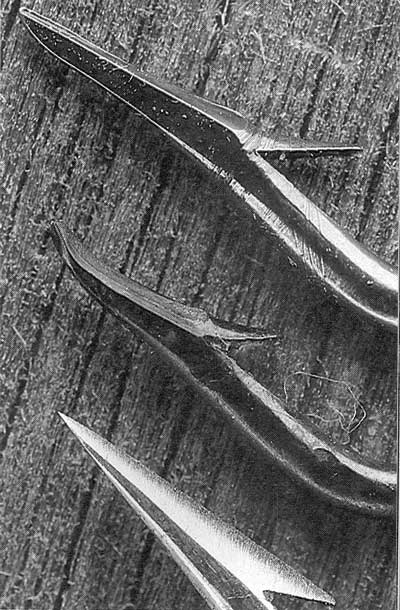
---------------------- The first rule of knife sharpening is safety; be extra careful with all cutting implements, just as you are with all shooting implements. Failure in knife sharpening is usually centered on two Ps. The first P is Pressure; the second P is Patience. Whenever there is a failure in knife sharpening, it is most likely due to too applying far more pressure than necessary and exercising far too little patience. Dont try to ram the knife through the sharpening instrument, or the sharpening instrument through the knife. Such action is not necessary to create a keen edge. Be sure to have patience; even with the most modern equipment, sharpening a knife takes a little time. There are many sharpening devices on the market, ranging from simple stones to complex systems that require an entire users manual. All are entirely workable and most will work well. Choosing a knife sharpener, and a knife sharpening method, is a matter of trying different types to see which one works best for you. Edited by TasunkaWitko |
|
|
TasunkaWitko - Chinook, Montana
 Helfen, Wehren, Heilen Die Wahrheit wird euch frei machen |
|
 |
|
|
TasunkaWitko
Administrator
aka The Gipper Joined: 10 June 2003 Location: Chinook Montana Status: Offline Points: 14753 |
Post Options
Thanks(0)
Quote Reply
Posted: 09 July 2006 at 12:47 |
|
|
|
TasunkaWitko - Chinook, Montana
Helfen, Wehren, Heilen Die Wahrheit wird euch frei machen |
|
|
|
|
TasunkaWitko
Administrator
aka The Gipper Joined: 10 June 2003 Location: Chinook Montana Status: Offline Points: 14753 |
Post Options
Thanks(0)
Quote Reply
Posted: 12 July 2006 at 07:36 |
|
19 jul 06
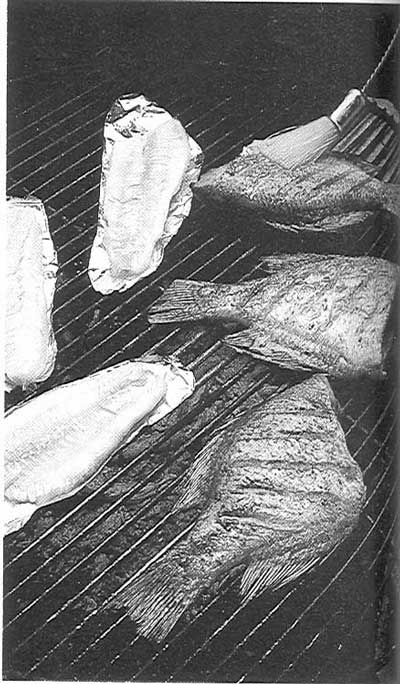
----------------------- When you combine the fresh air, the natural scenery and the tang of woodsmoke, nothing comes close to cooking outdoors over an open fire. Open-fire campfire cooking is similar to cooking over charcoal or natural gas, but there are a few differences and things to remember. Build a fire using dry, non-resinous hardwoods, preferably logs about 3-4 inches in diameter and some smaller kindling. If it has been raining, you may have to carry some newspaper or dry tinder to get the fire started. Stack the wood in a log cabin- or tipi-style over the tinder. When the fire has burned down to a bed of hot coals, place a grate over coals on rocks or logs bordering the fire. Feed the fire with small twigs as needed to maintain even heat. The usual way to cook over a fire is simply to set a frying pan on the grate. But you can also wrap food in a foil packet, along with vegetables, if desired, and set the packet directly on the coals. One of the biggest problems when cooking with foil over an open fire is telling when the food is done, because cooking time varies with the type of wood, wind and outside temperature. Open the foil and check the food for doneness. Meat should be done to your liking, fish should flake easily and vegetables should be tender. If the food is not done, reseal the package and put it back on the fire. When youre done cooking, be sure to extinguish your fire completely. How To Cook With A Frying Pan Test the coals by blowing on them; when they glow bright red, the fire is ready. Dont attempt to cook until the flames disappear. Place rocks around the fire to hold the grate 4-8 inches above the coals. Lower the height of the grate for more heat or raise it for less heat. Add 2 or 3 Tablespoons of cooking oil to the frying pan and heat for 1-2 minutes. Use long-handled tongs or fork to add the fish. How To Cook With Aluminum Foil Double-wrap fish by first criss-crossing two sheets of heavy-duty aluminum foil. Wrap fish in top sheet as shown; repeat with bottom sheet. Set the packet in the middle of coals or on grate. Cooking time will vary depending on weather, size of package and intensity of heat. Cook for half the recommended time. Using long-handled tongs, turn package over and cook for remaining time. Open package and test for doneness. Tips For Campfire Cooking Hold your hand 6-8 inches above grate to judge heat. If you can hold it there 2-4 seconds, the heat is high; 5-7 seconds, the heat is medium; 8-10 seconds, the heat is low. Premix flour or desired coating with dried herbs and other seasonings in a resealable plastic bag. To coat pieces of fish or meat, add them to the bag, reseal and shake. Keep spice mixtures needed for recipes in a 35mm film canister or similar small container. This way, youll be sure to have the proper blend and you wont have to carry several bottles of spices. Carry a small cooler for perishable foods and supplies such as cooking oil, matches, newspaper for tinder, seasonings and utensils. This keeps everything in one place for easy access. Water frozen in plastic bottles keeps food cool. Edited by TasunkaWitko |
|
|
TasunkaWitko - Chinook, Montana
Helfen, Wehren, Heilen Die Wahrheit wird euch frei machen |
|
|
|
|
TasunkaWitko
Administrator
aka The Gipper Joined: 10 June 2003 Location: Chinook Montana Status: Offline Points: 14753 |
Post Options
Thanks(0)
Quote Reply
Posted: 20 July 2006 at 06:51 |
|
26 jul 06
How To Cook Fish On Grate Over An Open Fire Edited by TasunkaWitko |
|
|
TasunkaWitko - Chinook, Montana
Helfen, Wehren, Heilen Die Wahrheit wird euch frei machen |
|
|
|
|
TasunkaWitko
Administrator
aka The Gipper Joined: 10 June 2003 Location: Chinook Montana Status: Offline Points: 14753 |
Post Options
Thanks(0)
Quote Reply
Posted: 26 July 2006 at 10:23 |
|
2 aug 06
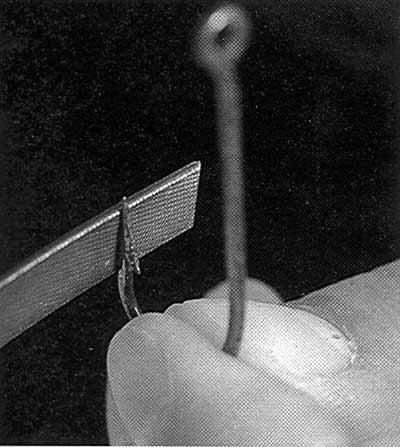
---------------------------- Northern Pike, and occa-sionally walleyes, will take dead smelt lying off the bot-tom, but these baits are more effective when floated up a foot or two. Because these fish can be found in deep water, using a bobber to suspend the bait is not always practical. Heres a way to float dead bait just off the bottom, where it is visible and also appears to be wounded and barely alive. Big pike would have a hard time resisting this presenta-tion: 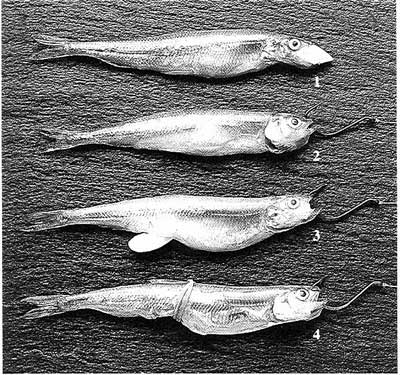 Stuff a (1) Styrofoam packing peanut inside the mouth of the bait and (2) run the hook through both lips to keep the mouth shut. If more floatation is needed to make the bait float off the bottom, (3) cut a small slit in the belly and stuff another peanut or two into the abdomen. (4) Slip a rubber band over the fish or tie mono around the bait to keep the peanut in the body. If the bait is small, use pieces of a peanut in place of a whole one. Fish the bait about two feet behind your sinker. Edited by TasunkaWitko |
|
|
TasunkaWitko - Chinook, Montana
Helfen, Wehren, Heilen Die Wahrheit wird euch frei machen |
|
|
|
|
TasunkaWitko
Administrator
aka The Gipper Joined: 10 June 2003 Location: Chinook Montana Status: Offline Points: 14753 |
Post Options
Thanks(0)
Quote Reply
Posted: 02 August 2006 at 08:15 |
|
9 aug 06
--------------------------- In his book, Wild Game and Country Cooking, Timothy Manion offers these thoughts on venison care and preparation: I spent my boyhood hunting the cedar swamp area of Waupaca County and it was not unusual to see two or three bucks and 25 does on opening day. Despite the water-filled cedar-choked jungle these swamp deer resided in, they had the luxury of dining regularly on some of the sweetest corn in all Wisconsin. I truly believe you are what you eat and these deer, no matter what their age, are delicious. Some people claim that the venison the attempt to prepare tastes like liver or is quite wild tasting. Well, it stands to reason that when a deer has been chased and shot through a barrage of hunters, the adrenaline is flowing and he is extremely tense. These conditions will make the meat tough and strong tasting. If you can get away from the crowd in areas that are remote and tough going, you will probably not only have an opportunity at a larger buck, but also one that will be much more relaxed and taste better. Venison, if prepared properly, will taste as good as [or better than] any milk-fed beef. All large game must be hung for periods ranging from three or four days to [two] weeks or longer before they are ready to eat, much as beef must be hung until it is tender. Wild meats are leaner than domestic meats and need fats for cooking; they are often larded or blanketed with larding pork. |
|
|
TasunkaWitko - Chinook, Montana
Helfen, Wehren, Heilen Die Wahrheit wird euch frei machen |
|
|
|
|
TasunkaWitko
Administrator
aka The Gipper Joined: 10 June 2003 Location: Chinook Montana Status: Offline Points: 14753 |
Post Options
Thanks(0)
Quote Reply
Posted: 11 August 2006 at 08:21 |
|
16 aug 06 ------------------------------------------ Whitetail Deer Edited by TasunkaWitko |
|
|
TasunkaWitko - Chinook, Montana
Helfen, Wehren, Heilen Die Wahrheit wird euch frei machen |
|
|
|
|
TasunkaWitko
Administrator
aka The Gipper Joined: 10 June 2003 Location: Chinook Montana Status: Offline Points: 14753 |
Post Options
Thanks(0)
Quote Reply
Posted: 17 August 2006 at 16:58 |
|
23 aug 06
-------------------------------------------------------
Beer and bratwurst are traditionally the essence of German gastronomy, but there is certainly more to German cooking than that. There is a flavor to The German hausfrau is economically-minded even in todays affluent society. Not every meal contains meat, and the humble potato is used in many interesting ways combined with apple, pears, grated raw into pancakes or cooked with caraway seeds. The main meal is usually served in the middle of the day and is either a meat dish or a high-protein cheese or lentil dish followed by a sweet or fruit. Supper is kept quite simple; a selection of cold meats, sausages and salads, and a variety of breads and rolls. On special occasions, traditional meals are cooked; perhaps the most famous of these is sauerkraut, cooked in white wine, cider, beer or champagne or flavored with Kirsch and served with frankfurters, pickled pork, garlic sausage and new boiled potatoes. Next week, well take a look at the regional nature of German food, and how the different regions of |
|
|
TasunkaWitko - Chinook, Montana
Helfen, Wehren, Heilen Die Wahrheit wird euch frei machen |
|
|
|
|
TasunkaWitko
Administrator
aka The Gipper Joined: 10 June 2003 Location: Chinook Montana Status: Offline Points: 14753 |
Post Options
Thanks(0)
Quote Reply
Posted: 17 August 2006 at 17:00 |
|
30 aug 06 ------------------------------------------- In The most important element of influence in the North is the sea. This is From the center of To the South, dumplings give way to tiny spaetzle and the famous Himmel und Erde potatoes cooked with apples. The well-known strudel of |
|
|
TasunkaWitko - Chinook, Montana
Helfen, Wehren, Heilen Die Wahrheit wird euch frei machen |
|
|
|
|
TasunkaWitko
Administrator
aka The Gipper Joined: 10 June 2003 Location: Chinook Montana Status: Offline Points: 14753 |
Post Options
Thanks(0)
Quote Reply
Posted: 08 September 2006 at 09:54 |
|
6 sep 06 ------------------------------------------------------------ ---- Home-pickled fish are delicious. They are as good as, if not better than, the pickled herring sold in the grocery stores. Pickled fish can be eaten with crackers or on its own, and is usually the first item to disappear from the appetizer tray. Practically any kind of fish can be pickled, but small fish with delicate flesh generally work better than large fish with coarse meat. Bony fish, such as northern pike, are often pickled because the acid in the pickling liquid helps dissolve small bones. Remove heavy rib bones and, if you wish, remove the skin and lateral line. Cut the fish into bite-sized chunks, 1 to 1-1/2 inches. Fresh, uncooked fish should be frozen for at least 48 hours before pickling, in case the meat contains tapeworms. Seldom is this a problem, but the broadfish tapeworm, found mainly in There are dozens of different pickling techniques. Generally, the fish is soaked in a vinegar/salt brine and then in a pickling liquid consisting of vinegar, sugar and seasonings. Total brining and pickling time varies from 4-20 days, depending on the recipe. When brining, keep fish submerged in the brine by placing a plate over the fish and a heavy object on the plate. This ensures that all of the fish is pickled. Use high-quality soft water in the brine solution; too much iron or sulfide adversely affects the flavor of fish. Buy bottled water, if necessary. The brine calls for pickling salt because table salt has bitter impurities that discolor the fish and affect the taste. Use a good-quality, distilled white vinegar that has at least 5% acetic acid content. Vinegar slows spoilage. Normally, the fish are packed in canning jars (with two-part sealing lids. Pickling containers can also include glass bowls or peanut butter or mayonnaise jars. Cover containers tightly with plastic wrap or non-corrodible lids. White onion, lemon and/or pimiento slices in the jars add flavor and color. The sugar and spices contribute little to fish preservation of fish and are often adjusted to suit taste. Whole cloves add a pleasant flavor. You can also make cream style pickled fish by draining off the brine before serving, then adding a sour cream and sugar mixture (1 tablespoon sugar to 1 cup sour cream). |
|
|
TasunkaWitko - Chinook, Montana
Helfen, Wehren, Heilen Die Wahrheit wird euch frei machen |
|
|
|
|
TasunkaWitko
Administrator
aka The Gipper Joined: 10 June 2003 Location: Chinook Montana Status: Offline Points: 14753 |
Post Options
Thanks(0)
Quote Reply
Posted: 08 September 2006 at 09:56 |
|
13 sep 06 ------------------------------------------------------------ - To preserve meat, Native Americans and early settlers would hang thinly-sliced meat over a smoky fire until it was dry. It could then be stored or carried long distances without spoiling. Almost any big game meat without tendons, fat or sinews can be used to make jerky. The exceptions would be bear, boar or javelina, which must be cooked thoroughly. Cut meat with the grain for a chewy texture, or across the grain for a more-tender jerky. Slice meat carefully in order to ensure uniform strips. Meat is also easier to slice partially frozen. There are literally hundreds of jerky recipes. Some are as simple as sprinkling salt and pepper on the meat; others involve complex marinades and exotic seasonings. Personally, I prefer some sort of marinade, no matter how simple. To me, marinades allow the meat to be thoroughly and evenly flavored. I would also recommend the use of a curing salt such as Morton Tender Quick mix when preparing jerky to help prevent bacterial growth. Combine marinade ingredients in a large, nonmetallic mixing bowl or gallon jar. Stir to dissolve seasonings and salt cure. Add meat strips; cover with plastic wrap and refrigerate at least 24 hours, stirring occasionally. Jerky can also be made from ground game; in fact, I often find it beneficial to simply grind all leftover venison in my freezer each year for use as burger or in making jerky. When using ground meat for jerky, simply mix ingredients into the meat. Be sure to add a cup or so of water to the ground meat in order to help distribute the flavor and aid the meat in binding together. After 24 hours, roll out seasoned meat flat between two sheets of waxed paper and cut into strips, or shoot it out of a jerky gun. Traditionally, jerky is smoked, but it can also be flavored with liquid smoke and dried in a cool oven or dehydrator. If using smoker, follow manufacturers directions for best results. If preparing jerky in the oven, add 2 teaspoons liquid smoke flavoring to the marinade, if smoke flavor is desired. Heat oven to lowest possible temperature setting, propping oven door open with a wooden spoon. Deciding when jerky has dried enough can be a matter of very personal taste. My recommendation is to dry it at least until it is leathery and not brittle, then continue drying as long as your preferences determine. Some like their jerky to be very dry to the point of brittleness; this also tends to last longer. Others prefer a chewy jerky that will not break like a twig. As with most things subject to personal preference, the optimum is probably somewhere in-between. |
|
|
TasunkaWitko - Chinook, Montana
Helfen, Wehren, Heilen Die Wahrheit wird euch frei machen |
|
|
|
|
TasunkaWitko
Administrator
aka The Gipper Joined: 10 June 2003 Location: Chinook Montana Status: Offline Points: 14753 |
Post Options
Thanks(0)
Quote Reply
Posted: 19 September 2006 at 17:58 |
|
20 sep 06 --------------------------------- Fresh big game sausage is surprisingly easy to make at home. All of the recipes to be printed can be used as uncased sausages and require no special equipment other than a food processor or meat grinder. You can use any big game cut to make sausage; the meat does not have to be tender. The best choices are cuts that might be tough if cooked whole, such as flank, shoulder or brisket. Scraps left over after cutting up a big game animal work very well. Fatty pork is often added to the trimmed game meat to make sausage. If you prefer sausage game meat only, you still need to add fat. Ask your butcher for hard pork fat from the outside of the loin. Be sure to specify hard pork back fat when you order; tell the butcher what youll be using it for to be sure you get the right thing. Back fat is not the same as fatback, which is fat that has been salted and dried. A ratio of one part fat to three or four parts game meat produces a juicy, flavorful sausage. To produce the best texture, keep the fat and meat very cold during chopping or grinding. Avoid substituting lard for hard fat; lard is too soft and will produce a greasy sausage. Keep meat grinder blades sharp when grinding meat for sausage. Dull blades squeeze juices from the meat, resulting in dry, less-flavorful sausage. If your grinder slows down during use, or if the texture of the meat suddenly becomes fine and mushy, partially disassemble the grinder and check the blades and plate. Sinew and other tough material can get caught in the mechanism, causing poor performance. Clean the blade and plate, then continue. Experiment with small batches to find a sausage recipe you like, then double or triple the recipe to make a big batch. Its best to under-season sausage somewhat, then fry up a small patty and taste it. Add any additional seasonings or salt if necessary. |
|
|
TasunkaWitko - Chinook, Montana
Helfen, Wehren, Heilen Die Wahrheit wird euch frei machen |
|
|
|
|
TasunkaWitko
Administrator
aka The Gipper Joined: 10 June 2003 Location: Chinook Montana Status: Offline Points: 14753 |
Post Options
Thanks(0)
Quote Reply
Posted: 19 September 2006 at 18:00 |
|
27 sep 06 In conjunction with last weeks Quick Tip, here are a few pointers to keep in mind when making your own sausage: · Wash all equipment thoroughly in very hot, soapy water prior to making sausages. Rinse and refrigerate equipment until cool before using. Wash hands and scrub fingernails with nail brush. Scrub countertops and cutting boards with soapy water and rinse well. · Keep meat as cold as possible during sausage making. If meat is to be ground twice, chill it thoroughly and wash and refrigerate grinder between grindings. When working with a large batch of meat, grind only a small portion at a time and leave the rest refrigerated. · Grind lean meat separately from fat for juicier fresh sausages. Cut fat into chunks, partially freeze it, then grind finer than the meat. Mix ground meat and ground fat together. This way, the fat will be more-evenly distributed and there wont be any large pieces in your sausage. · Sprinkle mixed, dry seasonings over coarsely ground meat. Mix well and refrigerate overnight to blend flavors. Mix with liquid called for in recipe, then grind through finer plate and stuff immediately. If using already-ground meat, mix dry seasonings with liquid before adding to meat. · Use a cure for all sausages that will be smoked to prevent botulism, a type of food poisoning. For a fresh sausage recipe that makes 5 pounds, substitute 8 level teaspoons of Morton TenderQuick mix for every 5 1/2 level teaspoons of canning/pickling salt; or, add 1 level teaspoon of Insta Cure No. 1 (formerly Prague Powder No. 1) to the salt already in recipe. |
|
|
TasunkaWitko - Chinook, Montana
Helfen, Wehren, Heilen Die Wahrheit wird euch frei machen |
|
|
|
|
TasunkaWitko
Administrator
aka The Gipper Joined: 10 June 2003 Location: Chinook Montana Status: Offline Points: 14753 |
Post Options
Thanks(0)
Quote Reply
Posted: 27 September 2006 at 12:22 |
|
04 OCT 06
----------------------------------------------
Any of the previous, current and future recipes in our sausage series can also be used to make cased sausages. Youll need casings, available from some butcher shops, and a sausage stuffer. Follow the instructions that come with the stuffer. Cased sausages can be cold-smoked for 2-3 hours to add additional flavor. Synthetic casings, which are edible, are available in 22mm for breakfast-sized links and 32 mm for bratwurst-sized sausages. Natural casings include lamb casings (22-24mm), which are used for breakfast links, and hog casings (32-35mm), which are used for Italian, Polish and bratwurst-style sausage. A butcher shop that specializes in sausages may sell you a hank; a bundle of casings packed in salt. You can also order casings from specialty stores. The casing you select is usually based on the sausage youll be making. Natural casings are usually used for fresh sausages, since they are tender and edible. Collagen casings are available for both fresh and smoked sausages in sizes for small links or bratwurst. They are easier to use than natural casings, but they dont hold a twist well and may need to be hand-tied at the ends. Next weeks Quick Tip will conclude our series on sausage with specific instructions for preparing and stuffing natural casings. Edited by TasunkaWitko |
|
|
TasunkaWitko - Chinook, Montana
Helfen, Wehren, Heilen Die Wahrheit wird euch frei machen |
|
|
|
|
TasunkaWitko
Administrator
aka The Gipper Joined: 10 June 2003 Location: Chinook Montana Status: Offline Points: 14753 |
Post Options
Thanks(0)
Quote Reply
Posted: 27 September 2006 at 12:25 |
|
11 OCT 06 ------------------------------------------------------------ ------ To prepare and stuff natural sausage casings: Spread out a hank of salted casings carefully on clean work surface. Find the beginning of the hank, and gently pull one length out until it is free, being careful not to twist the remainder of the lengths. Remove as many lengths as you need. Re-salt and freeze the remainder for future use. Open one end of the casings, and slip the end over a faucet. Hold your hand over the casing to keep it from slipping off. Run a steady, medium stream of cold water through the casing until it is completely filled and the water runs through. Continue flushing for a few minutes. Rinse the outside of the casing. Place the rinsed casing in a large measuring cup filled with cold water after draining out all water and air from the casing. Let one end of each casing hang over the edge of the cup. Rinse remaining casings, adding them to the measuring cup, until youve rinsed all the casings you will need. Slip one end of a rinsed, wet casing over the sausage-stuffing horn; push until end of the casings is at the back end of the horn. Continue pushing until the entire length is gathered onto the horn. Pull the casing forward until about one inch hangs over the open end of the horn. Turn the crank of the sausage stuffer slowly until some of the sausage mixture some of the sausage mixture comes out of the horn. Tie off the end of the casing with kitchen string, pinching off a small bit of meat. The pinching helps eliminate air at the end of the link. Continue cranking until sausage is desired length; have a helper guide the link away from the horn. Twist the first link several times; then crank until a second link is formed. Support both ends with one hand while using the other to keep the casings on the horn until it is firmly filled. Be sure to let the casing slip off easily before it overfills and breaks. Continue twisting and filling; keep casings on horn wet so they slip off without sticking.
|
|
|
TasunkaWitko - Chinook, Montana
Helfen, Wehren, Heilen Die Wahrheit wird euch frei machen |
|
|
|
|
TasunkaWitko
Administrator
aka The Gipper Joined: 10 June 2003 Location: Chinook Montana Status: Offline Points: 14753 |
Post Options
Thanks(0)
Quote Reply
Posted: 08 October 2006 at 05:09 |
|
18 oct 06 -----------------------
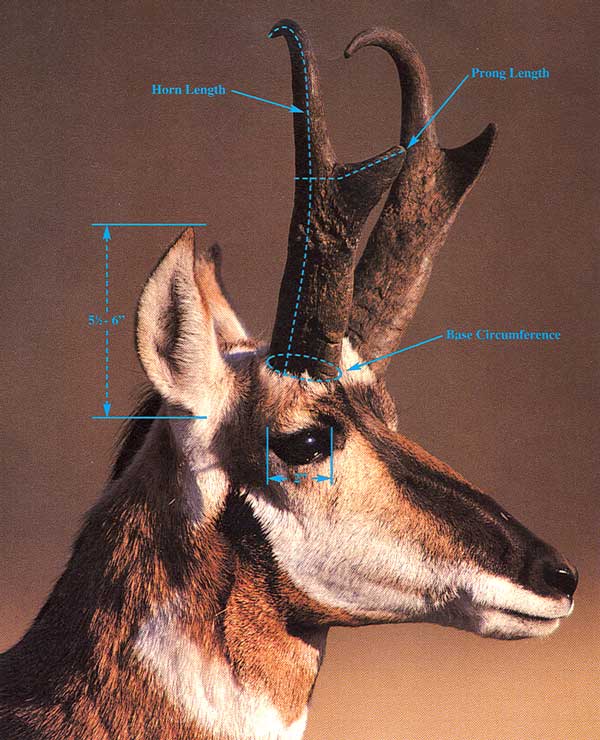
Accurate field judging is really only possible when you get a good, long look at a standing buck. You can use the eye diameter of the buck (about 2 inches) to judge horn mass, and the ear length (about 6 inches) to judge horn and prong length. After a bit of practice, youll be able to judge this buck as having horns measuring about 12 inches; prongs, 3 inches and mass (at the base) 5-1/2 to 6 inches. This young buck will be much larger next year.
From Pronghorn Hunting, by
Even the most experienced antelope hunters can have trouble field judging trophy animals. Once on the ground, pronghorn bucks have provided the successful hunter with plenty of surprises, both pleasant and not so pleasant, as the measuring tape reveals the truth. So-called ground shrinkage is reasonably common with all big game animals, but tends to occur more where antelope trophies are concerned.
Hunters who aspire to bag a trophy buck must be have the dedication, time and patience to inspect, stalk and pass up many good animals until they fine one truly exceptional head. The hunter must be prepared to carry home an unused tag if waiting for the right opportunity results in no antelope taken. Following are a few tips to more-accurately judge pronghorns in the field. These tips should give you some insight to the class of buck you are looking at through your optics.
· The most difficult judgment is the length of the main beam, due mostly to extreme variations in their curvature and shape. Bucks with nearly straight horns often appear bigger than a buck with very inward- or backward-hooked tips. Begin to determine horn length by comparing the length of the horn to the length of the ears. The average adult pronghorn bucks ear from base to tip generally measures 5-1/2 to 6 inches in length. Provided you are looking at a buck with horns that appear to be 2-1/2 ear-lengths long, youve found a really good buck with horns of around 15 inches. A good cross-check is to establish where the bottom of the prong is in relation to the tip of the ear. If it sits well above and there is as much main beam above the prong as below, youre onto a trophy with real potential. · Judge prongs by ear length. If the prong, measured from the rear of the main beam to the tip, appears to be nearly equal to the length of the ear, youve found a buck with great prongs. · An antelopes eyeball is approximately 2 inches in diameter. Horn bases that are 1-1/2 eyeballs wide indicate a very good buck that is probably well-within trophy territory. · The area from the base of the horn to the tip of a mature bucks nose regularly measures about 8 inches. The measurement can be used to reinforce estimates of both horn and prong length. · Time in the field is your best training for quick and accurate judging. Most of the time, a buck doesnt stand broadside and pose, waiting for you to size him up.
Edited by TasunkaWitko |
|
|
TasunkaWitko - Chinook, Montana
Helfen, Wehren, Heilen Die Wahrheit wird euch frei machen |
|
|
|
|
TasunkaWitko
Administrator
aka The Gipper Joined: 10 June 2003 Location: Chinook Montana Status: Offline Points: 14753 |
Post Options
Thanks(0)
Quote Reply
Posted: 08 October 2006 at 05:10 |
|
25 oct 06 ------------------------------ From The Art of Hunting Big Game in
[T]here is only one way to train the eyes in the judgment of big game trophies and that is by seeing many sets of horns and antlers and by intelligently evaluating them .
Anyone can read about horns and antlers until he gets spots before his eyes, but unless he has seen and compared many heads and knows what an exceptional head looks like, evaluating trophies is a laborious business.
The first time anyone hunts a new species, he simply cannot judge the heads unless he has done a good deal of homework
.
To me, one of the rules of trophy hunting is that to the man who knows something about the various animals, the really outstanding head knocks his eye out. He doesnt have to look at it hard and long to know it is good, just as a young man would not have to study a beautiful girl for some time to realize she was pretty. The heads that do not turn out well are the ones the hunter thinks about, hopes are good, tries to make grow, looks for an excuse to take.
[W]hen a hunt is planned for any trophy, the would-be hunter should carefully study pictures and look carefully and critically at every mounted head he sees.
In the Case of Pronghorn Antelope .
[T]he horns of buck antelope are very easy to classify. Those of an immature buck do not give the impression of blackness. If the hunter gets a good look at them, they appear rounded, unfinished. The prong is not prominent or well-developed.
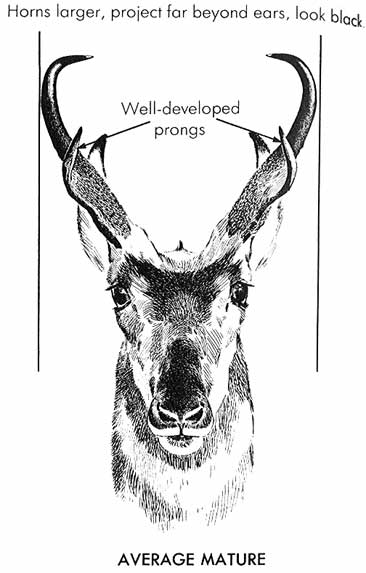
The horns of a mature buck are much more massive. The prong is well-developed and conspicuous. They look black. They project far beyond the ears. If the hunter gets a good chance to look over a buck with a high-powered binocular or spotting scope, he should notice the tips. Sometimes, they are not greatly curved. At other times, they are curved on the ends like fishhooks and are ivory-tipped. Estimating how far the horns project above the ears doesnt do too much good because many handsome heads have much of their length in the hook. A horn that looks very black, looks heavy and massive at the base, has a well-developed prong and a pronounced hook, and with a length approaching that of the face, is a very good head. Anyone who looks for these three characteristics and who does not shoot until he sees such a head will get a perfectly satisfactory trophy with a horn length around the curve from 14-15 inches.
Most mature antelope have horns measuring about13 to 14-1/2 inches. In any fairly good antelope country anyone content to wait a while and not shoot until he sees something that looks pretty good should be able to come home with a trophy in this class.
Any head with a well-developed prong and over 15 inches in length is a very good head and one to be proud of. If it is massive enough and has a good enough prong, it stands a good chance to get in the record book. Anyone who has seen some antelope heads and is lucky enough to run into a real buster will know it immediately. As is the case with almost any other trophy of top quality, the horns will jump out and hit you in the eye.
Any head with a curve of 17 inches is very, very good . A heavy, well-developed head that is 18 inches around the curve is really getting up there.
Edited by TasunkaWitko |
|
|
TasunkaWitko - Chinook, Montana
Helfen, Wehren, Heilen Die Wahrheit wird euch frei machen |
|
|
|
|
TasunkaWitko
Administrator
aka The Gipper Joined: 10 June 2003 Location: Chinook Montana Status: Offline Points: 14753 |
Post Options
Thanks(0)
Quote Reply
Posted: 03 November 2006 at 17:47 |
|
1 nov 06 ------------------------------------------------------------ ---- From The Art of Hunting Big Game in [G]ood mule deer heads are found pretty generally all over [the West] wherever their browse contains the right combination of lime and protein and the bucks are not shot before they mature
. It is rare that a good head comes from any area that is easily accessible and is pounded hard by hunters, but since most deer hunters are not found far from automobiles roads, there is still plenty of good mule deer country where the enterprising hunter can go in with a backpack or a little pack outfit.
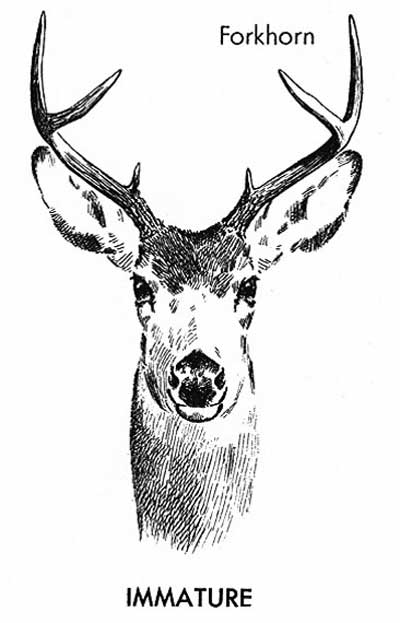
[T]he yearling mule deer is generally a spike, but may be a forkhorn. With rich food and plenty of it, he may grow four points and a brow tine his second fall. Antlers reach the maximum size between the fifth and eighth years .
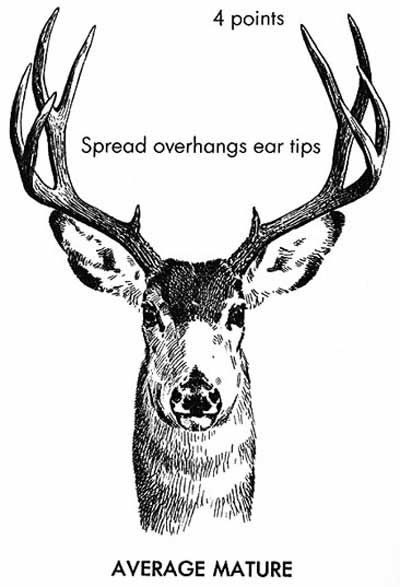
[C]lose-pinched and wide-spread antlers are found wherever there are mule deer. The handsomest and most spectacular are the antlers with wide spreads, and the average hunter ranks mule deer antlers by the spread .
[T]he important measurements are the length of the main beam, the number and length of the points and the symmetry. [A] hunter wanting to take home a mule deer trophy should hold out for a good, average, mature buck with five points [per side], counting the brow tine, on each side. If he should be fortunate enough to bump into [an exceptional] head
he will know it, as the buck will look all horns. If there is any doubt about the head being outstanding, then it isnt. Edited by TasunkaWitko |
|
|
TasunkaWitko - Chinook, Montana
Helfen, Wehren, Heilen Die Wahrheit wird euch frei machen |
|
|
|
|
TasunkaWitko
Administrator
aka The Gipper Joined: 10 June 2003 Location: Chinook Montana Status: Offline Points: 14753 |
Post Options
Thanks(0)
Quote Reply
Posted: 03 November 2006 at 17:57 |
|
8 nov 06 ------------------------------------------------------------ ------------ From The Art of Hunting Big Game In The same conditions that produce large deer antlers also produce large elk antlers: rich food and the opportunity to mature. As is the case with the mule deer, elk are hunted very hard in areas that can be reached by automobile road to by a short pack trip, but there are vast areas of wilderness back country difficult to get into where [they] are seldom hunted
.
When a bull is a long yearling, he is a spike. As a long two-year-old he has five points to a side. The next year he grows his first pair of six-point antlers. The normal elk head is always a six-pointer. The antlers grow larger until the bull is seven or eight years old, then they generally start to deteriorate. They grow smaller, but often have more points. Probably the finest, most spectacular and highest-scoring heads come from seven- and eight-year-old bulls . Bulls with more than six points are actually quite rare, and bulls with deformed and freak heads are rarer still.
No one wanting a trophy should ever shoot a five-pointer. It is not necessary to count the points because the five-point heads are always short and have a flattened-out appearance something like the antlers of a deer. For the beginning elk hunters, the foolers are the small six-point heads grown by bulls in their fourth and fifth year. To be a real trophy, the main beam of the antlers should be at least four feet long and the nearer they approach five feet, the better. If the hunter has time to look the head over he should note that the length of the beam approaches the height from ground to shoulder; that if the bull tips his head back, the tips of the antlers come almost to the hips; that all the points are large and well-developed. If a head looks like this, it is a real trophy. If it looks long and heavy and has more than six points, it is very, very exceptional.
For a quick check in the timber where a man must shoot instantly or not at all, the most important criterion is length. If the antlers tower far over the elks head or come back to his fanny when he lifts his head to go through the brush, crack him; hes worth shooting! Edited by TasunkaWitko |
|
|
TasunkaWitko - Chinook, Montana
Helfen, Wehren, Heilen Die Wahrheit wird euch frei machen |
|
|
|
|
TasunkaWitko
Administrator
aka The Gipper Joined: 10 June 2003 Location: Chinook Montana Status: Offline Points: 14753 |
Post Options
Thanks(0)
Quote Reply
Posted: 04 December 2006 at 16:47 |
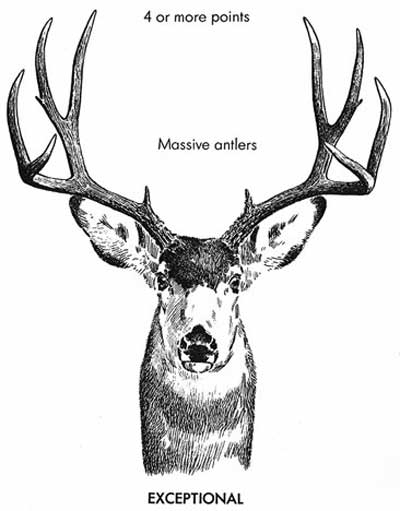
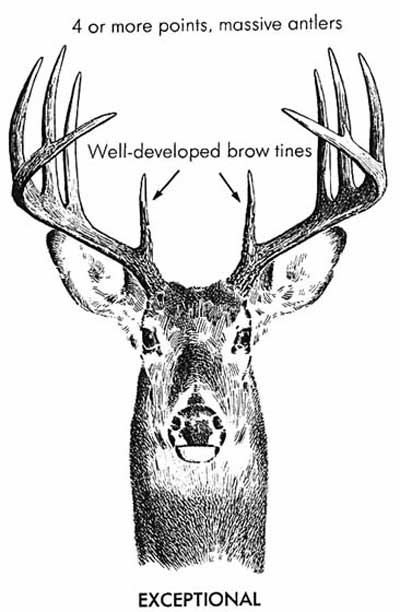
15 nov 06From The Art of Hunting Big Game In I do not think that there is any doubt but that the whitetail deer is the smartest of all North American game animals, and I am likewise convinced that getting a really outstanding whitetail head is the most difficult task in trophy collecting. There are many reasons for this. In the first place, the whitetail is generally an animal of forest and brush. When he is seen he is more often than not on the move and the hunter generally has to shoot quick or not at all. He has little time to size up a head. Another reason is that a great many whitetails are found close to large centers of population and they are hunted hard by people who shoot at the first glimpse of an antler. Consequently, not many whitetail bucks live to become fully mature and members of the deer family have their largest antlers when they are five to eight years old. Still another reason is that in many areas, whitetail deer have been allowed to become too plentiful and they have overbrowsed their range. Fawns born of half-starved mothers do not become large and to grow large antlers deer have to eat food rich in protein and lime. One pleasant thought is that good whitetail heads seem to come from just about every state where these beautiful deer are found, and the hunter wanting to collect an outstanding specimen would not have to go far from home. Actually, a high percentage of outstanding heads come from thickly-populated agricultural areas where the bucks feed on nourishing crops from fertile land
.
The normal
whitetail buck may be a spike or forkhorn first year; a forkhorn or a small three-pointer (eight-pointer by Eastern count). When the whitetail buck is mature, the normal head has the brow tine or eye guard and four points. Easterners call this a ten-pointer, Westerners a four-pointer. Two characteristics that make whitetail antlers different from those of mule deer are that all of the points on whitetail antlers grow off a main beam and the normal whitetail head has a large and prominent brow tine; on the other hand, normal mule deer antlers are dichotomous or evenly branched and the brow tine is smaller and is sometimes missing altogether .
Any mature whitetail buck is a very respectable trophy, and any buck with relatively massive antlers and five points to a side is a very good trophy. If Lady Luck ever sends a record-class whitetail in your direction youll know as he will look to be all antlers
.
Getting a record whitetail is very difficult to manage, as even in good country one does not see many mature bucks in a season to shoot at, and he must size up those he does see in a few seconds
. |
|
|
TasunkaWitko - Chinook, Montana
Helfen, Wehren, Heilen Die Wahrheit wird euch frei machen |
|
|
|
|
Post Reply
|
Page <1234> |
 Tweet
Tweet
|
| Forum Jump | Forum Permissions You cannot post new topics in this forum You cannot reply to topics in this forum You cannot delete your posts in this forum You cannot edit your posts in this forum You cannot create polls in this forum You cannot vote in polls in this forum |


 Topic Options