Quick Tip for the Week
Printed From: The BaitShop
Category: The Library
Forum Name: The BSB Archives
Forum Description: The cream of the BSB crop! When a topic of discussion becomes a true resource, it ends up here so that any sportsman can quickly look up the most useful information on any subject!
URL: http://www.baitshopboyz.com/forum_posts.asp?TID=9091
Printed Date: 26 March 2026 at 17:55
Software Version: Web Wiz Forums 11.10 - http://www.webwizforums.com
Topic: Quick Tip for the Week
Posted By: TasunkaWitko
Subject: Quick Tip for the Week
Date Posted: 05 October 2005 at 06:48
|
21 sep 05
Jack OConnor considered a trophy whitetail buck to be the most difficult of American big game animals to bag. They do not grow those huge sets of antlers by being foolish! More than noise or scent, I would say that the biggest danger of spooking a wary whitetail is that he will see your movement. Walk softly, stay upwind of the area you want to hunt, and stay out of sight. Work the edges of tree- or brush-lines and keep low when possible. Many times, you can walk right by one while stalking or still-hunting and not even know it; other times, they will detect you abscond with impressive stealth. You will probably enter an area never knowing that they had just left. If you are seen, a whitetail might try to wait it out while you pass. If you stop for a moment every 15 or 20 yards and carefully look around, you might notice or jump a trophy. For more recipes, as well as excellent outdoors-related discussion, be sure to visit www.baitshopboyz.com!~~ ------------- TasunkaWitko - Chinook, Montana  Helfen, Wehren, Heilen Die Wahrheit wird euch frei machen |
Replies:
Posted By: TasunkaWitko
Date Posted: 05 October 2005 at 06:49
|
Quick Tip for the Week
Take a kid fishing, hunting, camping or even out for a day of shooting. More and more, the outdoors sports are becoming a thing of memory; something all of us remember fondly, but never seem to have enough time for these days. If you know of a youth who might like to do these things, but doesnt have much opportunity due to the home situation, offer to take him or her out when you take your own kids. You might spark an interest or set an example that will last a lifetime. When taking a youngster afield, dont expect to get an opportunity to chase a trophy for yourself. Make the day about the kid, and chase that 6-pound fish or trophy bull elk on another day. For more recipes, as well as excellent outdoors-related discussion, be sure to visit www.baitshopboyz.com! ------------- TasunkaWitko - Chinook, Montana Helfen, Wehren, Heilen Die Wahrheit wird euch frei machen |
Posted By: TasunkaWitko
Date Posted: 05 October 2005 at 06:50
|
5 oct 05
If you have a rifle that isnt shooting accurately, dont be too quick to sell it! Chances are that you can do some very simple and inexpensive things to correct the problem. Regarding the rifle itself, you have several options. Open up the barrel channel a bit in order to free-float the barrel. You can also glass bed the barrel very easily, or even install pillars to ensure metal-to- metal contact. Any of these steps will help to stabilize the relationship between your rifle barrel and your sock. Another simple option would be to have the muzzle crowned in order to ensure that the gasses are exiting in a way that wont de-stabilize the bullet. If you handload, you have even more options. You can try different components; brass, primers, powders or bullets. You can also vary your powder charges or the seating depth of your bullet. Sometimes even a tenth of a grain of powder or a thousandth of an inch in the seating depth will shrink groups dramatically. Almost any rifle should be capable of printing a one- inch group at a hundred yards. In order to achieve this goal, it is usually a matter of tuning your rifle and ammunition; however, the final accuracy of any rifle will always lie with the shooter. For more recipes, as well as excellent outdoors- related discussion, be sure to visit www.baitshopboyz.com! ------------- TasunkaWitko - Chinook, Montana Helfen, Wehren, Heilen Die Wahrheit wird euch frei machen |
Posted By: TasunkaWitko
Date Posted: 05 October 2005 at 08:15
|
12 oct 05
Two of the simplest rigs for trout fishing are probably also the most effective. They can be used by young or old alike, and do not rely on so-phisticated gear or fancy knot-tying. For stream fishing, use one or two split-shot, just enough to keep the hook and bait cruis-ing on the bottom, then tie on an appropriately-sized hook 6-12 inches above the split-shot. I prefer the Trilene knot, which is a close cousin to the standard clinch knot; however, any strong knot will work. This rig, while simple, is incredibly versatile. You can fish fast or slow streams with worm, salmon egg, spawn sack, scud, grasshopper or any other bait available. The length of line between the split-shot and the hook will vary according to the stream conditions. With a little practice, you will be able to judge what works best. For lake fishing, thread on an egg sinker that is only heavy enough for good casting. Tie a small barrel swivel (the smaller the better, as long as it stops the egg sinker from rid-ing the line) to the end of the line. A barrel swivel is simply a regular snap swivel without the snap. To the other end of the swivel, attach a leader of line (once again, you can vary the length; anywhere from 6-12 inches is probably good) with a hook at the end. This hook can then be baited as you please. To float bait off the bottom, run a miniature marshmallow sideways up the hook to the eye. Depending on the weight of the bait, it will float as high as the leader is long. The beauty of this rig is that a wary trout can nip and snatch at the bait, but the line will slip through the egg sinker. This means that there will be very little, if any resistance which could spook the fish. Both of these rigs, as you can see, are very easy and very versatile. Since adopting these rigs, I have caught many more fish than using any other method. They are my two "go-to" rigs for trout fishing, and can also be used for other fish; just use bigger or smaller equipment, depending on the fish you are after and the water you are fishing. For trout fish-ing, always use the smallest equipment (line, sinker hook, etc.) that you can get away with, because trout are ex-tremely wary. For more recipes, as well as excellent out-doors- related discussion, be sure to visit www.baitshopboyz.com! ------------- TasunkaWitko - Chinook, Montana Helfen, Wehren, Heilen Die Wahrheit wird euch frei machen |
Posted By: TasunkaWitko
Date Posted: 14 October 2005 at 04:33
|
19 oct 2005
Anyone with questions or tips regarding hunting, shooting or fishing is encouraged to submit them by mail to The Journal in care of Ronald Fischer; they can also be emailed to bcj_fischer@yahoo.com. Selected tips or answers to selected questions will be posted when possible. When it comes to truly enjoying your deer or antelope at the table, first and most important is to do the butchering yourself. It is not that difficult and no way mysterious. Once you get started removing the meat from the bone it is all self-explanatory. For what it is worth, I have butchered all my own game except one deer, and the main thing I have learned is to get everything off of the meat that isn't meat, because careful trimming will ensure the best tasting meal. This includes fat, membrane, silverskin, bone, you name it. Trim it off carefully with a very sharp fillet knife, you will be left with a nice roast, which you can package or cut into steaks, butterfly steaks or cubes. Another thing, at least in this cool, dry climate, is to leave the animal to hang a few days. This will age the meat and make it very tasty, using the same process that the big beef places use for prime rib and such. Here in north-central Montana, considering the weather during hunting season, I can let a deer hang for a week easily; even two weeks, if it gets cold during the night and the deer is hung in a shady place such as in a garage or shed. Then I can skin and butcher it over a weekend. Antelope, on the other hand, should probably not be hung longer than 3-4 days because of the warmer temperatures during the day and the fact that antelope meat is much more delicate than deer. If you have to skin it immediately because of the climate or cannot hang it for some reason, you can skin it, then cut out the loins and tenderloins and remove the front quarters, then saw the hindquarters into two quarters. Place each quarter into a trash bag (unscented) and the loins and backstraps into another one and store them in the fridge for at least 3 days, but no more than a week. There is not much steak on the shoulder. Trying to make steak of any cut other than the tenderloin, loin or hindquarter sets you up for disappointment. Having said that, the shoulder is excellent meat and after being boned should be cubed up for stew meat, burger or sausage if you like. The loin and tenderloin cuts speak for themselves. Simply bone along the backbone ridge and off of the ribs. The best way of butchering the hindquarters is to first remove them one at a time from the pelvic bone. It will take some experience to remove the quarters cleanly. But don't worry about your first efforts, whatever you botch up makes excellent stew meat to add to your shoulder. Once you have the removed quarters, examine them. There are lines to follow for undoing the muscle groups. Use the tip of a fillet knife and slit along these lines and pull with your other hand to separate the muscles from one another along the vellum (silverskin) folds. The entire quarter will come apart this way. Some of the muscles will be flat and diagonal, some will be round and straight, but all will be separated from each other by the gray vellum that allows the muscles to slide against each other as the animal moves. Use this vellum as your road map to disassemble the quarter. Once you have separated the major groups, trim every bit of fat, membrane and silverskin off and slice the steaks perpendicular to (across) the grain. As for the ribcage and neck, there are many options. You can trim quite a bit of good meat off for jerky or cut the ribs into equal sections, then saw the sections in half and wrap them for barbecued ribs. Cut the neck off and wrap it whole as a roast. If none of these options works for you, you can take the whole thing in to be made into burger or sausage. When it comes to packaging venison, I have become a very big believer in using home vacuum sealers. They are inexpensive, convenient and work very well to keep meat fresh. If you do not have one, there is another easy option that works just as well. Portion out your meat as you wish (I do a pound at a time), then stuff the meat into a quart-sized freezer bag. Gently squeeze out all the air you can, then fold the bag in half, and seal, taking care to keep air from entering. Freeze each bag separately (not stacked together) on a flat surface in the freezer. The reason for this is because the meat will freeze faster and be less likely to develop ice crystals, which can affect the texture and flavor. If you are packaging more than a pound of meat, folding the bag over may not be necessary, and you can freeze if flat. Once frozen, the bags can be wrapped in paper for extra protection and stacked in the freezer. Be sure to label the bag with the species, the date, the weight or number of portions, and any other information you feel to be pertinent. If you have a dog, it will love you for keeping the scraps, portioning them into dog-sized meals, freezing them in plastic bags and wrapping the bags in paper. I label these packages "DOG;" The kids think it is hilarious and the neighbors wonder.... For more tips, as well as excellent outdoors-related discussion, be sure to visit www.baitshopboyz.com! ------------- TasunkaWitko - Chinook, Montana Helfen, Wehren, Heilen Die Wahrheit wird euch frei machen |
Posted By: TasunkaWitko
Date Posted: 20 October 2005 at 05:10
|
bumped to
2 nov 05 Quick Tip For The Week Anyone with questions or tips regarding hunting, shooting or fishing is encouraged to submit them by mail to The Journal in care of Ronald Fischer; they can also be emailed to bcj_fischer@yahoo.com. Selected tips or answers to selected questions will be posted when possible. When hunting deer, do not overlook any patch of brush, no matter how small or low to the ground it seems! One of the biggest whitetail bucks I have ever seen sprang up from a patch which I would have thought too small and to short to cover a gopher. A few years ago, I saw someone shoot a good-sized muley buck that actually crawled (CRAWLED!) Through a very expansive patch of brush that was only as high as my knees, trying to get away in the last seconds before the lung shot killed it. We literally had to look for it and I don't mind admitting that we would have been looking for quite a while except for the fact that I heard one leg scraping against the brush (less than knee-high!) As it literally exhaled its last breath. Tracking would have been difficult because the brush was not crushed, and the blood fell to the ground to be canopied by the brush. From what I could tell, the buck went totally unseen from the spot where it dropped 75 yards to the spot where it gave up the ghost, and once it dropped I had absolutely no way of knowing which direction it went. People who has been hunting a lot longer than I have and who have tracked deer for miles just for the challenge of it, could not find it. The only way I found it was by luck! Of course, we would have found it eventually, but it would have taken a while. The moral of the story is that these animals can hide, and are good at it. They will get down on their bellies and shinny around like snakes. I didn't believe it either until I saw it! Don't overlook any patch of brush, when stalking or tracking, because they can be anywhere! For more tips, as well as excellent outdoors-related discussion, be sure to visit www.baitshopboyz.com! ------------- TasunkaWitko - Chinook, Montana Helfen, Wehren, Heilen Die Wahrheit wird euch frei machen |
Posted By: TasunkaWitko
Date Posted: 02 November 2005 at 07:05
|
9 nov 05
-------------- Quick Tip For The Week Anyone with questions or tips regarding hunting, shooting or fishing is encouraged to submit them by mail to The Journal in care of Ronald Fischer; they can also be emailed to bcj_fischer@yahoo.com. Selected tips or answers to selected questions will be posted when possible. As per Mr. Jack O'Connor, here are some "rules" for long-range hunting. I believe that they can be agreed upon by most anyone who does much hunting. A long-range shot should never be taken if there is a reasonable chance of getting closer. A long-range shot should never be taken if the rifleman feels doubtful of his ability to make a good, solid, well-placed hit. A long-range shot should never be taken if the hunter cannot get into a solid position - prone with a sling, from a rest, etc. A long-range shot should never be taken at any dangerous animal - a brown, grizzly or polar bear, a lion, a tiger, a leopard, a cape buffalo. A long-range shot should never be taken at an unwounded, running animal. A long-range shot should never be taken if the animal shot at can get out of sight so quickly that it would be difficult to ascertain the effect of the shot. A long-range shot should not be taken if the range is so great that a hold on top of the shoulders will not drop a bullet into the chest cavity. (Note from OConnor) These rules may seem ultra conservative to many, and I must admit that there have been times when I did not follow them myself. however, the more I hunt and the more I see others shoot the more convinced I am that they are wise and sensible rules and if they were universally adopted the number of game animals that get away wounded to suffer and die would be greatly reduced. The question then remains, what defines a long-range shot on a game animal? I believe that each hunter has to make an honest evaluation of his own abilities (not the rifle's) and let his moral and ethical judgment guide his choice when the game is sighted. For some, this might be a hundred yards, for others, it might be three hundred, or more. The key here is a decision based on values and experience as well frank and honest assessment of abilities, not based on the size of the rack on the animal! For more tips, as well as excellent outdoors-related discussion, be sure to visit www.baitshopboyz.com! ------------- TasunkaWitko - Chinook, Montana Helfen, Wehren, Heilen Die Wahrheit wird euch frei machen |
Posted By: TasunkaWitko
Date Posted: 07 November 2005 at 09:14
|
16 nov 05 Quick Tip For The Week Anyone with questions or tips regarding hunting, shooting or fishing is encouraged to submit them by mail to The Journal in care of Ronald Fischer; they can also be emailed to bcj_fischer@yahoo.com. Selected tips or answers to selected questions will be posted when possible. If you load your own ammunition, it might be handy to have a comparative burn-rate chart for the leading commercial powders. Such a chart can be found and downloaded for free at this website: http://www.hodgdon.com/data/general/ burnratechart.php You can also find burn rate charts in some reloading manuals, including those published by Lee Precision (Modern Reloading), Speer and in Western Powders load pamphlet. Keep in mind that these charts are relative to each other, and not fixed in stone; more like wet cement. Depending on several variables, such as crimp, load density, etc., burn rates can and do swap positions. For more tips, as well as excellent outdoors-related discussion, be sure to visit www.baitshopboyz.com! ------------- TasunkaWitko - Chinook, Montana Helfen, Wehren, Heilen Die Wahrheit wird euch frei machen |
Posted By: TasunkaWitko
Date Posted: 16 November 2005 at 07:45
|
23 nov 05
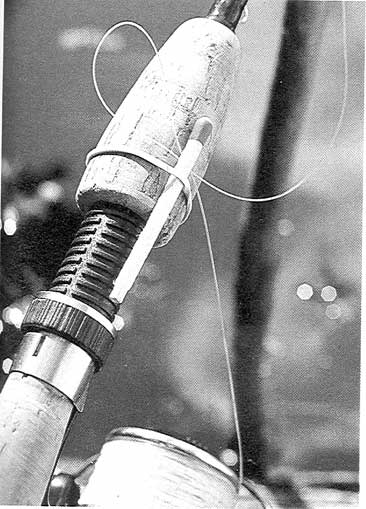
----------------------------- Quick Tip For The Week Anyone with questions or tips regarding hunting, shooting or fishing is encouraged to submit them by mail to The Journal in care of Ronald Fischer; they can also be emailed to bcj_fischer@yahoo.com. Selected tips or answers to selected questions will be posted when possible. Maps are indispensable tools for the hunter or angler. Whether you use contour maps or river channel maps for fishing, or topographical or state/private land boundary maps for hunting, chances are there is a very good chance of your map getting wet, dirty or both. Some specialized maps for fishing large bodies of water are water resistant, but most are not, including any maps used for hunting. They can, however, be easily protected. Lay your map out on newspaper and apply a coat of waterproof sealant such as Thompsons Water Seal, designed for treating concrete block and wood. Spread the sealant on both sides of your map with a foam varnish brush. Cover the surface, but dont drench it. Use clothespins to hang the map from a line until it dries. When dry, the map will fold easily and will be waterproof, protecting it from even the worst that the elements (or even a hunter or angler!) can dish out. For more tips, as well as excellent outdoors-related discussion, be sure to visit www.baitshopboyz.com! ------------- TasunkaWitko - Chinook, Montana Helfen, Wehren, Heilen Die Wahrheit wird euch frei machen |
Posted By: TasunkaWitko
Date Posted: 23 November 2005 at 07:34
|
30 nov 05
------------------- Quick Tip For The Week Anyone with questions or tips regarding hunting, shooting or fishing is encouraged to submit them by mail to BCJ in care of Ronald Fischer; they can also be emailed to bcj_fischer@yahoo.com. Selected tips or answers to selected questions will be posted when possible. Getting lost is a relative matter, even when you are out in familiar territory. In general, those who spend any time at all in the outdoors have a good working knowledge of where they are, but may be turned around a bit due to any number of circumstances. Most times, as long as a sportsman is able to get his bearings, he (or she!) can know which direction to go. The easiest and most reliable way to get your bearings is probably to locate north, and use that information in context of where you want to go. Here are some quick tips on finding north. Finding North By Day Shadow-Stick Method Push a short stick into the ground at an angle so that it makes no shadow. Wait until it casts a shadow six inches long or longer. The shadow will be pointing east from the stick. A line across the shadow line will be north/south. Watch Method This method requires standard time. If your watch is on daylight savings time, turn it back one hour. Hold your watch flat. Place a short, straight piece of straw or grass or a twig upright against the edge of the watch at the point of the hour hand. Turn the watch until the shadow of the straw falls exactly along the hour hand that is, until the hour hand points directly to the sun. A line from the center of the watch, dividing in half the angle between the hour hand and the numeral 12 will give you a fair direction south, the opposite of which, of course, is north. Finding North By Night Using the Moon The shadow-stick method described above works equally well with the moon, assuming it is bright enough to cast a shadow. Using the Stars You cant ask for a better north-pointing set of stars than the Big Dipper, so set out to locate it in the sky. There it is four stars make up its bowl, three its handle. Three, did you say? Not so fast; look at the second star in the handle. If you have good eyesight, you will see that it is really two stars. Now let the pointers of the Big Dipper those two stars farthest from the handle guide you to the pole star of the North Star. The distance is about five times the distance between the two stars. True north on earth lies at the horizon directly under the North Star. If you look close, you notice that the North Star is at the end of the handle of a smaller dipper, the Little Dipper. Between the two dippers dangles the dragon (Draco), a long line of faint stars. Once you have found the North Star, you can push a long stick upright into the ground. Push a shorter stick where, when you sight over the tips of both sticks, you hit the North Star. A line between the sticks is a true north/south line. If All Else Fails . Find a body of running water (a stream, creek, brook or river) and follow it downstream. You will almost always hit some sign of civilization: a road, a bridge, a house, a town or a campground. Following it downstream will assure your getting close to other people, since areas tend to be less-remote. If nothing else, you will be near a source of water and food until you get your bearings . For more tips, as well as excellent outdoors-related discussion, be sure to visit www.baitshopboyz.com! ------------- TasunkaWitko - Chinook, Montana Helfen, Wehren, Heilen Die Wahrheit wird euch frei machen |
Posted By: TasunkaWitko
Date Posted: 30 November 2005 at 08:09
|
7 dec 05
----------------------------- Quick Tip For The Week Anyone with questions or tips regarding hunting, shooting or fishing is encouraged to submit them by mail to BCJ in care of Ronald Fischer; they can also be emailed to bcj_fischer@yahoo.com. Selected tips or answers to selected questions will be posted when possible. The following was written with fishing in mind; however, there is absolutely no reason why most of it cannot be adapted for hunting applications. Good photos prolong the memory of a trip, but many folks still have trouble taking interesting pictures. Their photos are out of focus or poorly-lit, the background is cluttered, and the fish looks stiff and lifeless. The problems are endless. The first step toward taking better photos is to start with a reliable camera. Casual photographers can take good photos with one of the many fully automatic 35mm pocket cameras ort disposable cameras, some of which are waterproof. These days, a decent digital camera is relatively affordable, and easy to use. A good optical zoom is a must, as is a resolution of at least 3.1 megapixels. Dont worry, I dont know what a megapixel is either, but I do know, the more the better. The tips that follow can help you take better pictures next time you go fishing (or hunting). By paying attention to detail and giving up a few minutes to concentrate on your photography, youll bring back photographs that are exciting and alive, even if the subject is a half- pound sunfish. Making Photos Look Good An angler posing with a big fish can make a terrific or terrible shot. The next time you take a picture of a friend with a fish, pay attention to the following details. The result will be a better photo. Take a picture when the fish is still alive best of all, moments after it is landed. Thats when the colors are brightest, the fins flare the most and the fish looks most vigorous. Dip the fish in water to wash off dirt, blood or weeds. Choose the background carefully. Sky, water or undeveloped shoreline looks better than a back yard, the inside of a tackle shop, the back of a pickup or a cluttered boat. Push back your subjects hat and take off sunglasses to keep shadows from hiding the face. Dont let your subjects hands obscure the fish, especially its head. Get a shot with the lure in the fishs mouth, but dont let the lure cover the eyes. Cover up a torn or stained shirt with another shirt or jacket, especially one with a bright color. Photograph a single good-looking fish rather than a big stringer. Dont throw a pile of fish on the ground and have your subject stand behind it. Catch The Action Try shooting action photos. Keep the camera loaded, set for the prevailing light and close at hand. Use a wide-angle lens to get the anger and the fish in the frame and in focus. Set the shutter speed at 1/500 second to stop the action. With an auto-focus camera, remember to keep whatever you want in focus in the center of the frame. Try Natural Poses Try poses that dont look like poses. Do something with the fish. Have your partner pretend to land the fish, unhook it, lift it or release it. Photos like this have more life than the usual meat shot. Play The Angles Move higher or lower than your subject to make shots more interesting. Get below the level of the fish and shoot upward to emphasize the fishs size and eliminate boat clutter from a shot. On a stream, shoot down from a bank or bridge to get a good view of your friend as well as the surroundings. Low-Light Advantage Shoot in the morning or evening, when the sun is low, for the warmest, richest light. Good lights makes a photo look vivid. The same shot at midday would have deep shadows and contrasting bright spots. Midday glare presents another problem: the bright light can overpower all the detail of a fish. Silvery fish such as trout and salmon are more likely to burn out by reflecting too much light. If you must shoot in bright light, turn the fish slightly until you get the best coloration and detail Take Lots Of Photos Dont spare the film. Compared to gas, tackle and other expenses, film is cheap. If you like the looks of a shot, take extras to compensate for those that are inevitably ruined by movement or awkward expressions. To make sure the exposure is correct, bracket your photos, the way professional photographers do. For example, if you set your shutter speed at 1/250 second and your light meter says f8, try a second shot at f5.6, and a third at f11. That way youre sure one will have the proper expression. Fill The Frame Turn your camera and take some verticals as well as the usual horizontals. By matching your format to the shape of your subject, you can fill the frame with the fish and angler and eliminate the dead space. The result: more interesting photos with greater impact. Fill Flash For Flat Photos If your subject is backlit, use fill flash to eliminate shadows and make your photo pop. Fill flash works best with a variable-power flash unit. With the camera in manual mode, set your shutter speed to synchronize with the flash, usually 1/60 second. Then, set the aperture (f-stop) according to the cameras light meter. Adjust your flash unit according to the aperture setting of your camera and the distance to the subject. Then turn down the power dial by one f- stop. Otherwise the flash will burn out your subject. Shoot one or two shots. For insurance, lower your power setting by one f-stop and shoot again. You cant use fill flash with some automatic cameras because the flash wont fire in bright light. Other automatics have fill flash buttons, so you can use the flash anytime. Wide Angles Add Interest A short, wide-angle lens (a 24mm or 28mm) makes objects in the foreground of your photo look bigger while shrinking objects in the background. As a result, a wide-angle image is often more interesting than a similar picture taken with a normal lens. Wide-angle (fisheye) lenses also let you keep both foreground and background objects in focus in the same photograph. Cheap Lens Protection A polarizing filter, like polarized sunglasses, cuts glare from water and other objects. You can adjust the filter for greater or less polarization. A filter also serves to protect the more expensive camera lens. A skylight or UV-haze filter gives protection without noticeably affecting the photo. Adjust For Bright Snow Dazzling white backgrounds, such as new-fallen snow or big rapids, often fool photographers. For example, a picture of an ice fisherman on a sunny day is likely to be badly underexposed. The ice and snow will appear light gray, and the anglers face will be a dark shadow. That happens because the cameras light meter reads and adjusts for the intense light of the background rather than the light coming off the subjects face. Here are two ways to remedy the problem. If youre using a camera that can be operated in a manual mode, move closer to your subject and set the exposure by metering off the persons face. Step back and take the photo. The anglers face will be properly exposed. The snow will be bright and white and lack detail, but no one will care about that. Some automatic cameras without a fully manual mode can be set to overexpose by up to two full stops, which will correct for snow or white water in the background. Some fully automatic cameras can be fooled by setting them to meter for a slower film. But many cameras read the film speed electronically off the film canister and cant be adjusted to compensate for these conditions. Preserve The Day Theres more to fishing than fish, and theres more to fishing photography than pictures of fish. Try photographing your surroundings and the entire fishing experience. Little things like running the boat, changing lures or casting can make shots that are every bit as interesting as a picture of a trophy. Keep Film Safe Beginning Photographers dont realize that film can be easily damaged. Here are a couple of tips to keep your film in good shape. Water, heat and light all damage film. Keep unexposed and exposed film in the plastic canisters it comes in to help protect it. On a hot day, keep the containers in your cooler. Radiation, such as the X-rays used in airport luggage scanning equipment, can damage film. The machines are billed as film safe and may not damage ordinary film the first time through; but X-ray damage is cumulative, building up with each additional exposure. If your film is checked several times before it is developed, the pictures are likely to have streaks or lines in them, or they may be fogged. Fast, light- sensitive film (ASA above 400) is more easily damaged than other film. If youre traveling with light-sensitive film or expect to pass though security checks several times, ask the agent to inspect the film by hand rather than pass it through the X-ray machine. For more tips, as well as excellent outdoors-related discussion, be sure to visit www.baitshopboyz.com! ------------- TasunkaWitko - Chinook, Montana Helfen, Wehren, Heilen Die Wahrheit wird euch frei machen |
Posted By: TasunkaWitko
Date Posted: 07 December 2005 at 06:51
|
14 dec 05
_______________________________ Anyone with questions or tips regarding hunting, shooting or fishing is encouraged to submit them by mail to BCJ in care of Ronald Fischer; they can also be emailed to bcj_fischer@yahoo.com. Selected tips or answers to selected questions will be posted when possible. Many anglers use twisted multi-strand steel leaders to keep northern pike and muskellunge from biting through the line. The problem is that this type of leader easily gets kinks that are impossible to remove. Then, as you work a lure, the leader flexes at the kink, eventually weakening and perhaps breaking as you play a fish. Get around the problem this way: Buy single-strand leaders, or make them yourself from stainless steel wire. It kinks less than twisted wire, and kinks that do form are easier to remove. As a result, a leader of the same weight remains stronger, and could save you from losing a trophy Esocid. For more tips, as well as excellent outdoors-related discussion, be sure to visit www.baitshopboyz.com! ------------- TasunkaWitko - Chinook, Montana Helfen, Wehren, Heilen Die Wahrheit wird euch frei machen |
Posted By: TasunkaWitko
Date Posted: 14 December 2005 at 06:48
|
21 December 2005
________________________ Quick Tip For The Week Anyone with questions or tips regarding hunting, shooting or fishing is encouraged to submit them by mail to BCJ in care of Ronald Fischer; they can also be emailed to bcj_fischer@yahoo.com. Selected tips or answers to selected questions will be posted when possible. Broadhead Evaluations By Bryce Corris I compared my Montecs with a friends Crimson Talon Raptor expandables and some Wal-Mart special cheapies that he had from last year. Results are as follows: Montecs: Loudest, loud wind noise Most accurate groups Impact compared to field points, dead on vertical but 3/4" per 10 yards to the right. Tried tuning rest to counteract but never could, still only 3" right at 40 yards so it is tolerable. Stayed razor sharp after over a dozen hits on target Crimson Talon Raptors: Second loudest Third most accurate Impact was dead on horizontal, but slightly higher Seemed to get duller with every shot, but still stayed plenty sharp to slice paper One expandable blade broke off on 3rd hit El Cheapos Quietest of the 3 Accuracy was dead on with field points Very dull very fast Would be ok in a pinch but would need to be watched and frequently re-sharpened. Maybe not the most informative trial, but gives an idea of what I found. The only ones I actually weighed were my Montecs; 2 were 103.6, one was 103.7 grains, I was impressed with that. They look very easy to sharpen; I will actually try to touch them up after todays shoot. I was actually quite surprised at how loud the Montecs were. Keep in mind this was shooting indoors in a high echo environment, so outside it may not be as noticeable. Actually I am a little worried from the noise factor, but not that worried that I won't use them. The building has a 20-yard range, if you stand at the door you can get 30, and 10 yards outside the door yields 40. Not a real safe thing to do with lots of people around, but it was just a friend and me. When standing outside, I didn't notice a noise difference, but inside it was very noticeable. I also noticed that inside, my Hoyt bow was quite loud compared to his Martin; outside, mine only had a quiet 'tump' while his was louder. The cheap Wal-Mart ones were quite useable. They were accurate and quiet, but they dulled easy. I don't know what brand, but they are just the $8 ones. If you sharpen them or at least check them before use you should be fine. I just wouldn't expect a lot of use from them, but you may be surprised and get several deer from each. For more tips, as well as excellent outdoors-related discussion, be sure to visit www.baitshopboyz.com! ------------- TasunkaWitko - Chinook, Montana Helfen, Wehren, Heilen Die Wahrheit wird euch frei machen |
Posted By: TasunkaWitko
Date Posted: 21 December 2005 at 06:26
|
28 december 2005
_________________ Quick Tip For The Week Fishing When bait fishing for northern pike or muskies, select a minnow or sucker that is one-fourth to one-third the length of the fish you hope to catch. In other words, a 40-inch northern weighing 16 pounds prefers a minnow 10-13 inches long. Many anglers make the mistake of using a minnow that is too small to interest their quarry. ____________________ Big northern pike congregate around cold-water springs in lakes and large rivers during the hottest days of summer. To find these areas, look for spring-holes in the ice during winter. Carefully note their location so you can return in the summer. UGB Hunting Pheasants may remain buried in snow-covered clumps of grass, sometimes for several days. Although you may not see fresh tracks, encourage your dog to work these mounds thoroughly. If hunting alone, give these clumps a kick as you walk past. _________________________________ Once spooked, Hungarian partridges can have a tendency to run, sometimes for long distances. One way to stop them is to blow a hawk call. The birds think a hawk is hunting above them and duck into cover. For more tips, as well as excellent outdoors-related discussion, be sure to visit www.baitshopboyz.com! ------------- TasunkaWitko - Chinook, Montana Helfen, Wehren, Heilen Die Wahrheit wird euch frei machen |
Posted By: TasunkaWitko
Date Posted: 28 December 2005 at 06:38
|
4 jan 06
Several weeks ago, I posted an extensive look into caring for your big game in the field and at the processing table. It logically follows that there should be a few tips for cooking big game as well; after all, it wouldnt do to waste all of that care and effort beforehand, only to have a poor meal due to mistakes in the kitchen! Here are some quick tips to make your venison a success: Cook at medium-high temperature; hot, but not too hot. If your oil is smoking, back off a few degrees. Leave room between pieces in the pan so that the water that cooks out of the steaks can evaporate and doesn't 'boil' the meat. Sear the juice inside immediately and cook quickly; two or three minutes on each side is good for average steaks, adjust according to thickness. In general, you do not need to cook as long after turning as you did before. Turn only once and dont over-cook. Some like to leave their game steaks slightly rare, and this is a matter of personal taste. After turning, some like to add broth, water, sour cream or some other sauce, then turn the burner down and simmer for 15-20 minutes, the purpose being to tenderize the meat and finish cooking. I have tried this and have not noticed a difference, but my venison is aged by hanging before I process it, which results in tender meat. If yours isnt aged, you might try this. Serve on a hot plate and eat steaks while hot; do not allow them to cool. ------------- TasunkaWitko - Chinook, Montana Helfen, Wehren, Heilen Die Wahrheit wird euch frei machen |
Posted By: TasunkaWitko
Date Posted: 04 January 2006 at 06:33
|
11 jan 06
To keep bird portions, fish and small game cuts fresh much longer in the freezer, and also to protect from freezer burn, always freeze in water packs. This eliminates contact with air, which minimizes loss of moisture, the primary cause of freezer burn and lost flavor. This is especially important if you own a frost-free freezer, which uses a fan to pull out moisture and can burn your fish or game very quickly. Two easy ways to water pack follow: Place a ZipLock-type freezer bag in a cake pan, then arrange fillets or pieces in the bag. The bag should lie on its side in the pan. Add enough water to completely cover your fish or game. Squeeze out all the air, then seal the bag. Set the pan in the freezer. Later, butcher-wrap the frozen bag with freezer paper. This keeps it from ripping or puncturing, which could open your meat to freezer burn. Another method is to soak your fillets and pieces in blocks of ice. Select plastic containers, thoroughly-washed cardboard milk cartons, or small cake or bread pans. Pack enough fillets or pieces for one meal in one of these containers, leaving a couple of inches of air space. Cover portions with very cold water, then freeze in pan or container. Once frozen, add another layer of cold water to cover anything that might have floated to the top during freezing. Cover milk carton or pan with foil, or place lid on container, then freeze again. Once frozen, pop out the block of ice and meat by running a little cold water on the bottom. Wrap the solid block of ice in plastic wrap or foil, then overwrap with butcher paper, sealing tightly. For either method, be sure to label the package with the species, date and number of servings. When thawing, melt blocks of ice under cold, running water. When fillets or portions are free from ice, place them on a plate lined with paper towels. Cover with plastic wrap and finish thawing in refrigerator. ------------- TasunkaWitko - Chinook, Montana Helfen, Wehren, Heilen Die Wahrheit wird euch frei machen |
Posted By: TasunkaWitko
Date Posted: 12 January 2006 at 07:40
|
18 jan 06
------------------------------- Anyone who has fished rivers has probably gotten snagged and lost a lot of tackle. The snaggy bottoms of good holes can gobble up a lot of sinkers, hooks, walleye rigs and who-knows-what-else. Heres a way to cut your losses by making your own slip-sinkers out of otherwise worthless scrap: Tie a heavy washer, bolt, nut or other scrap to a 12-inch piece of mono. Attach a barrel swivel to the other end. This is your junkyard dropper. Slip the line from your rod through the free end of the swivel and tie it to a second barrel swivel run a leader and hook off the second swivel. Your junkyard dropper should be made of line that is lighter than your main line; that way, if the scrap hangs up, the dropper will break, sparing the rest of the rig. ------------- TasunkaWitko - Chinook, Montana Helfen, Wehren, Heilen Die Wahrheit wird euch frei machen |
Posted By: TasunkaWitko
Date Posted: 18 January 2006 at 05:59
|
25 jan 06
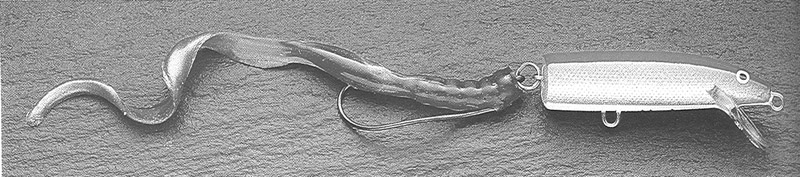
Fish such as bass, northern pike and walleye cant resist the wile action of a jointed minnow plug, but its almost impossible to use these lures in weedy or bushy cover because they foul immediately. Heres a way to make a jointed minnow more weedless while adding the enticing action of a plastic worm: 1. Remove the back end of a medium-sized jointed minnow plug by cutting or opening the rear eye; take off the front treble and split ring. 2. Twist the eye on the front section so that it is horizontal rather than vertical. Slide a split ring onto a 3/0 worm hook; then join the split ring to the plug so that the hook rides point-up. 3. Rig a 4-inch plastic worm, creature or other body on the hook Texas style. Fish the lure in pads, stumps and trees, retrieving it steadily so it swims at or neat the surface like a snake. When a fish hits, pause a second before setting the hook. ------------- TasunkaWitko - Chinook, Montana Helfen, Wehren, Heilen Die Wahrheit wird euch frei machen |
Posted By: TasunkaWitko
Date Posted: 25 January 2006 at 07:41
|
------------- TasunkaWitko - Chinook, Montana Helfen, Wehren, Heilen Die Wahrheit wird euch frei machen |

Posted By: TasunkaWitko
Date Posted: 02 February 2006 at 06:08
|
8 feb 06
------------- TasunkaWitko - Chinook, Montana Helfen, Wehren, Heilen Die Wahrheit wird euch frei machen |

Posted By: TasunkaWitko
Date Posted: 08 February 2006 at 06:59
|
15 feb 06
------------- TasunkaWitko - Chinook, Montana Helfen, Wehren, Heilen Die Wahrheit wird euch frei machen |
Posted By: TasunkaWitko
Date Posted: 20 February 2006 at 04:09
|
22 feb 06
------------- TasunkaWitko - Chinook, Montana Helfen, Wehren, Heilen Die Wahrheit wird euch frei machen |
Posted By: TasunkaWitko
Date Posted: 22 February 2006 at 07:07
|
i march 2006 -----------------------------------
Always use a steel leader when fishing for Esocids, which include ------------- TasunkaWitko - Chinook, Montana Helfen, Wehren, Heilen Die Wahrheit wird euch frei machen |

Posted By: TasunkaWitko
Date Posted: 02 March 2006 at 07:09
|
8 mar 06
-------------------------- Corning Big Game: Corning is a method of meat preservation developed in the days before refrigeration. After butchering a steer, a farmer would cure the brisket or some other tough cut in a salt/sugar brine for several weeks. The salt acted as a preservative, and the sugar developed flavor and tenderness. Meat cured this way was called corned because the salt pellets were about the size of corn kernels. On a moose or elk, the brisket, or thin meat that covers the bottom of the rib cage, is thick enough for corning. On smaller animals like antelope and deer, it may be too thin. A rolled, boneless shoulder roast will work well; flank meat, which lies between the last rib and hindquarter, is also a good choice. The corning method below requires two types of salt. Canning and pickling salt is pure salt, without any iodine or free-flowing agents, which might adversely affect the texture of the meat. Tenderizing salt is a mixture of salt, sugar and preservatives. It adds flavor and tenderness, and the preservatives give the meat its characteristic pink color. To make corned venison, follow this method: 2 to 3-pound brisket, flank or shoulder roast up to 1 inch thick. 2 quarts spring water or distilled water 1/2 cup canning and pickling salt 1/2 cup tenderizing salt (e.g. Mortons TenderQuick) 3 Tbs. sugar 2 Tbs. mixed pickling spice 2 bay leaves 8 whole, black peppercorns 1 or 2 cloves garlic, minced Roll brisket, flank or shoulder loosely and tie. Place in large glass or pottery mixing bowl, or in large oven cooking bag. In large glass or enamel saucepan, combine remaining ingredients. Heat just to boiling, then remove from heat and cool. Pour cooled brine over meat. Cover bowl with plastic wrap; or, if using oven cooking bag, squeeze to remove air, then twist neck of bag and seal. Refrigerate 4 to 5 days, turning meat occasionally. Drain and rinse meat with cold water. ------------- TasunkaWitko - Chinook, Montana Helfen, Wehren, Heilen Die Wahrheit wird euch frei machen |
Posted By: TasunkaWitko
Date Posted: 08 March 2006 at 07:55
|
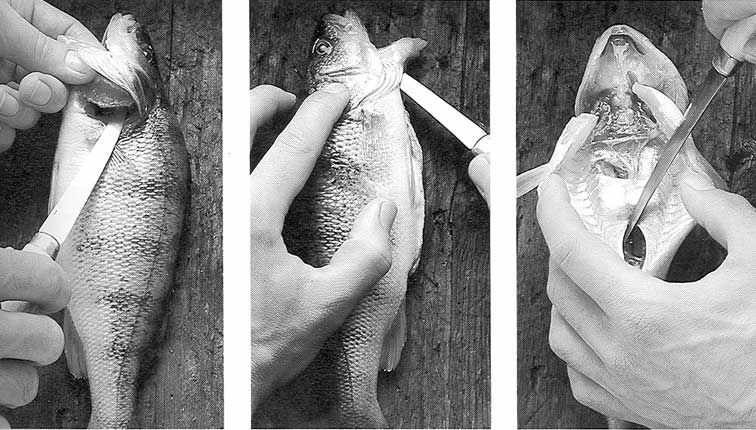
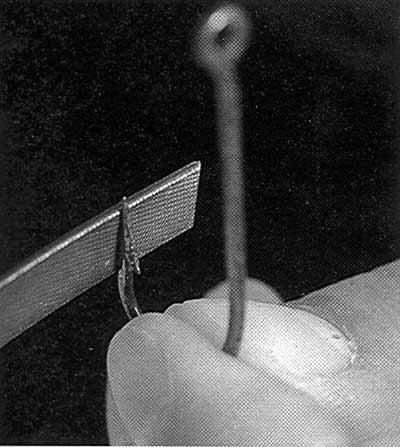
15 march 06 ------------------------------- If you are out at the lake or on the ice and the fishing is especially good, you might run out of bait. The way perch steal bait, you can spend more time baiting your hook than fishing. Two common fish, walleyes and perch, bring their own bait with them. Try tipping jigs or hooks with these natural baits, which can be used on the lake or frozen for later use: 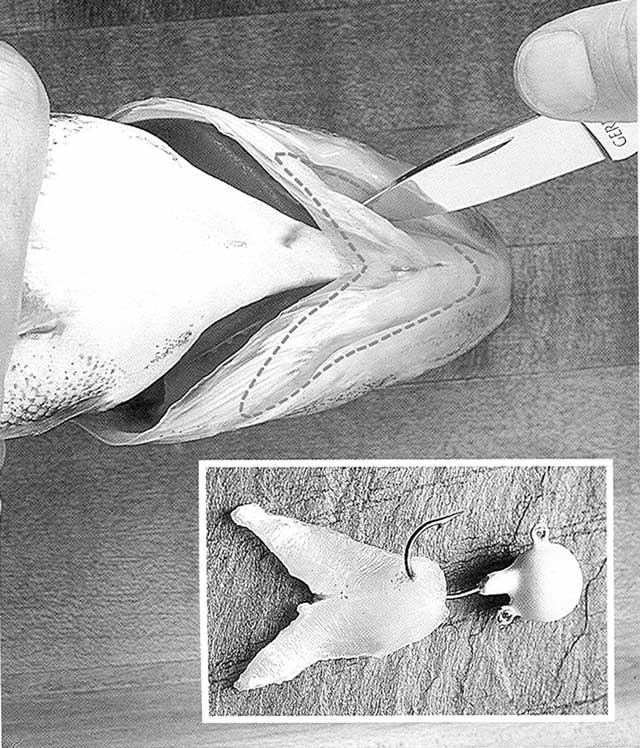 Cut the throat tissue out of a walleye by slicing along the dotted lines as shown. Then cut the tissue loose at the point of the chin. Drive the hook through the front of the piece of throat tissue. The meat is thicker and tougher, so the hook wont tear out. The thin flesh wiggles enticingly, emits natural scent and is remarkably durable. 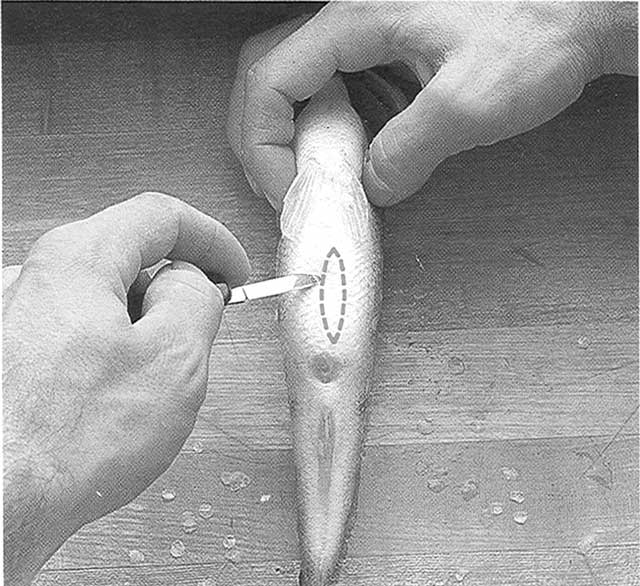 Scale the belly of a small perch and cut out an inch-long strip (dotted lines). Split one end of the strip to form two tails. Hook the other end on the jog or hook. This bait attracts fish with smell, taste and action. ------------- TasunkaWitko - Chinook, Montana Helfen, Wehren, Heilen Die Wahrheit wird euch frei machen |
Posted By: TasunkaWitko
Date Posted: 15 March 2006 at 09:15
|
22 mar 06
--------------------- Nearly all of the tips and recipes that are printed in this column come from one of two sources. The first is my website, www.baitshopboyz.com, which I started back in 2001. Over the last five years, the BaitShop has grown into an outstanding web community of sportsmen dedicated to hunting, fishing, shooting, camping, conservation and generally anything to do with the outdoors. More than 550 members from every corner of the United States as well as Canada, Australia, New Zealand and other countries meet at the BaitShop to swap information, stories and good times. If you would like to tap into this wealth of information, or simply shoot the breeze with a group of fellow sportsmen, take a look at this website. This web service is totally, 100% free of charge; all you need is a computer. Check it out. A second source that I rely on very heavily is a series of books called The Hunting and Fishing Library. Originally published by Cy DeCosse Publishing, the series went on to be published by Cowles Creative Publishing. To my knowledge, the original series is now out of print, but books can still be found in bookstores and on the Internet; I have also seen some copies at K-Mart, Wal-Mart and Shop-Ko. Two very good Internet sources for these books are amazon.com and ebay.com, where these books can be purchased for a very reasonable price. Some of the titles in the series include: The Art of Freshwater Fishing, Cleaning and Cooking Fish, Fishing Rivers and Streams, Walleye, Northern Pike and Muskie, Fishing with Natural Bait, Fishing with Artificial Lures, Fishing Tips and Tricks, the Art of Hunting, Dressing and Cooking Wild Game, Mule Deer, Elk, Pronghorn and Upland Game Birds. This is just a small sampling of titles. I highly recommend this series to anyone interested in reading about hunting or fishing. As always, I welcome and encourage anyone out there to submit recipes or tips. They can be sent to me by email at bcj_fischer@yahoo.com or mailed to Ron Fischer, C/O The Blaine County Journal, POB 279, Chinook, Montana 59523. Also, if anyone would like to see any specific recipes printed or has specific questions about the outdoors sports, please let me know. Ill do my best to accommodate your request! ------------- TasunkaWitko - Chinook, Montana Helfen, Wehren, Heilen Die Wahrheit wird euch frei machen |
Posted By: TasunkaWitko
Date Posted: 23 March 2006 at 07:57
|
Look for early-season walleyes on rock piles in water less than 10 feet Bays are obvious spots to check, but another type of spot that isnt so ------------- TasunkaWitko - Chinook, Montana Helfen, Wehren, Heilen Die Wahrheit wird euch frei machen |

Posted By: TasunkaWitko
Date Posted: 30 March 2006 at 06:15
|
5 apr 06
------------- TasunkaWitko - Chinook, Montana Helfen, Wehren, Heilen Die Wahrheit wird euch frei machen |

Posted By: TasunkaWitko
Date Posted: 06 April 2006 at 07:57
|
12 apr 06
Theres no disputing the concept of catch-and-release fishing, but unless fishermen know exactly how to release their fish, many will die from mishandling. If you follow these procedures, the fish you release will have an excellent chance of survival. Flatten barbs on hook so that they can be removed without injuring the fish. By keeping a tight line during the fight, you will seldom lose a fish. When playing a fish on a river or stream, move to a location out of the current. This way, it cannot use the current to its advantage, and tires more quickly. Leave the fish in the water, grasp the hook with a pliers or hemostat, then shake the hook to release the fish. This way, you wont remove the fishs protective slime, which protects it from infection. Do not squeeze or touch the gills. Cut the leader if a fish is deeply hooked. In a Wisconsin study, 56% of deep-hooked fish survived when the leader was cut; only 11% survived when the hook was removed. Hold the fish in an upright position facing into the current. Give it time to recover so it can swim away on its own. If it starts to sink, hold it upright a little while longer. After an especially long battle, the fish might need a little help gaining its energy back. Hold the fish in the water and gently move the fish back and forth in the water to get water running through the gills, the fish will scoot when it is ready. Above all, do everything you can to minimize stress and fatigue for the fish. Play it quickly, keep it in the water and handle the fish as little as possible. ------------- TasunkaWitko - Chinook, Montana Helfen, Wehren, Heilen Die Wahrheit wird euch frei machen |
Posted By: TasunkaWitko
Date Posted: 13 April 2006 at 06:40
|
19 apr 06
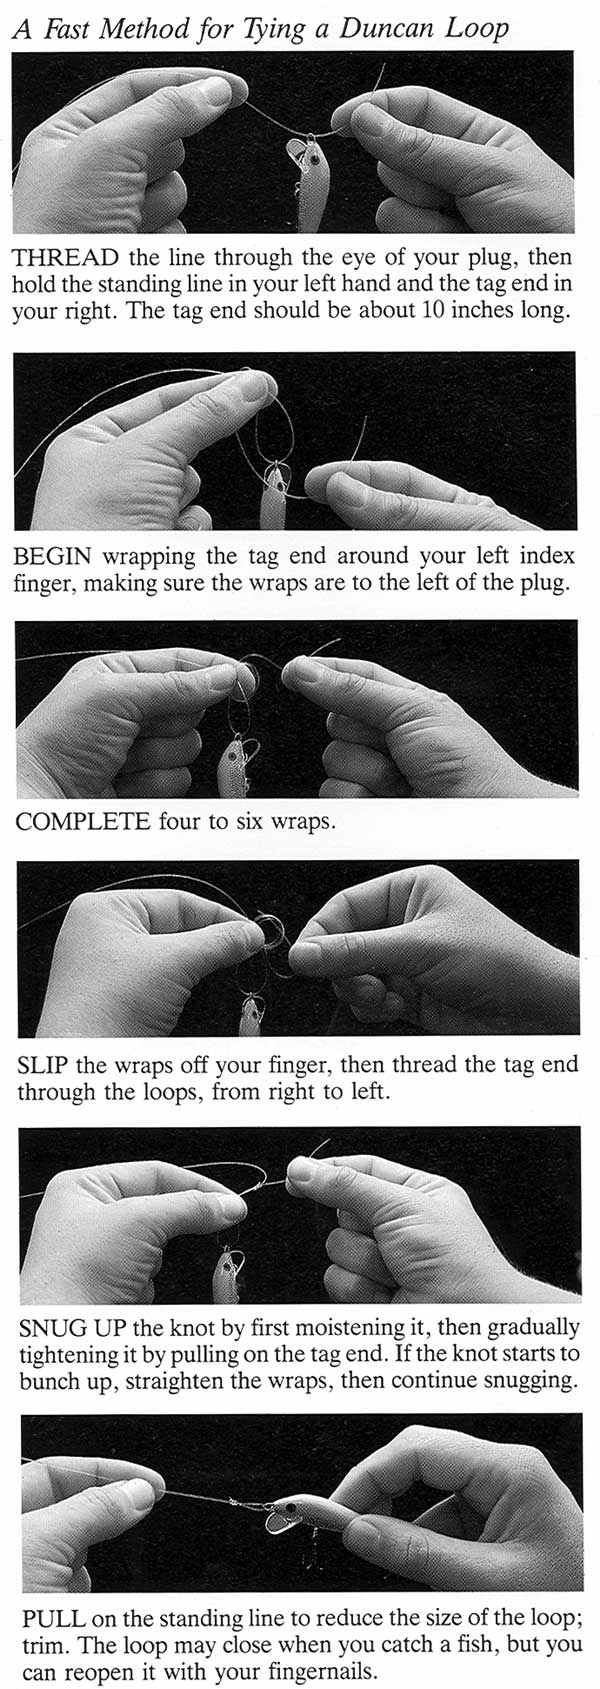
--------------------------------------------------- Crankbaits, plugs and Rapala-style minnows will catch practically any kind of gamefish except the smallest panfish species. The key to fishing these types of lures is to know that they run at different depths and are most effective within their optimum depth. For instance, if youre fishing in 8 feet of water, youll probably want a lure that runs 6 or 7 feet deep. To determine how deep a crankbait tracks, retrieve the lure through water of a known depth, feeling for it to touch the bottom. If it does, move to slightly deeper water and try again. Continue until the lure no longer touches and note the depth. To help you remember how deep your crankbait runs, write the running depth of each lure on the body or lip with an indelible marker so you know at a glance which crankbait to use. Running depths are often listed in catalogs or the instructions that come with the lures, but its best to test them yourself. Different line weights and retrieve speeds will cause the lures to run at different depths. A crankbait will not attain maximum depth unless tuned so that it tracks perfectly straight. Depending on the type of lip, a crankbait must be tuned by bending or twisting the eye, bending the lip itself or bending the attachment wire. To reach maximum depth, cast as far as possible and keep your rod tip low while retrieving. With a shorter cast or higher rod position, you will begin pulling the plug upward before it reaches its potential depth. As noted before, line diameter also affects depth. Thin line has less water resistance and allows the plug to run deeper than thick line. The smaller the plug, the more it is affected by line diameter. 6- to 12-pound mono is usually sufficient for most fishing, but for heavy cover or big fish, strength up to 25-pound test may be necessary. For the best action, tie a crankbait directly to the line. If the plug does not have a split ring on the eye, install one or use a Duncan loop (demonstrated a couple of weeks ago; if you need a copy, email me). A heavy leader or snap-swivel will restrict the plugs wobble. To keep your lure in the fish zone as long as possible, cast parallel to the structure or cover. For example, to work the shady side of a log, cast parallel to the log and retrieve the lure along its length. If you cast perpendicular to a log, your lure will be in the fish zone only a fraction of the time. ------------- TasunkaWitko - Chinook, Montana Helfen, Wehren, Heilen Die Wahrheit wird euch frei machen |
Posted By: TasunkaWitko
Date Posted: 21 April 2006 at 07:29
|
For top quality flavor, all fish should be field dressed as quickly as
------------- TasunkaWitko - Chinook, Montana Helfen, Wehren, Heilen Die Wahrheit wird euch frei machen |

Posted By: TasunkaWitko
Date Posted: 28 April 2006 at 12:22
|
3 may 06 ------------------------------- Some fish recipes for cooking larger fish call for the fish to be "butterflied." This procedure keeps the fish whole while making it boneless. To do this, use the instructions and pictures below as a guide. Start with a whole, drawn fish such as a lake trout or walleye. Cut from inside cavity along each side of backbone to release bone from fish (Left). Do not cut through skin. Discard bone and spread out two sides of fish so it lies flat (Right). Trim fat and discard belly meat. Remove rib bones.
"Butterflying" also refers to a preparation method that is a fast and appealing alternative to steaking larger, smooth-skinned fish such as large trout, salmon or catfish.
Normally, these fish are "steaked," which means that they are cut into sections through the backbone along the ribs. When butterflying them, however, you dont cut through the heavy backbone, so your knife stays sharp. The finished cut is also easier to eat than a steak because it has no bones. Finally, butterflied fillets are more appealing because the meat is on the outside, with the skin and fat tucked away on the inside. To butterfly fillets:
Cut a (1) fillet from the fish. Remove the rib bones, but dont skin the fillet. (2) Slice across the fillet, about an inch from the end, cutting through the meat but not the skin. (3) Make a second cut, parallel to the first and about an inch farther from the end; slice completely through both the meat and the skin. (4) Fold the piece of fish backwards along the first cut so the meat is on the outside and the skin is on the inside. Butterfly the rest of the fillet, except the tail section. ------------- TasunkaWitko - Chinook, Montana Helfen, Wehren, Heilen Die Wahrheit wird euch frei machen |


Posted By: TasunkaWitko
Date Posted: 04 May 2006 at 08:25
|
10 may 06 ------------------------------- The fillets of many kinds of fish contain a row of small bones, called
Remove the row of bones after first locating it with your finger. Slice through the fillet along one side of the bones for the length of the body cavity. Then slice along the other side, forming a thin strip (dotted line) that you can lift out, leaving a completely boneless fillet.
Members of the pike family have delicious, flaky meat; but the Y-bones (above) are bothersome enough that some people refuse to eat these fish. Although there are a couple of ways to remove these bones, most fishermen dont know how, so they are forced to pick them out at the table. Heres one easy way to make boneless fillets from pike and pickerel. Then you can forget about Y-bones and enjoy your meal.
Cut down behind the head. Turn the blade toward the tail and run it along the backbone (dotted line). Slice upward just ahead of the dorsal fin, cutting away the back fillet.
Loosen the skin along the edge of the back fillet so it will lie flat on the cutting surface. Now you can skin the fillet as you would any other.
Remove the side fillets by first cutting down to the backbone, once behind the head, and a second time ahead of the dorsal fin (arrows). Feel along the back to find the Y-bones (row of dots). With the fish on its side, insert your knife just above the Y-bones and cut away a fillet (shown) so the Y-bones remain attached to the fish. Remove the fillet from the other side in the same way. Skin the fillets.
Cut off the fillets from each side of the tail section by slicing along the backbone. There are no Y-bones in this part of the fish. Skin the tail fillets. You now have five boneless fillets. ------------- TasunkaWitko - Chinook, Montana Helfen, Wehren, Heilen Die Wahrheit wird euch frei machen |


Posted By: TasunkaWitko
Date Posted: 12 May 2006 at 08:54
|
17 may 06
------------- TasunkaWitko - Chinook, Montana Helfen, Wehren, Heilen Die Wahrheit wird euch frei machen |
Posted By: TasunkaWitko
Date Posted: 17 May 2006 at 06:12
|
24 may 06 ------------------------------ Most minnow plugs are either floating or sinking. A standard floating minnow plug must be retrieved at moderate speed to prevent it from rising quickly to the surface. Sinking plugs require similar retrieval in order to keep from sinking into the depths. This means that both styles are somewhat limited in their useful applications. There is a third option: the neutrally buoyant plug. This plug will stay suspended in the water without rising to the top or sinking to the bottom. A neutrally buoyant plug can be retrieved much more slowly than floating or sinking plugs, yet it will maintain its depth. Slower retrieves often work better in cool water or when fish are sluggish. It is easy for fishermen to doctor their floating minnow plugs to make them neutrally buoyant: 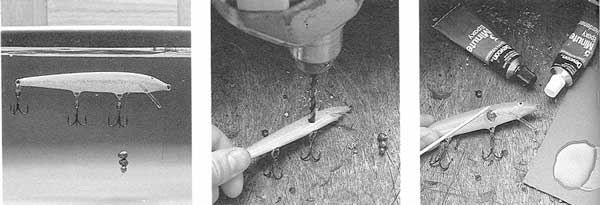 1. Slip a mono noose over the plug, then pinch on enough shot so the lure barely sinks and remains suspended in a tub of water. Move the noose forward or backward to find the balance point. 2. Drill a hole large enough for the shot just below the center line and directly in line with the position of the noose. 3. Center the shot in the hole, otherwise the plug will tip to one side in the water. Seal both ends of the hole with epoxy glue. ------------- TasunkaWitko - Chinook, Montana Helfen, Wehren, Heilen Die Wahrheit wird euch frei machen |
Posted By: TasunkaWitko
Date Posted: 01 June 2006 at 09:56
|
31 may 06
------------------------------------------------------------ ---------------
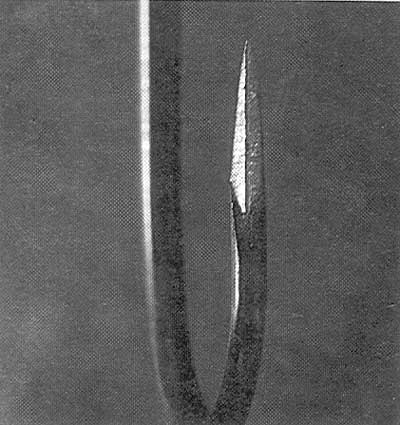
Most plugs, spoons and spinners come with treble hooks, but if youre after trophy-class fish, ordinary trebles may not be strong enough. Big-fish specialists know that a good-sized single hook will sink deeper and hold better than a treble, and no fish is likely to bend or break it. If youre fishing in waters where theres a good chance of hooking something big, replace your trebles with a single Siwash hook. A Siwash has a sturdy shank and an extra-long, low-tapering point that penetrates like a needle. Once a fish is on, there is little chance that it will get away. Lures with a Siwash hook offer another advantage: they can be used in waters where treble hooks are banned.
If the trebles are attached with split rings, you can simply open the ring, take off the treble and substitute the Siwash. If the ring is welded, youll have to cut it off and add a new one. If a lure has two or three trebles, you may want to remove all of them and add just one Siwash where the rear treble was. ------------- TasunkaWitko - Chinook, Montana Helfen, Wehren, Heilen Die Wahrheit wird euch frei machen |
Posted By: TasunkaWitko
Date Posted: 01 June 2006 at 09:59
|
7 jun 06 ----------------------------------------
Its widely believed that the best way to set the hook on a fish is to jerk the rod as hard as you can and cross their eyes. A solid hook set will catch more fish, but theres a better way to sink the hooks than jerking wildly, especially if youre using monofilament line. If you have any slack at all in your line, a fast jerk of the rod will exert practically no force at the end of the line. If you find this hard to believe, try the following experiment. Tie a swivel to your line and have someone squeeze it between his fingers. With the rod in your hand, back off about 50 feet. Let out a little extra line and then jerk as hard as you can. Chances are you wont pull the swivel from your partners fingers. Because of the slack and the stretch of the monofilament, surprisingly little force is transmitted. Heres a better way to get a powerful hook set. When you feel a bite, point your rod at the fish and immediately reel up slack until you feel weight. Then, set the hook with a quick snap of the wrists. Although this hook-setting method is much less spectacular, it transmits considerably more force for driving in the hook. ------------- TasunkaWitko - Chinook, Montana Helfen, Wehren, Heilen Die Wahrheit wird euch frei machen |
Posted By: TasunkaWitko
Date Posted: 07 June 2006 at 07:12
|
14 jun 06
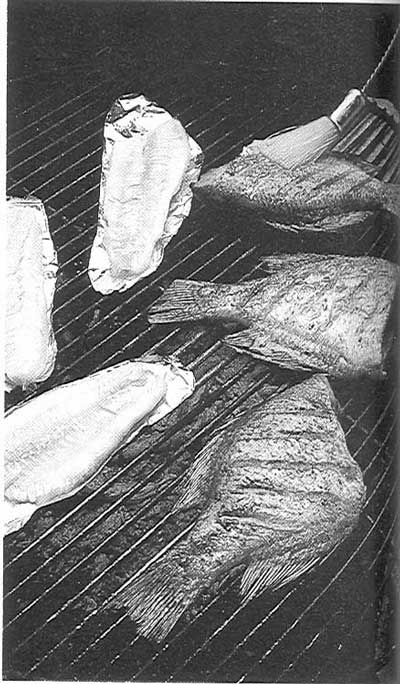
------------------------- Many people do not associate outdoor grilling with fish, but the fact is that grilled fish has the same delicious, charred-wood flavor as other grilled meats. Oily fish, such as trout and salmon, are best suited to grilling because they stay moist despite the high-heat cooking process. Lean fish, such as walleye or largemouth bass, tend to get dry unless you select thick cuts. You can grill steaks, fillets or whole fish. On the average, fish should cook for 10 minutes per inch of thickness. Any fish can be grilled, but many freshwater species such as crappie and walleye have delicate meat that breaks up easily and falls through the grate. Always grill these fish in a grilling basket or on a grilling screen or piece of aluminum foil. Fillets or steaks from firm-textured fish such as northern pike and trout can be placed directly on a well-oiled grill. If you place a skin-on fillet or whole fish directly on the grate, the skin may stick. An oil-based marinade not only adds flavor to grilled fish, but also prevents lean fish from drying out and reduces the chance that the meat will stick. Coat he fish with marinade before cooking and baste frequently during the cooking process. Other tips for grilling fish: Remove hardened grease from your grate with a foaming-type oven cleaner. Keep the grate clean by washing frequently in soapy water. Spray the grate with nonstick vegetable cooking spray after cleaning it thoroughly with a stiff wire brush or coarse steel wool and rinsing it with water. Do not spray the grate over hot coals the spray may ignite. Close the lid and adjust the vents to regulate the heat of the grill. You can also increase the heat by lowering the grate or bunching the coals more closely. You can reduce the heat by raising the grate or spreading the coals. Turn the fish after half the cooking time, using a long-handled spatula. Total cooking time depends on air temperature and wind strength, but seldom exceeds 10 minutes per inch of thickness. ------------- TasunkaWitko - Chinook, Montana Helfen, Wehren, Heilen Die Wahrheit wird euch frei machen |
Posted By: TasunkaWitko
Date Posted: 19 June 2006 at 19:40
|
21 jun 06
------------------------------------------------------------ --------------
All knots weaken line; the best have little effect on line strength, while the worst cut strength in half. Two favorites, the clinch knot and the improved clinch, are not recommended, because few fishermen tie them consistently well. As a result, these knots often have sharp bends that fracture under stress. Choose knots that are easy to tie correctly, because even the strongest knot is weak if not properly tied.
The Trilene knot is unusually strong. It is rated at 90% of the line strength, compared to an average of about 75% for other fishing knots such as the clinch knot. Here are a few tips for tying knots:
· Moisten the knot with saliva before snugging it up. This reduces friction and helps to form a knot that is smooth and tight.
· Snug up the knot with a smooth, strong pull. Do not be timid about testing it. Better that it breaks while being tied than after hooking a big fish!
· Clip the tag end of the line carefully, being sure not to nick the knot. It pays to leave a little extra line, because all knots slip slightly just before they break.
· Knots weaken with use. Good fishermen tie new knots before a trip and test their knots frequently.
There are many, many knots available for anglers. As mentioned before, the Trilene knot is one of the strongest and most versatile. Below are instructions for tying the Trilene knot:
------------- TasunkaWitko - Chinook, Montana Helfen, Wehren, Heilen Die Wahrheit wird euch frei machen |


Posted By: TasunkaWitko
Date Posted: 22 June 2006 at 06:36
|
Fishermen catch plenty of good-sized northern pike in the shallow,
weedy bays during the spring, but when the water warms up, they get nothing but hammer handles in these areas. The lack of big pike in the summer has led to the mistaken belief among some anglers that pike lose their teeth or have sore mouths this time of year and dont feed. The truth is, however, that they are feeding more than ever. The main reason for the scarcity of big pike in summer is that anglers arent fishing deep enough. As pike get larger, they prefer cooler water. In some cases, they will congregate around spring holes, artesian wells, the mouths of trout streams or other specific point sources of cold water; however, if there are no point sources, pike have no choice but to go deep. If there is adequate oxygen in the lake depths, theyll go as deep as 50 feet and occasionally down to 100. Lake trout anglers sometimes catch big pike. At these depths, theyre generally feeding on good sized baitfish, such as whitefish or ciscoes, and youll have to use similar-sized baitfish to catch them. A good rule of thumb is to use a baitfish that is about one-fourth the length of this northern you plan to catch; thus, you would use an 9-inch baitfish to catch a 36-inch northern, and so on. ------------- TasunkaWitko - Chinook, Montana Helfen, Wehren, Heilen Die Wahrheit wird euch frei machen |
Posted By: TasunkaWitko
Date Posted: 28 June 2006 at 07:21
|
5 jul 06
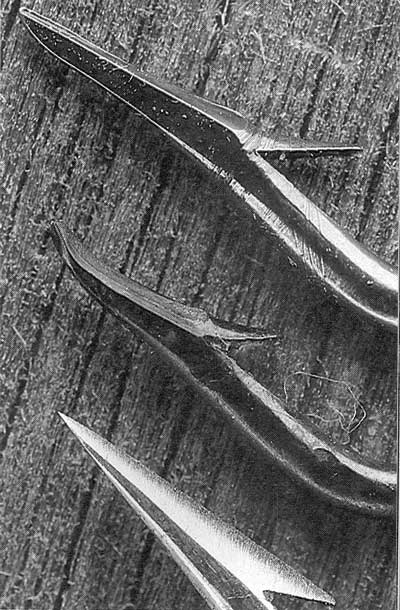
---------------------- The first rule of knife sharpening is safety; be extra careful with all cutting implements, just as you are with all shooting implements. Failure in knife sharpening is usually centered on two Ps. The first P is Pressure; the second P is Patience. Whenever there is a failure in knife sharpening, it is most likely due to too applying far more pressure than necessary and exercising far too little patience. Dont try to ram the knife through the sharpening instrument, or the sharpening instrument through the knife. Such action is not necessary to create a keen edge. Be sure to have patience; even with the most modern equipment, sharpening a knife takes a little time. There are many sharpening devices on the market, ranging from simple stones to complex systems that require an entire users manual. All are entirely workable and most will work well. Choosing a knife sharpener, and a knife sharpening method, is a matter of trying different types to see which one works best for you. ------------- TasunkaWitko - Chinook, Montana Helfen, Wehren, Heilen Die Wahrheit wird euch frei machen |
Posted By: TasunkaWitko
Date Posted: 09 July 2006 at 12:47
|

Posted By: TasunkaWitko
Date Posted: 12 July 2006 at 07:36
|
19 jul 06
----------------------- When you combine the fresh air, the natural scenery and the tang of woodsmoke, nothing comes close to cooking outdoors over an open fire. Open-fire campfire cooking is similar to cooking over charcoal or natural gas, but there are a few differences and things to remember. Build a fire using dry, non-resinous hardwoods, preferably logs about 3-4 inches in diameter and some smaller kindling. If it has been raining, you may have to carry some newspaper or dry tinder to get the fire started. Stack the wood in a log cabin- or tipi-style over the tinder. When the fire has burned down to a bed of hot coals, place a grate over coals on rocks or logs bordering the fire. Feed the fire with small twigs as needed to maintain even heat. The usual way to cook over a fire is simply to set a frying pan on the grate. But you can also wrap food in a foil packet, along with vegetables, if desired, and set the packet directly on the coals. One of the biggest problems when cooking with foil over an open fire is telling when the food is done, because cooking time varies with the type of wood, wind and outside temperature. Open the foil and check the food for doneness. Meat should be done to your liking, fish should flake easily and vegetables should be tender. If the food is not done, reseal the package and put it back on the fire. When youre done cooking, be sure to extinguish your fire completely. How To Cook With A Frying Pan Test the coals by blowing on them; when they glow bright red, the fire is ready. Dont attempt to cook until the flames disappear. Place rocks around the fire to hold the grate 4-8 inches above the coals. Lower the height of the grate for more heat or raise it for less heat. Add 2 or 3 Tablespoons of cooking oil to the frying pan and heat for 1-2 minutes. Use long-handled tongs or fork to add the fish. How To Cook With Aluminum Foil Double-wrap fish by first criss-crossing two sheets of heavy-duty aluminum foil. Wrap fish in top sheet as shown; repeat with bottom sheet. Set the packet in the middle of coals or on grate. Cooking time will vary depending on weather, size of package and intensity of heat. Cook for half the recommended time. Using long-handled tongs, turn package over and cook for remaining time. Open package and test for doneness. Tips For Campfire Cooking Hold your hand 6-8 inches above grate to judge heat. If you can hold it there 2-4 seconds, the heat is high; 5-7 seconds, the heat is medium; 8-10 seconds, the heat is low. Premix flour or desired coating with dried herbs and other seasonings in a resealable plastic bag. To coat pieces of fish or meat, add them to the bag, reseal and shake. Keep spice mixtures needed for recipes in a 35mm film canister or similar small container. This way, youll be sure to have the proper blend and you wont have to carry several bottles of spices. Carry a small cooler for perishable foods and supplies such as cooking oil, matches, newspaper for tinder, seasonings and utensils. This keeps everything in one place for easy access. Water frozen in plastic bottles keeps food cool. ------------- TasunkaWitko - Chinook, Montana Helfen, Wehren, Heilen Die Wahrheit wird euch frei machen |
Posted By: TasunkaWitko
Date Posted: 20 July 2006 at 06:51
|
26 jul 06
How To Cook Fish On Grate Over An Open Fire ------------- TasunkaWitko - Chinook, Montana Helfen, Wehren, Heilen Die Wahrheit wird euch frei machen |
Posted By: TasunkaWitko
Date Posted: 26 July 2006 at 10:23
|
2 aug 06 ---------------------------- Northern Pike, and occa-sionally walleyes, will take dead smelt lying off the bot-tom, but these baits are more effective when floated up a foot or two. Because these fish can be found in deep water, using a bobber to suspend the bait is not always practical. Heres a way to float dead bait just off the bottom, where it is visible and also appears to be wounded and barely alive. Big pike would have a hard time resisting this presenta-tion:  Stuff a (1) Styrofoam packing peanut inside the mouth of the bait and (2) run the hook through both lips to keep the mouth shut. If more floatation is needed to make the bait float off the bottom, (3) cut a small slit in the belly and stuff another peanut or two into the abdomen. (4) Slip a rubber band over the fish or tie mono around the bait to keep the peanut in the body. If the bait is small, use pieces of a peanut in place of a whole one. Fish the bait about two feet behind your sinker. ------------- TasunkaWitko - Chinook, Montana Helfen, Wehren, Heilen Die Wahrheit wird euch frei machen |
Posted By: TasunkaWitko
Date Posted: 02 August 2006 at 08:15
|
9 aug 06
--------------------------- In his book, Wild Game and Country Cooking, Timothy Manion offers these thoughts on venison care and preparation: I spent my boyhood hunting the cedar swamp area of Waupaca County and it was not unusual to see two or three bucks and 25 does on opening day. Despite the water-filled cedar-choked jungle these swamp deer resided in, they had the luxury of dining regularly on some of the sweetest corn in all Wisconsin. I truly believe you are what you eat and these deer, no matter what their age, are delicious. Some people claim that the venison the attempt to prepare tastes like liver or is quite wild tasting. Well, it stands to reason that when a deer has been chased and shot through a barrage of hunters, the adrenaline is flowing and he is extremely tense. These conditions will make the meat tough and strong tasting. If you can get away from the crowd in areas that are remote and tough going, you will probably not only have an opportunity at a larger buck, but also one that will be much more relaxed and taste better. Venison, if prepared properly, will taste as good as [or better than] any milk-fed beef. All large game must be hung for periods ranging from three or four days to [two] weeks or longer before they are ready to eat, much as beef must be hung until it is tender. Wild meats are leaner than domestic meats and need fats for cooking; they are often larded or blanketed with larding pork. ------------- TasunkaWitko - Chinook, Montana Helfen, Wehren, Heilen Die Wahrheit wird euch frei machen |
Posted By: TasunkaWitko
Date Posted: 11 August 2006 at 08:21
|
16 aug 06 ------------------------------------------ Whitetail Deer ------------- TasunkaWitko - Chinook, Montana Helfen, Wehren, Heilen Die Wahrheit wird euch frei machen |
Posted By: TasunkaWitko
Date Posted: 17 August 2006 at 16:58
|
23 aug 06
-------------------------------------------------------
Beer and bratwurst are traditionally the essence of German gastronomy, but there is certainly more to German cooking than that. There is a flavor to The German hausfrau is economically-minded even in todays affluent society. Not every meal contains meat, and the humble potato is used in many interesting ways combined with apple, pears, grated raw into pancakes or cooked with caraway seeds. The main meal is usually served in the middle of the day and is either a meat dish or a high-protein cheese or lentil dish followed by a sweet or fruit. Supper is kept quite simple; a selection of cold meats, sausages and salads, and a variety of breads and rolls. On special occasions, traditional meals are cooked; perhaps the most famous of these is sauerkraut, cooked in white wine, cider, beer or champagne or flavored with Kirsch and served with frankfurters, pickled pork, garlic sausage and new boiled potatoes. Next week, well take a look at the regional nature of German food, and how the different regions of ------------- TasunkaWitko - Chinook, Montana Helfen, Wehren, Heilen Die Wahrheit wird euch frei machen |
Posted By: TasunkaWitko
Date Posted: 17 August 2006 at 17:00
|
30 aug 06 ------------------------------------------- In The most important element of influence in the North is the sea. This is From the center of To the South, dumplings give way to tiny spaetzle and the famous Himmel und Erde potatoes cooked with apples. The well-known strudel of ------------- TasunkaWitko - Chinook, Montana Helfen, Wehren, Heilen Die Wahrheit wird euch frei machen |
Posted By: TasunkaWitko
Date Posted: 08 September 2006 at 09:54
|
6 sep 06 ------------------------------------------------------------ ---- Home-pickled fish are delicious. They are as good as, if not better than, the pickled herring sold in the grocery stores. Pickled fish can be eaten with crackers or on its own, and is usually the first item to disappear from the appetizer tray. Practically any kind of fish can be pickled, but small fish with delicate flesh generally work better than large fish with coarse meat. Bony fish, such as northern pike, are often pickled because the acid in the pickling liquid helps dissolve small bones. Remove heavy rib bones and, if you wish, remove the skin and lateral line. Cut the fish into bite-sized chunks, 1 to 1-1/2 inches. Fresh, uncooked fish should be frozen for at least 48 hours before pickling, in case the meat contains tapeworms. Seldom is this a problem, but the broadfish tapeworm, found mainly in There are dozens of different pickling techniques. Generally, the fish is soaked in a vinegar/salt brine and then in a pickling liquid consisting of vinegar, sugar and seasonings. Total brining and pickling time varies from 4-20 days, depending on the recipe. When brining, keep fish submerged in the brine by placing a plate over the fish and a heavy object on the plate. This ensures that all of the fish is pickled. Use high-quality soft water in the brine solution; too much iron or sulfide adversely affects the flavor of fish. Buy bottled water, if necessary. The brine calls for pickling salt because table salt has bitter impurities that discolor the fish and affect the taste. Use a good-quality, distilled white vinegar that has at least 5% acetic acid content. Vinegar slows spoilage. Normally, the fish are packed in canning jars (with two-part sealing lids. Pickling containers can also include glass bowls or peanut butter or mayonnaise jars. Cover containers tightly with plastic wrap or non-corrodible lids. White onion, lemon and/or pimiento slices in the jars add flavor and color. The sugar and spices contribute little to fish preservation of fish and are often adjusted to suit taste. Whole cloves add a pleasant flavor. You can also make cream style pickled fish by draining off the brine before serving, then adding a sour cream and sugar mixture (1 tablespoon sugar to 1 cup sour cream). ------------- TasunkaWitko - Chinook, Montana Helfen, Wehren, Heilen Die Wahrheit wird euch frei machen |
Posted By: TasunkaWitko
Date Posted: 08 September 2006 at 09:56
|
13 sep 06 ------------------------------------------------------------ - To preserve meat, Native Americans and early settlers would hang thinly-sliced meat over a smoky fire until it was dry. It could then be stored or carried long distances without spoiling. Almost any big game meat without tendons, fat or sinews can be used to make jerky. The exceptions would be bear, boar or javelina, which must be cooked thoroughly. Cut meat with the grain for a chewy texture, or across the grain for a more-tender jerky. Slice meat carefully in order to ensure uniform strips. Meat is also easier to slice partially frozen. There are literally hundreds of jerky recipes. Some are as simple as sprinkling salt and pepper on the meat; others involve complex marinades and exotic seasonings. Personally, I prefer some sort of marinade, no matter how simple. To me, marinades allow the meat to be thoroughly and evenly flavored. I would also recommend the use of a curing salt such as Morton Tender Quick mix when preparing jerky to help prevent bacterial growth. Combine marinade ingredients in a large, nonmetallic mixing bowl or gallon jar. Stir to dissolve seasonings and salt cure. Add meat strips; cover with plastic wrap and refrigerate at least 24 hours, stirring occasionally. Jerky can also be made from ground game; in fact, I often find it beneficial to simply grind all leftover venison in my freezer each year for use as burger or in making jerky. When using ground meat for jerky, simply mix ingredients into the meat. Be sure to add a cup or so of water to the ground meat in order to help distribute the flavor and aid the meat in binding together. After 24 hours, roll out seasoned meat flat between two sheets of waxed paper and cut into strips, or shoot it out of a jerky gun. Traditionally, jerky is smoked, but it can also be flavored with liquid smoke and dried in a cool oven or dehydrator. If using smoker, follow manufacturers directions for best results. If preparing jerky in the oven, add 2 teaspoons liquid smoke flavoring to the marinade, if smoke flavor is desired. Heat oven to lowest possible temperature setting, propping oven door open with a wooden spoon. Deciding when jerky has dried enough can be a matter of very personal taste. My recommendation is to dry it at least until it is leathery and not brittle, then continue drying as long as your preferences determine. Some like their jerky to be very dry to the point of brittleness; this also tends to last longer. Others prefer a chewy jerky that will not break like a twig. As with most things subject to personal preference, the optimum is probably somewhere in-between. ------------- TasunkaWitko - Chinook, Montana Helfen, Wehren, Heilen Die Wahrheit wird euch frei machen |
Posted By: TasunkaWitko
Date Posted: 19 September 2006 at 17:58
|
20 sep 06 --------------------------------- Fresh big game sausage is surprisingly easy to make at home. All of the recipes to be printed can be used as uncased sausages and require no special equipment other than a food processor or meat grinder. You can use any big game cut to make sausage; the meat does not have to be tender. The best choices are cuts that might be tough if cooked whole, such as flank, shoulder or brisket. Scraps left over after cutting up a big game animal work very well. Fatty pork is often added to the trimmed game meat to make sausage. If you prefer sausage game meat only, you still need to add fat. Ask your butcher for hard pork fat from the outside of the loin. Be sure to specify hard pork back fat when you order; tell the butcher what youll be using it for to be sure you get the right thing. Back fat is not the same as fatback, which is fat that has been salted and dried. A ratio of one part fat to three or four parts game meat produces a juicy, flavorful sausage. To produce the best texture, keep the fat and meat very cold during chopping or grinding. Avoid substituting lard for hard fat; lard is too soft and will produce a greasy sausage. Keep meat grinder blades sharp when grinding meat for sausage. Dull blades squeeze juices from the meat, resulting in dry, less-flavorful sausage. If your grinder slows down during use, or if the texture of the meat suddenly becomes fine and mushy, partially disassemble the grinder and check the blades and plate. Sinew and other tough material can get caught in the mechanism, causing poor performance. Clean the blade and plate, then continue. Experiment with small batches to find a sausage recipe you like, then double or triple the recipe to make a big batch. Its best to under-season sausage somewhat, then fry up a small patty and taste it. Add any additional seasonings or salt if necessary. ------------- TasunkaWitko - Chinook, Montana Helfen, Wehren, Heilen Die Wahrheit wird euch frei machen |
Posted By: TasunkaWitko
Date Posted: 19 September 2006 at 18:00
|
27 sep 06 In conjunction with last weeks Quick Tip, here are a few pointers to keep in mind when making your own sausage: · Wash all equipment thoroughly in very hot, soapy water prior to making sausages. Rinse and refrigerate equipment until cool before using. Wash hands and scrub fingernails with nail brush. Scrub countertops and cutting boards with soapy water and rinse well. · Keep meat as cold as possible during sausage making. If meat is to be ground twice, chill it thoroughly and wash and refrigerate grinder between grindings. When working with a large batch of meat, grind only a small portion at a time and leave the rest refrigerated. · Grind lean meat separately from fat for juicier fresh sausages. Cut fat into chunks, partially freeze it, then grind finer than the meat. Mix ground meat and ground fat together. This way, the fat will be more-evenly distributed and there wont be any large pieces in your sausage. · Sprinkle mixed, dry seasonings over coarsely ground meat. Mix well and refrigerate overnight to blend flavors. Mix with liquid called for in recipe, then grind through finer plate and stuff immediately. If using already-ground meat, mix dry seasonings with liquid before adding to meat. · Use a cure for all sausages that will be smoked to prevent botulism, a type of food poisoning. For a fresh sausage recipe that makes 5 pounds, substitute 8 level teaspoons of Morton TenderQuick mix for every 5 1/2 level teaspoons of canning/pickling salt; or, add 1 level teaspoon of Insta Cure No. 1 (formerly Prague Powder No. 1) to the salt already in recipe. ------------- TasunkaWitko - Chinook, Montana Helfen, Wehren, Heilen Die Wahrheit wird euch frei machen |
Posted By: TasunkaWitko
Date Posted: 27 September 2006 at 12:22
|
04 OCT 06
----------------------------------------------
Any of the previous, current and future recipes in our sausage series can also be used to make cased sausages. Youll need casings, available from some butcher shops, and a sausage stuffer. Follow the instructions that come with the stuffer. Cased sausages can be cold-smoked for 2-3 hours to add additional flavor. Synthetic casings, which are edible, are available in 22mm for breakfast-sized links and 32 mm for bratwurst-sized sausages. Natural casings include lamb casings (22-24mm), which are used for breakfast links, and hog casings (32-35mm), which are used for Italian, Polish and bratwurst-style sausage. A butcher shop that specializes in sausages may sell you a hank; a bundle of casings packed in salt. You can also order casings from specialty stores. The casing you select is usually based on the sausage youll be making. Natural casings are usually used for fresh sausages, since they are tender and edible. Collagen casings are available for both fresh and smoked sausages in sizes for small links or bratwurst. They are easier to use than natural casings, but they dont hold a twist well and may need to be hand-tied at the ends. Next weeks Quick Tip will conclude our series on sausage with specific instructions for preparing and stuffing natural casings. ------------- TasunkaWitko - Chinook, Montana Helfen, Wehren, Heilen Die Wahrheit wird euch frei machen |
Posted By: TasunkaWitko
Date Posted: 27 September 2006 at 12:25
|
11 OCT 06 ------------------------------------------------------------ ------ To prepare and stuff natural sausage casings: Spread out a hank of salted casings carefully on clean work surface. Find the beginning of the hank, and gently pull one length out until it is free, being careful not to twist the remainder of the lengths. Remove as many lengths as you need. Re-salt and freeze the remainder for future use. Open one end of the casings, and slip the end over a faucet. Hold your hand over the casing to keep it from slipping off. Run a steady, medium stream of cold water through the casing until it is completely filled and the water runs through. Continue flushing for a few minutes. Rinse the outside of the casing. Place the rinsed casing in a large measuring cup filled with cold water after draining out all water and air from the casing. Let one end of each casing hang over the edge of the cup. Rinse remaining casings, adding them to the measuring cup, until youve rinsed all the casings you will need. Slip one end of a rinsed, wet casing over the sausage-stuffing horn; push until end of the casings is at the back end of the horn. Continue pushing until the entire length is gathered onto the horn. Pull the casing forward until about one inch hangs over the open end of the horn. Turn the crank of the sausage stuffer slowly until some of the sausage mixture some of the sausage mixture comes out of the horn. Tie off the end of the casing with kitchen string, pinching off a small bit of meat. The pinching helps eliminate air at the end of the link. Continue cranking until sausage is desired length; have a helper guide the link away from the horn. Twist the first link several times; then crank until a second link is formed. Support both ends with one hand while using the other to keep the casings on the horn until it is firmly filled. Be sure to let the casing slip off easily before it overfills and breaks. Continue twisting and filling; keep casings on horn wet so they slip off without sticking.
------------- TasunkaWitko - Chinook, Montana Helfen, Wehren, Heilen Die Wahrheit wird euch frei machen |
Posted By: TasunkaWitko
Date Posted: 08 October 2006 at 05:09
|
18 oct 06 -----------------------
Accurate field judging is really only possible when you get a good, long look at a standing buck. You can use the eye diameter of the buck (about 2 inches) to judge horn mass, and the ear length (about 6 inches) to judge horn and prong length. After a bit of practice, youll be able to judge this buck as having horns measuring about 12 inches; prongs, 3 inches and mass (at the base) 5-1/2 to 6 inches. This young buck will be much larger next year.
From Pronghorn Hunting, by
Even the most experienced antelope hunters can have trouble field judging trophy animals. Once on the ground, pronghorn bucks have provided the successful hunter with plenty of surprises, both pleasant and not so pleasant, as the measuring tape reveals the truth. So-called ground shrinkage is reasonably common with all big game animals, but tends to occur more where antelope trophies are concerned.
Hunters who aspire to bag a trophy buck must be have the dedication, time and patience to inspect, stalk and pass up many good animals until they fine one truly exceptional head. The hunter must be prepared to carry home an unused tag if waiting for the right opportunity results in no antelope taken. Following are a few tips to more-accurately judge pronghorns in the field. These tips should give you some insight to the class of buck you are looking at through your optics.
· The most difficult judgment is the length of the main beam, due mostly to extreme variations in their curvature and shape. Bucks with nearly straight horns often appear bigger than a buck with very inward- or backward-hooked tips. Begin to determine horn length by comparing the length of the horn to the length of the ears. The average adult pronghorn bucks ear from base to tip generally measures 5-1/2 to 6 inches in length. Provided you are looking at a buck with horns that appear to be 2-1/2 ear-lengths long, youve found a really good buck with horns of around 15 inches. A good cross-check is to establish where the bottom of the prong is in relation to the tip of the ear. If it sits well above and there is as much main beam above the prong as below, youre onto a trophy with real potential. · Judge prongs by ear length. If the prong, measured from the rear of the main beam to the tip, appears to be nearly equal to the length of the ear, youve found a buck with great prongs. · An antelopes eyeball is approximately 2 inches in diameter. Horn bases that are 1-1/2 eyeballs wide indicate a very good buck that is probably well-within trophy territory. · The area from the base of the horn to the tip of a mature bucks nose regularly measures about 8 inches. The measurement can be used to reinforce estimates of both horn and prong length. · Time in the field is your best training for quick and accurate judging. Most of the time, a buck doesnt stand broadside and pose, waiting for you to size him up.
------------- TasunkaWitko - Chinook, Montana Helfen, Wehren, Heilen Die Wahrheit wird euch frei machen |
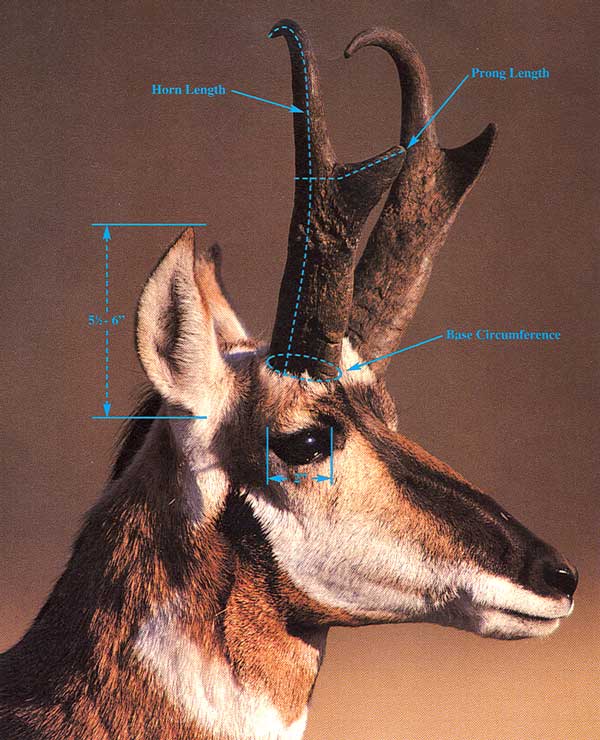
Posted By: TasunkaWitko
Date Posted: 08 October 2006 at 05:10
|
25 oct 06 ------------------------------ From The Art of Hunting Big Game in
[T]here is only one way to train the eyes in the judgment of big game trophies and that is by seeing many sets of horns and antlers and by intelligently evaluating them .
Anyone can read about horns and antlers until he gets spots before his eyes, but unless he has seen and compared many heads and knows what an exceptional head looks like, evaluating trophies is a laborious business.
The first time anyone hunts a new species, he simply cannot judge the heads unless he has done a good deal of homework
.
To me, one of the rules of trophy hunting is that to the man who knows something about the various animals, the really outstanding head knocks his eye out. He doesnt have to look at it hard and long to know it is good, just as a young man would not have to study a beautiful girl for some time to realize she was pretty. The heads that do not turn out well are the ones the hunter thinks about, hopes are good, tries to make grow, looks for an excuse to take.
[W]hen a hunt is planned for any trophy, the would-be hunter should carefully study pictures and look carefully and critically at every mounted head he sees.
In the Case of Pronghorn Antelope .
[T]he horns of buck antelope are very easy to classify. Those of an immature buck do not give the impression of blackness. If the hunter gets a good look at them, they appear rounded, unfinished. The prong is not prominent or well-developed.
The horns of a mature buck are much more massive. The prong is well-developed and conspicuous. They look black. They project far beyond the ears. If the hunter gets a good chance to look over a buck with a high-powered binocular or spotting scope, he should notice the tips. Sometimes, they are not greatly curved. At other times, they are curved on the ends like fishhooks and are ivory-tipped. Estimating how far the horns project above the ears doesnt do too much good because many handsome heads have much of their length in the hook. A horn that looks very black, looks heavy and massive at the base, has a well-developed prong and a pronounced hook, and with a length approaching that of the face, is a very good head. Anyone who looks for these three characteristics and who does not shoot until he sees such a head will get a perfectly satisfactory trophy with a horn length around the curve from 14-15 inches.
Most mature antelope have horns measuring about13 to 14-1/2 inches. In any fairly good antelope country anyone content to wait a while and not shoot until he sees something that looks pretty good should be able to come home with a trophy in this class.
Any head with a well-developed prong and over 15 inches in length is a very good head and one to be proud of. If it is massive enough and has a good enough prong, it stands a good chance to get in the record book. Anyone who has seen some antelope heads and is lucky enough to run into a real buster will know it immediately. As is the case with almost any other trophy of top quality, the horns will jump out and hit you in the eye.
Any head with a curve of 17 inches is very, very good . A heavy, well-developed head that is 18 inches around the curve is really getting up there.
------------- TasunkaWitko - Chinook, Montana Helfen, Wehren, Heilen Die Wahrheit wird euch frei machen |

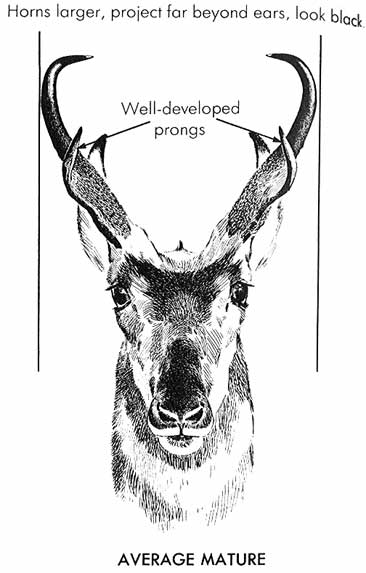

Posted By: TasunkaWitko
Date Posted: 03 November 2006 at 17:47
|
1 nov 06 ------------------------------------------------------------ ---- From The Art of Hunting Big Game in [G]ood mule deer heads are found pretty generally all over [the West] wherever their browse contains the right combination of lime and protein and the bucks are not shot before they mature
. It is rare that a good head comes from any area that is easily accessible and is pounded hard by hunters, but since most deer hunters are not found far from automobiles roads, there is still plenty of good mule deer country where the enterprising hunter can go in with a backpack or a little pack outfit.
[T]he yearling mule deer is generally a spike, but may be a forkhorn. With rich food and plenty of it, he may grow four points and a brow tine his second fall. Antlers reach the maximum size between the fifth and eighth years .
[C]lose-pinched and wide-spread antlers are found wherever there are mule deer. The handsomest and most spectacular are the antlers with wide spreads, and the average hunter ranks mule deer antlers by the spread .
[T]he important measurements are the length of the main beam, the number and length of the points and the symmetry. [A] hunter wanting to take home a mule deer trophy should hold out for a good, average, mature buck with five points [per side], counting the brow tine, on each side. If he should be fortunate enough to bump into [an exceptional] head
he will know it, as the buck will look all horns. If there is any doubt about the head being outstanding, then it isnt. ------------- TasunkaWitko - Chinook, Montana Helfen, Wehren, Heilen Die Wahrheit wird euch frei machen |
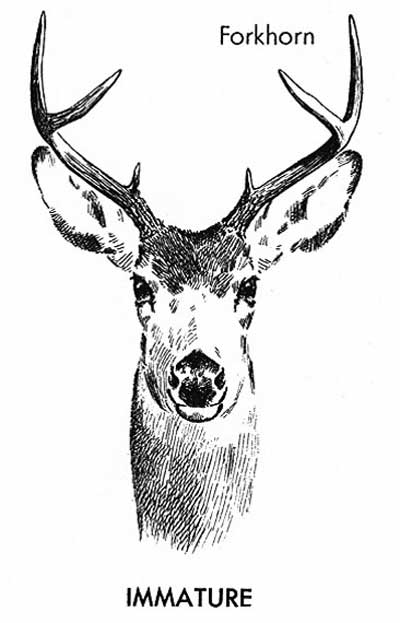
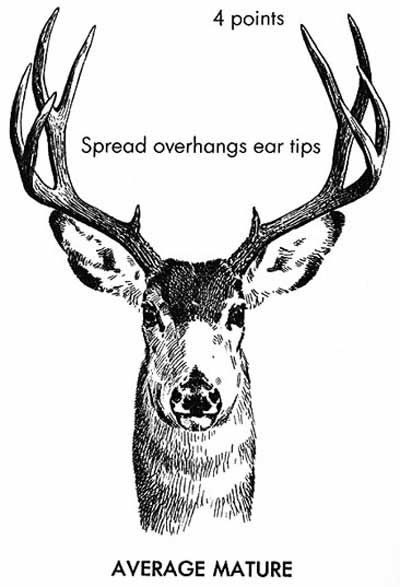
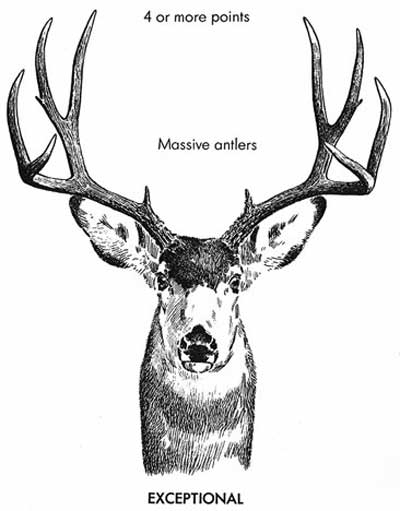
Posted By: TasunkaWitko
Date Posted: 03 November 2006 at 17:57
|
8 nov 06 ------------------------------------------------------------ ------------ From The Art of Hunting Big Game In The same conditions that produce large deer antlers also produce large elk antlers: rich food and the opportunity to mature. As is the case with the mule deer, elk are hunted very hard in areas that can be reached by automobile road to by a short pack trip, but there are vast areas of wilderness back country difficult to get into where [they] are seldom hunted
.
When a bull is a long yearling, he is a spike. As a long two-year-old he has five points to a side. The next year he grows his first pair of six-point antlers. The normal elk head is always a six-pointer. The antlers grow larger until the bull is seven or eight years old, then they generally start to deteriorate. They grow smaller, but often have more points. Probably the finest, most spectacular and highest-scoring heads come from seven- and eight-year-old bulls . Bulls with more than six points are actually quite rare, and bulls with deformed and freak heads are rarer still.
No one wanting a trophy should ever shoot a five-pointer. It is not necessary to count the points because the five-point heads are always short and have a flattened-out appearance something like the antlers of a deer. For the beginning elk hunters, the foolers are the small six-point heads grown by bulls in their fourth and fifth year. To be a real trophy, the main beam of the antlers should be at least four feet long and the nearer they approach five feet, the better. If the hunter has time to look the head over he should note that the length of the beam approaches the height from ground to shoulder; that if the bull tips his head back, the tips of the antlers come almost to the hips; that all the points are large and well-developed. If a head looks like this, it is a real trophy. If it looks long and heavy and has more than six points, it is very, very exceptional.
For a quick check in the timber where a man must shoot instantly or not at all, the most important criterion is length. If the antlers tower far over the elks head or come back to his fanny when he lifts his head to go through the brush, crack him; hes worth shooting! ------------- TasunkaWitko - Chinook, Montana Helfen, Wehren, Heilen Die Wahrheit wird euch frei machen |


Posted By: TasunkaWitko
Date Posted: 04 December 2006 at 16:47
15 nov 06From The Art of Hunting Big Game In I do not think that there is any doubt but that the whitetail deer is the smartest of all North American game animals, and I am likewise convinced that getting a really outstanding whitetail head is the most difficult task in trophy collecting. There are many reasons for this. In the first place, the whitetail is generally an animal of forest and brush. When he is seen he is more often than not on the move and the hunter generally has to shoot quick or not at all. He has little time to size up a head. Another reason is that a great many whitetails are found close to large centers of population and they are hunted hard by people who shoot at the first glimpse of an antler. Consequently, not many whitetail bucks live to become fully mature and members of the deer family have their largest antlers when they are five to eight years old. Still another reason is that in many areas, whitetail deer have been allowed to become too plentiful and they have overbrowsed their range. Fawns born of half-starved mothers do not become large and to grow large antlers deer have to eat food rich in protein and lime. One pleasant thought is that good whitetail heads seem to come from just about every state where these beautiful deer are found, and the hunter wanting to collect an outstanding specimen would not have to go far from home. Actually, a high percentage of outstanding heads come from thickly-populated agricultural areas where the bucks feed on nourishing crops from fertile land
.
The normal
whitetail buck may be a spike or forkhorn first year; a forkhorn or a small three-pointer (eight-pointer by Eastern count). When the whitetail buck is mature, the normal head has the brow tine or eye guard and four points. Easterners call this a ten-pointer, Westerners a four-pointer. Two characteristics that make whitetail antlers different from those of mule deer are that all of the points on whitetail antlers grow off a main beam and the normal whitetail head has a large and prominent brow tine; on the other hand, normal mule deer antlers are dichotomous or evenly branched and the brow tine is smaller and is sometimes missing altogether .
Any mature whitetail buck is a very respectable trophy, and any buck with relatively massive antlers and five points to a side is a very good trophy. If Lady Luck ever sends a record-class whitetail in your direction youll know as he will look to be all antlers
.
Getting a record whitetail is very difficult to manage, as even in good country one does not see many mature bucks in a season to shoot at, and he must size up those he does see in a few seconds
. ------------- TasunkaWitko - Chinook, Montana Helfen, Wehren, Heilen Die Wahrheit wird euch frei machen |


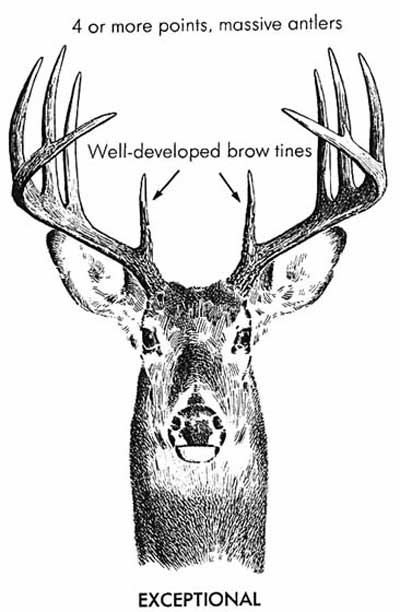
Posted By: TasunkaWitko
Date Posted: 04 December 2006 at 16:49
Quick Tip
For The Week 22 nov 06 Good stock is fundamental to good cooking. It is used as the base for sauces, and as the cooking liquid in many recipes. Game stock is usually made by boiling the bones of big-game animals, birds or small game, usually with vegetables or seasonings. It adds more flavor to recipes than commercial beef or chicken broth. For convenience, freeze stock in 1-cup batches or can it in a pressure cooker. Leave 1/2-inch space in pint jars; process at 10 pounds pressure for 20 minutes. If you make a large batch of stock, you may want to try a technique used by professional chefs. Prepare the stock without adding salt, then strain it through a double thickness of cheesecloth. Allow the strained stock to cool completely, then skim off any fat. Boil the strained, skimmed stock until it is reduced by half to make a demi glace (half-glaze), which is the base for many classic French sauces. Reducing the demi glace even further produces a hard, rubbery glaze that can be cut into small chunks and frozen. A small chunk of the glaze added to a sauce or braising liquid intensifies the flavor of the dish without adding liquid. If a recipe calls for a teaspoon of instant bouillon granules, you can substitute a small chunk of glaze and a bit of salt. Next week, we will offer recipes for venison and game bird stock that you can use in any wild game recipe rather than beef or chicken broth. ------------- TasunkaWitko - Chinook, Montana Helfen, Wehren, Heilen Die Wahrheit wird euch frei machen |
Posted By: TasunkaWitko
Date Posted: 04 December 2006 at 16:51
|
29 nov 06 Venison Stock: Browning the bones in the oven makes the stock rich and dark. Venison stock requires long cooking to bring out all the flavor from the large bones. This recipe will produce about three quarts of stock. · Enough deer, antelope, elk or moose bones to fill stockpot (5 to 10 pounds) · 4 to 6 carrots, cut into 2-inch pieces · 3 or 4 stalks of celery, cut into 2-inch pieces · 2 medium onions, cut into quarters · 2 bay leaves · 10 whole black peppercorns · 4 or 5 sprigs of fresh parsley · 1 sprig fresh thyme, or 1/2 tsp. dried thyme leaves Arrange bones in roasting pan. Heat oven to 450 degrees. Roast until well-browned, about one hour, turning bones once during roasting. Transfer bones to stockpot. Loosen browned bits from roaster by stirring, adding 1 cup water if necessary. Pour liquid into large measuring cup. Skim fat and discard. Add liquid to stockpot. Add remaining ingredients to stockpot. Cover bones with cold water. Heat to boiling over medium-high heat. Reduce heat. Skim foam from top of stock. Simmer for about 8 hours, skimming periodically, adding water as necessary to keep bones covered. Strain stock through a double thickness of cheesecloth. Discard bones and vegetables. Pour stock into stockpot. Heat to boiling over medium-high heat. Cook until reduced to about 3 quarts. Cool slightly. Refrigerate overnight. Skim any solidified fat from top. Game Bird Stock: Pheasant, partridge, grouse, turkey or any waterfowl work best. Save the backbone and neck when portioning birds, and any bones left after boning, until you have enough to make stock game bird stock cooks quicker than venison stock. This recipe will produce about three cups of stock. · 1-1/2 to 2 pounds uncooked game bird backs and bones · 1 small onion, quartered · 1 stalk celery, cut into 1-inch pieces · 1 carrot, cut into 1-inch pieces · 1/4 cup snipped, fresh parsley · 1/2 tsp. dried marjoram leaves · 1/2 tsp. dried thyme leaves · 6 whole black peppercorns · 2 whole cloves · 1 bay leaf · 1-1/4 tsp. salt (optional) · 4 to 6 cups water In large saucepan, combine all ingredients, adding enough water to completely cover the bones and vegetables. Heat to boiling over medium-high heat. Reduce heat. Skim foam from top of stock. Simmer for 1-1/2 to 2 hours, skimming periodically. Strain through a double thickness of cheesecloth. Discard bones and vegetables. Cool stock slightly. Refrigerate overnight. Skim any solidified fat from top. Rabbit Stock: ------------- TasunkaWitko - Chinook, Montana Helfen, Wehren, Heilen Die Wahrheit wird euch frei machen |
Posted By: TasunkaWitko
Date Posted: 04 December 2006 at 17:05
|
6 dec 06 Tips for the Do-It-Yourself Butcher:
------------- TasunkaWitko - Chinook, Montana Helfen, Wehren, Heilen Die Wahrheit wird euch frei machen |
Posted By: TasunkaWitko
Date Posted: 13 December 2006 at 14:00
|
13 dec 06 --------------------------------------------------- Now that hunting season is over, its a good time to take care of a few things in preparation for the year ahead. Doing so now will prevent any last-minute surprises next year. First and most obvious clean and lubricate your rifle. Separate the barreled action from the stock and give the metal parts a good wiping down with a very lightly-oiled rag, using a brush to clean out action parts. Lightly oil moving parts with the barest hint of lubricant, such as 3-In-1 oil. Also, run just a touch of grease, such as Shooters Choice all-weather grease, behind each lug and on the side of each lug, then work the action a couple times. Finish by wiping the barreled action down with a dry, lint-free cloth. Some prefer to use a cloth that is impregnated with silicone; I have tried these and have found them to be very satisfactory as they add a final barrier against the elements. For the bore, a good scrubbing with your favorite bore cleaner, such as Hoppes No. 9, is a must. Scrub with a brush (I prefer nylon brushes rather than bronze never use steel!) several times, then swab with a patch until the patch comes through clean. Work from the breech forward and out the muzzle in order to avoid knocking any grit or powder residue into the action. Think youre done? Maybe; maybe not. Run a patch saturated with copper solvent. If there is any green or blue, scrub with a nylon brush (bronze brushes contain copper and the solvent will destroy them over time) the same as you did with the Hoppes No. 9, then run a patch until it comes through clean. On rifles that have been neglected, you might find several layers of fouling, alternating between powder/grit, then copper, which comes from the bullet as it travels down the barrel and scrapes against the rifling. When you are sure that your bore is completely clean, lightly oil a final patch, then run it through the bore in order to leave a very light film of oil. Some prefer to finish by running a dry patch through to catch any excess oil. Use a wood conditioner such as Pledge to remove dirt, oils and fingerprints from the stock, rubbing it in deeply to bring out the natural glow of the wood. If you use a leather sling, nows the time to saddle-soap it in order to keep it strong, pliable and free of cracks; also, make sure that the sling mounts and studs are secure. When youre finished, wipe everything down with a dry or silicone-impregnated cloth and reassemble the rifle. Check your scope base and/or mounts to make sure that they are tight and will not move. Check your sight picture through your scope to make sure that the crosshairs are aligned properly. A good way to check this is by hanging a weighted piece of colored yarn from the ceiling; also one from the butt of the rifle to make sure that it is truly vertical. Once you have established that the rifle is straight, look through the scope at the string hanging from the ceiling. You will immediately notice if the scope is tilted. Clean your scope lenses according to the manufacturers instructions. Check your supply of ammunition. If you need more, nows the time to get it, not the night before hunting season starts next year! If you load your own ammunition, check your stock of components: powder, primers, brass, and bullets. If you find yourself in need of anything, replenish your supply now. If your rifle needs any gunsmithing work, such as bedding the action or having the muzzle re-crowned, call your gunsmith now! The last thing a gunsmith needs is to have another rifle come into his shop in late September with the request, Can I have it in time for opening day? Finally, sharpen your knives! Hunting knives, butchering knives, any other knives; get them done now, so you know that theyre done; rather than finding out that you have a dull knife when youre standing over a freshly killed deer as the sun and the snow are starting to come down. By following these few housekeeping techniques, you will be able to put your rifle away for the winter knowing that the next time you want to use it, it will be ready to go without any hitches. Failure to do so might result in a missed hunting or shooting opportunity next year. ------------- TasunkaWitko - Chinook, Montana Helfen, Wehren, Heilen Die Wahrheit wird euch frei machen |
Posted By: TasunkaWitko
Date Posted: 13 December 2006 at 14:05
|
20 dec 06 ------------------------------------------------------------ ------- It is no secret that wild game is good eating, but it can be surprising to learn just how healthy wild game is. Phyllis Dennee, Nutrition Education Specialist with the Montana State University Extension Service, states, Without a doubt, when wild game or birds are harvested in a safe manner and care is taken both in the field and in the kitchen to handle and prepare the meat safely, it can be both a nutritious and tasty addition to your menu. Any meat is a substantial source for iron, protein and B vitamins; wild game is significant in that it is incredibly low in fat, including saturated fat. Following is a table showing comparative nutritional values:
Nutrient Comparison of Different Foods (3 oz. serving) Deer - 134 calories, 3 grams fat, 1 gram saturated fat Elk - 124 calories, 2 grams fat, 1 gram saturated fat Moose - 114 calories, 1 gram fat, 0 grams saturated fat Caribou - 142 calories, 4 grams fat, 1 gram saturated fat Pronghorn - 127 calories, 2 grams fat, 1 gram saturated fat Beef - 259 calories, 18 grams fat, 7 grams saturated fat Pork - 214 calories, 13 grams fat, 5 grams saturated fat Source: U.S. Department of Agriculture ------------- TasunkaWitko - Chinook, Montana Helfen, Wehren, Heilen Die Wahrheit wird euch frei machen |
Posted By: TasunkaWitko
Date Posted: 11 January 2007 at 15:34
|
27dec06 If youve always been a salt-and-pepper cook when it comes to fish and game, you might have been missing out. While these basic condiments will always be found in any kitchen, there are many spices and herbs that will really enhance and bring out flavors, sending your prepared dishes to a whole new level. With that in mind, dont be afraid to do a bit of experimenting. The key with any new flavoring or seasoning is to start with just a little and then adjust from there. The goal is to complement the flavor of your fish and game; not to overwhelm. Along with salt and pepper, four commercial seasonings that will always be welcome in our kitchen include Alpine Touch, Cavenders Greek Seasoning and Lawrys Seasoned Salt, which are all available locally. Those not living in As much as I praise the above seasoning blends, the fact remains that all are heavy in salt. Too much salt is unhealthy and can also overwhelm your food when cooking or at the table. For this reason, I advise that they be used sparingly and not combined with each other. To step away from salt and enjoy some outstanding variety, the fish-and-game cook should always keep handy an assortment of herbs and spices. Following is a list of condiments that should be found in any sportsmans kitchen. Some items, such as garlic and onion, can also be used fresh, depending on the intended use. A crushed or minced clove of garlic will turn any dish into a treat, as will a chopped onion. You will not use the listed items all of the time, but most of them will come in handy most of the time. A few will be rarely used, but when they are, you will be glad that you did. Garlic Powder Onion Powder Beef Bouillon Granules Chicken Bouillon Granules Paprika Poultry Seasoning Dry Mustard Lemon Pepper Tender-Quick Celery Salt Bay Leaf Chili Powder Crushed Red Pepper Cayenne Pepper Sage Cumin Coriander Basil Thyme Oregano Allspice Rosemary Savory Tarragon Marjoram Dill Chives Fennel Parsley Mint Saffron There are also a few liquid enhancements that will definitely come in handy in the sportsmans kitchen. Use them in marinades, sauces, gravies and as splash-on seasonings. Use them sparingly, working up to an optimum amount according to taste: Worcestershire Sauce Soy Sauce (low-sodium is an excellent choice to bring our flavor without crowding in more salt) Teriyaki Sauce Liquid Smoke Lemon Juice Lime Juice Red Wine Vinegar White Wine Vinegar Apple Cider Vinegar Bourbon Brandy Rum Beer Sherry ------------- TasunkaWitko - Chinook, Montana Helfen, Wehren, Heilen Die Wahrheit wird euch frei machen |
Posted By: TasunkaWitko
Date Posted: 11 January 2007 at 15:34
|
3 jan 07 For longer freezer-life and better versatility, it is recommended that burger be ground without fat, which can be added when thawed, if necessary. Fat is not always needed or wanted in ground meat; also from this, any fat will turn rancid in the freezer over time. In the long run, your burger will be healthier and taste better if you omit the fat until it is actually needed, and then only use as much as necessary. Cooking no-fat gameburger is not as difficult as it might seem, although some care is necessary. In sauces, chili, casseroles, meatloaf, meatballs and other similar dishes, it is actually easier to use; the ponderous process of degreasing burger by frying, then draining etc. is eliminated. There is no reason at all to add fat, only to eliminate it later. One place where no-fat burger can be a challenge is with the American hamburger. When making a burger in a pan, on the grill or over the coals, rub both sides of the burger with canola oil and do not pre-heat above medium. If you want to brown the burger toward the end of cooking time, turn the heat up for the last minute or two, but not before. Since the no-fat burger burns more easily, use lower heat than you normally would and keep an eye on it. Before long, cooking burgers using this method will be as natural as frogs in a pond. If the above process sounds too complicated or time-consuming, freshly-ground fat can be added to your burger just before cooking. Add 10-20%, depending on preference. Beef fat, such as steak trimmings, is the most common type; however, pork fat or a half-beef, half-pork combination can be an excellent choice. Due to suets greasy, waxy texture, it should not be a first choice. When grinding fat, grind it very fine and mix it in completely. Grinding is easiest when fat is partially frozen. ------------- TasunkaWitko - Chinook, Montana Helfen, Wehren, Heilen Die Wahrheit wird euch frei machen |
Posted By: TasunkaWitko
Date Posted: 11 January 2007 at 15:35
|
10 jan 07 When making burger, add spices to the meat before it is ground. Pre-seasoning enhances flavor and is worth a try. When you thaw your burger for use, it will be pre-spiced and flavorful, ready for any cooking job. In a large bowl holding 10 pounds of meat (chunked for grinding), lightly sprinkle garlic powder, freshly-ground pepper and a tablespoon of Worcestershire sauce. Grind your burger, package, label and freeze. The above formula makes a good initial spicing. If you find later that your taste buds call for more or less spicing, alter the amount to suit yourself or try different spices. Soy sauce, onion powder, paprika and oregano are prime candidates. Other suggestions include teriyaki marinade or commercial seasonings such as Carls, Dales, Alpine Touch or Cavenders Greek seasoning. Do not overdo spicing because, even frozen, flavors tend to get stronger over time. Your burger can easily be overwhelmed, especially with garlic. For the same reason, go easy with any liquid used for pre-seasoning. ------------- TasunkaWitko - Chinook, Montana Helfen, Wehren, Heilen Die Wahrheit wird euch frei machen |
Posted By: TasunkaWitko
Date Posted: 13 January 2007 at 13:32
|
17 January 2007 Making a big-game rolled roast is easy and increases the versatility of cuts such as flank, shoulder and bottom round.
Butterfly meat that is thicker than one inch by cutting into two thinner pieces; leave the meat connected at one edge. Open the butterflied meat so it lies flat. Roll the meat tightly with the grain, tucking in any irregular edges.
Tie rolled meat about an inch from the end that is farthest from you; use a 60-inch piece of kitchen string. Leave several inches at the short end of the string; you will need to tie the two ends of the string together after making loops around the meat.
Make a loop in the string, then twist the loop once to make a small braid (arrow). Slip the braided loop over the end of the meat closest to you, then slide the loop so it is about one inch from the string tied around the far end.
Snug up the first loop by pulling on the long end of the string, adjusting its length so the braid lines up with the original knot. The roast will look more attractive when it is served if all the braids are lined up along the top of the roast.
Continue making loops about an inch apart, snugging them up as you go. Tie on additional string if necessary. When you have made a loop about an inch from the close end (dotted line), slip the string underneath the roast so it comes out on the far side.
------------- TasunkaWitko - Chinook, Montana Helfen, Wehren, Heilen Die Wahrheit wird euch frei machen |


Posted By: TasunkaWitko
Date Posted: 13 January 2007 at 13:35
|
24 January 2007 The primary consideration before beginning any ice-fishing trek is ice thickness. As a general rule-of-thumb, you need three inches of solid ice for walking; four for ice fishing; five for walking on ice with a heavy load of gear; seven for a loaded snowmobile or ATV; eight for a car or light truck and twelve for a heavy truck. Listed below are a few circumstances that ice-fishermen (or women!) should be keep in mind before heading out to the ice: · New Ice vs. Old Ice Clear blue, freshly-formed ice is much stronger than old ice that has been partially-thawed or broken up, then refrozen. · · River Currents River ice normally has great variations in thickness; this is due to several factors, including channel depth, bottom content and current speed. · Springs Inflowing springs bring warmer, moving water that can create pockets of open water or thin ice. · Ice Cracks, Heaves and Ridges Anglers should avoid pressure cracks, heaves and ridges. Such areas form when layers of thickening ice expand, often leaving lines of open water that may expand as winds shift the ice. Ice anglers should also follow the Boy Scout Motto and BE PREPARED for the unexpected by carrying the following safety equipment: · Life Jacket Whenever possible, wear a Coast Guard-approved personal flotation device (PFD) when traveling on ice of questionable thickness. · Ice Chisel As you walk onto any frozen lake, check ice thickness by striking it firmly with a sharp chisel; if the chisel punctures or fractures the ice, immediately follow your path back to shore. · Ice Cleats Ice cleats, or creepers, consist of adjustable straps, belts, elastic bands or rubber overshoes supporting metal teeth. They attach to boots, allowing traction on smooth, slippery ice, helping anglers avoid injury-causing falls. · Ice Picks When venturing on ice of unknown thickness, carry a set of ice picks. If you do fall though the ice, you can use the picks to pull yourself from the water by sticking them into the ice. · Rope Carry a rope in a convenient location; if you do happen to fall through the ice, or if you see someone else fall through it will surely come in handy. ------------- TasunkaWitko - Chinook, Montana Helfen, Wehren, Heilen Die Wahrheit wird euch frei machen |
Posted By: TasunkaWitko
Date Posted: 18 January 2007 at 07:58
|
31 jan 07
Although fish are cold-blooded and slowed down metabolically in the winter, many species remain active beneath the ice; a few studies have even suggested some cold-water species (such as trout, salmon and char) may become more aggressive in winter than during the open-water season, feeding just as much or more than other periods of the year. Obviously, winter fish must adapt to their icy world, learning to continue moving, feeding and detecting danger. These things are accomplished through vision, hearing, smell, taste and a unique vibration-sensing series of cells exclu-sive to fish called the lateral line. Knowledge of these senses will certainly help improve your ice fishing; for example, experienced ice anglers avoid scraping portable ice shacks across the ice, especially when fishing shallow, clear water during first ice. They know that fish can be easily spooked by the unnatural sound and vibration. Many anglers use long rods when fishing clear, shallow water to decrease the chance of being seen. Some ice anglers add colored beads or spinners in order to add color and flash to their presentations, helping to attract fish by sight. Others use rattles to add fish-attracting vibrations, and almost all knowledgeable ice anglers have realized the importance of using live bait to add fish-attracting scent, taste and texture to their winter presentations. ------------- TasunkaWitko - Chinook, Montana Helfen, Wehren, Heilen Die Wahrheit wird euch frei machen |
Posted By: TasunkaWitko
Date Posted: 18 January 2007 at 08:00
|
7 feb 07
There are two basic ways to roast big game: with dry heat and moist heat. Dry-heat roasting includes high-and low-temperature methods. The most common method of moist-heat roasting is braising, which includes pot-roasting. Only prime cuts are candidates for dry-heat, high-temperature cooking. These include the top round, sirloin tip, loin and rump roasts. The tenderloin of an elk, moose or large deer may also be used. These cuts are naturally tender, and do not need long, slow cooking for tenderizing. For high-temperature cooking, select a roast between 2 and 5 inches thick, or a thinner piece you can roll and tie. First, brown the meat in hot fat, then roast it in a hot (400- or 450-degree) oven. With these high temperatures, roasts should be cooked only rare to medium. If cooked well-done, they dry out and shrink. Low-temperature roasting is another option for these same prime cuts; it is also necessary for such medium-tender cuts such as the bottom round and eye of round, which need longer cooking to ensure tenderness. Cover the meat with bacon or a sheet of beef or pork fat (available from your butcher), or baste it frequently. Cook it in a slow (300- to 325-degree) oven. With low heat, roasts may be cooked rare, medium or well-done. When roasting with dry heat, use a meat thermometer to check for doneness. A roast is rare when the internal temperature is 130-135 degrees; medium-rare at 135-140 degrees; medium at 140-145 degrees; medium-well at 150-155 degrees and well-done at 155-160 degrees. Remove the meat from the oven when it reads 5 degrees below the ideal temperature; it will continue to heat on the platter. It will slice better if you wait 10 to 15 minutes before carving. Moist heat tenderizes shoulder roasts and other tough cuts, and also works well with the bottom round and eye or round. Brown the roast in hot fat, then add liquid and flavoring and cover the pan tightly. Cook the meat until tender, on the stovetop or in a moderate (325- to 350-degree) oven. A slow-cooker or crock pot can also be used. When pot-roasting, add vegetables during the last hour or so of cooking. Braised meat is always served well-done. ------------- TasunkaWitko - Chinook, Montana Helfen, Wehren, Heilen Die Wahrheit wird euch frei machen |
Posted By: TasunkaWitko
Date Posted: 23 February 2007 at 08:41
|
14feb07
Winter poses many challenges for fish, and a primary one is forage availability. Fish are cold-blooded, so their metabolism is greatly slowed in winter, reducing their need for food. Yet at the same time, winter fish still must feed, and they do find forage from all parts of the food chain available, from phytoplankton and zooplankton to freshwater invertebrates such as freshwater shrimp and scuds, insect larvae and nymphs and worms. Also available is a variety of minnows and panfish fry to provide winter prey for fish beneath the ice. Often, winter fish feed on a preferred or the most readily-available forage, and consequently, are attracted to areas holding these food items. Walleyes feeding on small perch, for example, might be found on weedy flats or deep, hard-bottom structure. At the same time, perch feeding on plankton would probably be found in shallow weeds or suspended over open water, while those feeding on bloodworms would likely hold in deep mud flats. ------------- TasunkaWitko - Chinook, Montana Helfen, Wehren, Heilen Die Wahrheit wird euch frei machen |
Posted By: TasunkaWitko
Date Posted: 23 February 2007 at 08:48
|
21feb07
Not long ago, we discussed big game and game bird stock for use in various recipes. The same basic idea applies to fish; some flesh always remains after making steaks or fillets. Instead of wasting it by throwing it away, try making a richly-flavored fish stock by simmering the skeleton and head. To make fish stock: Remove the gills, guts, fins and tail with kitchen shears or a sharp knife. Scale the head, if necessary. Rinse the head under cold, running water. Wipe off slime with paper towels. Cut the skeleton into small pieces that fit easily into a pan. Cover the skeleton and head with water. Add a dash of salt and pepper. Heat to boiling, then reduce heat. Simmer for 30 minutes. Remove head and bones. Strip the cooked flesh from the bones and head; discard the bones. Freeze or refrigerate the flaked fish in plastic containers or freezer bags. Strain the cooked fish stock through a double layer of cheesecloth to remove any bones and scales. Return stock to pan. Boil the stock over high heat to reduce it by half for storage; cool. Freeze or refrigerate in plastic containers or pint-sized ZipLock bags. Label as fish stock. The flaked cooked fish can be used for fish chowder, quiche, salad, cakes, loaf, patties or sandwich spread. Store fish in plastic containers in the refrigerator no longer than 2 days, or in the freezer. Use the remaining fish stock as a foundation for chowder, sauces or soups. Refrigerate or freeze the stock. Fish stock frozen in 1- or 2-cup quantities is the easiest to thaw. ------------- TasunkaWitko - Chinook, Montana Helfen, Wehren, Heilen Die Wahrheit wird euch frei machen |
Posted By: TasunkaWitko
Date Posted: 23 February 2007 at 08:54
|
28 feb 07
Regrettably, this will probably be my last Quick Tip due to the fact that I am leaving BCJ. I will try to continue the recipes section of this page as long as possible, but as of today it is out of my hands. For information and how-to on any number of outdoors subjects, I sincerely recommend checking in with the crowd at my website, www.baitshopboyz.com. If the answer isnt already there, we can provide it! I will leave you with a tip that was one of my first tips when I began this page: take a kid fishing; or hunting, or camping, or hiking, or even for a walk on a trail somewhere. Boys or girls, toddlers or teenagers; it doesnt matter. I have been blessed with four boys who, at the time of this writing, range in age from 16 down to four. The times that I have spent with them outdoors are the best memories of my life, and I wouldnt trade a single one of those memories for any amount of wealth in the world. Just as I have fond memories of fishing, hunting, camping and otherwise spending time outdoors with my father, I hope that when my boys grow up, they will recall the times that they spent on the lake or in the field with their dad, and will continue the tradition with their own children. These days, it is all too easy to have a ready excuse not to do something. Work can interfere, or the price of gas might seem too high. We might have some important project that needs to be completed, and it is easy to say, We can go next week, or, Im really tired after working all week. On top of that, kids seem to always be doing their own thing, or watching TV, or playing with any number of hand-held electronic gizmos. This may all be true, but as an excuse, it falls flat. Spending time with your kids outdoors doesnt need to be expensive, and it doesnt need to take all day. Some of the best times I had with my boys while fishing, hunting or walking in the forest only took a couple of hours or, at most, a morning or afternoon. The memories alone are worth it, but I also firmly believe that such time builds character, promotes self- reliance, and ultimately brings families closer together. There is a huge shortage of all the above these days. Make the time. Shut off the TV. Put the PSP on a shelf. Go outside. If you dont fish or hunt, no big deal; go camping or for a hike! Montana is too beautiful to miss; were lucky to live here. Be sure to take a camera along on your trips outdoors! With my three older boys, we never seemed to have a camera when we were outdoors. Other times, we had a camera, but never got the film developed for whatever reason. Trips to the Bear Paws, to Fresno Reservoir, to the streams and lakes of the northern Black Hills and to the six mountain ranges surrounding Lewistown are all lost, except in memory. In the last three years or so, however, weve had a digital camera everywhere and are able to go back in time simply by opening an album or double-clicking on a computer file folder. Digital cameras make saving memories especially easy and are affordable enough nowadays that theres really no excuse not to have a camera with you every time you are afield. During my time here you have all seen our familys memories of some great days outdoors, including a little boys first fish and a young mans first big buck. I strongly encourage you to load up your camera and do the same; it wont be long before theyre off in college or somewhere! Personal loss these recent years has taught me that every day is a gift, and that when it is all said and done, no amount of career advancement or material gain is worth even one minute of time spent with my boys. It has been said that no one, on his or her deathbed, has wished that they would have spent more time at work. My time for such reflections is hopefully many decades away, but when it does come, I intend to have many happy memories with no regrets. I would like to give my wholehearted thanks to everyone who has supported this page during my time at BCJ. Through this page, I have been able to promote two of my favorite pastimes: cooking and the outdoors sports. Thanks to all of you for reading and for sending recipes, tips, pictures, comments, questions and suggestions. It is my hope that you all continue to enjoy time with your families as much as I intend to enjoy time with mine. Anyone wishing to keep in touch can reach me at the email address and/ or website below. Thank you all and may God bless you and your families. Never forget to pray for our troops; no matter how you feel about the war, they deserve our unwavering support. Ill see you out in the field or on the lake ~ Ron fischer@mtintouch.net www.baitshopboyz.com ------------- TasunkaWitko - Chinook, Montana Helfen, Wehren, Heilen Die Wahrheit wird euch frei machen |