Thank you, from the BaitShop Boyz! |
How many coats? |
Post Reply 
|
| Author | |
The_Mountaineer 
.416 Rigby 

** West BY-GOD Virginian! ** Joined: 02 July 2003 Location: United States Status: Offline Points: 2653 |
 Post Options Post Options
") Thanks(0) Thanks(0)
 Quote Reply Quote Reply
 Topic: How many coats? Topic: How many coats?Posted: 13 February 2011 at 13:53 |
|
Got a DIY project going on as we speak. Old P.O.S. single shot 12 ga., basically an off-brand H&R topper style. Fixing it on the cheap and will supply pics when its finished. So far, got the DIY metalwork done - i.e., re-bluing w/ birchwood casey cold blue (yeah, yeah, I know the Brownell's Oxpho is better but this is something I'm just cutting my teeth on). Anyways, got the walnut sanded and cleaned up nice. Already been rubbing Birchwood Casey's standard gun stock oil on it. Going for a nice shiny appearance but the instructions say to lightly buff with steel wool. This knocks the shine down immediately. So, I quit doing that. I'm on my 3rd rub down of stock oil. Directions say to keep doing it till the wood is sealed and finish is achieved. Also says to buy their stock wax? Question: How many coats should I expect to put on this? Allowing at least 24 hrs between hand-rubbed coats using nothing more than my fingers. Also, should I go with the stock wax for a high sheen or should the standard oil work just fine? |
|
|
Paritur pax bello - Peace is obtained by war.
|
|
 |
|
|
Wing master
Administrator

AKA StraightShooter Joined: 10 June 2003 Location: United States Status: Offline Points: 8029 |
Post Options
Thanks(0)
Quote Reply
Posted: 13 February 2011 at 14:02 |
|
I refinished a stock on a Model 70 Featherweight for my daughter. I put 20 coats on it. It looks good, Very good. That being said, I don't think it needed that many coats. I think 10 would have been ok, but this was a gun I had rebarreled for my daughters first hunting rifle and wanted it to be perfect. When I was done I put carnuba car wax on it. I guess it worked. It looks good. Wing master |
|
|
I have always considered myself to be quite the bullshitter, But ocasionally it is nice to sit back and listen to a true professional......So, Carry on.
|
|
|
|
|
Rockydog
Administrator

Joined: 13 June 2003 Location: United States Status: Offline Points: 3191 |
Post Options
Thanks(0)
Quote Reply
Posted: 13 February 2011 at 14:17 |
|
Montaineer, The last one I did I used 50/50 oil and mineral spirits for the first 2 coats applied with automotive type wet or dry sand paper. Working it up until I had a little walnut sludge going. Then I hand rubbed it across the grain and finally wiped off the excess across the grain. Then I did a couple of coats with 75/25 oil and ms. and sandpaper. Then a couple of coats with 100% oil using the paper. Always sanding with the grain and wiping across the grain to fill pores. After those six coats I rubbed straight oil on by hand for two more coats wiping the first coat and not wiping the second. My stock came out very shiny but has a few bubbles in the finish. I suspect dust settling on the finish as it dries. Almost forgot. 48 hours between coats. RD
Edited by Rockydog |
|
|
When the people fear their government, there is tyranny; when the government fears the people, there is liberty.
Thomas Jefferson |
|
|
|
|
Irish Bird Dog
.416 Rigby

Too many Joined: 01 March 2009 Location: Midwest Status: Offline Points: 5574 |
Post Options
Thanks(0)
Quote Reply
Posted: 13 February 2011 at 17:34 |
|
Sounds like a good project Mountaineer..I did same to an old Win M37 SS 50 yrs ago & still have that shotgun....they used good walnut on plain guns back then....I used Tru-Oil for my stock finish, applied with bare hands, then rubbed with pumice and gun oil & more Tru-Oil by hand....several coats til it was what looked good to me. Drying time was however long it took me to get back to the project....did use B/C gun stock wax for final coat. But it can wear off in wet weather conditions....snow, rain....where you carry the stock in your hand....needs reapplication over the years....now days I don't really want a "shine" but would rather have a "satin" type non shiny look so as not to be so reflective to game.
|
|
|
Irish Bird Dog
NRA Life/Endowment 2nd Amendment Supporter |
|
|
|
|
The_Mountaineer
.416 Rigby
** West BY-GOD Virginian! ** Joined: 02 July 2003 Location: United States Status: Offline Points: 2653 |
Post Options
Thanks(0)
Quote Reply
Posted: 15 February 2011 at 00:38 |
|
Thanks for the input fellas! The final product, even if I quit now, will be a lot better than when I started out. Dang thing had the recoil pad duct taped on if that tells you anything It ain't even my gun! A cousin of mine asked if I wanted to work on it. I said I would use it as a trial learning project and promised nothing fancy or professional. He didn't care, "anything's better than what it is now!" With that I sanded everything and did the cold bluing and recoil pad installation (I did cheat and have a gunsmith do the recoil pad). Now I'm at the wood finishing stage and since it is a better piece of walnut than a lot of new guns have as Bird Dog pointed out, I wanted that to look pretty good. Asked my gunsmith about it, as he's done some stocks for me in the past, and he used nothing but Birchwood Casey Tru Oil. Didn't ask about the wax though. His results were great and shiny just like I'm going for. So, guess I'll keep working on the stock as is. Think I'll shoot for at least a dozen coats if not more. Also been swirling the oil in then following up along the grain. Directions say to always work with the grain but I feel I'll just miss some spots. Might end up knocking the finish down with some steel wool since that might help seal the stock as Rocky done with the sanding. Plus, it might even out the finish, no bubbles. I'll keep ya posted but I'll be working on this a bit longer I suspect! |
|
|
Paritur pax bello - Peace is obtained by war.
|
|
|
|
|
Wing master
Administrator
AKA StraightShooter Joined: 10 June 2003 Location: United States Status: Offline Points: 8029 |
Post Options
Thanks(0)
Quote Reply
Posted: 15 February 2011 at 15:07 |
|
If you knock down with steel wool between coats, be sure to get ALL of the little steel wool dust off before putting the next coat of oil on. If you dont it will be in the finish. Wing master |
|
|
I have always considered myself to be quite the bullshitter, But ocasionally it is nice to sit back and listen to a true professional......So, Carry on.
|
|
|
|
|
CB900F
Administrator

Honor, Integrity Joined: 10 June 2003 Location: Eritrea Status: Offline Points: 8857 |
Post Options
Thanks(0)
Quote Reply
Posted: 15 February 2011 at 15:50 |
|
Moutaineer; I'm not the woodworking guy on this site. That's fer damn sure! But, I seem to recall that rottenstone is what you want to use instead of steel wool. 900F |
|
|
Birth certificate!? He don't need no steenkink birth certificate!!
|
|
|
|
|
Irish Bird Dog
.416 Rigby
Too many Joined: 01 March 2009 Location: Midwest Status: Offline Points: 5574 |
Post Options
Thanks(0)
Quote Reply
Posted: 15 February 2011 at 18:43 |
that's what I said....only I called it pumice..... = rottenstone.......900F, YOU must be an old cogger to know what rottenstone is  |
|
|
Irish Bird Dog
NRA Life/Endowment 2nd Amendment Supporter |
|
|
|
|
The_Mountaineer
.416 Rigby
** West BY-GOD Virginian! ** Joined: 02 July 2003 Location: United States Status: Offline Points: 2653 |
Post Options
Thanks(0)
Quote Reply
Posted: 16 February 2011 at 13:53 |
|
Good idea. Seems that on my 3rd coat I'm picking up some grit. Suppose I can always take it out with something else, perhaps pumice. Still, directions be directions and I've been following them since I really don't know WTH I'm doing! As directions say, lightly buff w/ steel wool and then wipe clean. Directions ain't working to my satisfaction so we'll see. Wonder if anybody has pumice locally? |
|
|
Paritur pax bello - Peace is obtained by war.
|
|
|
|
|
Irish Bird Dog
.416 Rigby
Too many Joined: 01 March 2009 Location: Midwest Status: Offline Points: 5574 |
Post Options
Thanks(0)
Quote Reply
Posted: 16 February 2011 at 17:38 |
|
"Wonder if anybody has pumice locally?"
Paint store or hardware store?? |
|
|
Irish Bird Dog
NRA Life/Endowment 2nd Amendment Supporter |
|
|
|
|
CB900F
Administrator
Honor, Integrity Joined: 10 June 2003 Location: Eritrea Status: Offline Points: 8857 |
Post Options
Thanks(0)
Quote Reply
Posted: 17 February 2011 at 13:42 |
|
Mountaineer; Or Brownell's, part #083-039-008. Eight ounces of the stuff, shipping included will be under a twenty dollar bill. They call it rottenstone too. Ipso-facto, Brownell's must be older than dirt.
|
|
|
Birth certificate!? He don't need no steenkink birth certificate!!
|
|
|
|
|
Kingpin
.416 Rigby
aka Old IronSides Joined: 01 July 2003 Location: United States Status: Offline Points: 11716 |
Post Options
Thanks(0)
Quote Reply
Posted: 03 March 2011 at 11:18 |
|
Not known for being a wood man, you can wet sand it if you thin some of your oil to almost water. Wet sanding fills pores quick, Don't use anything finer than 320 grit, and let it dry before attacking it with 0000 steel wool between coats. It works fine and if more polish is required after the pores are filled, use a good grade of automotive rubbing compound.This will smooth and shine it to an exhibition grade shine. Just be careful to use a soft cloth when using the compound, and be VERY careful not to rub through the finish you applied. You asked how many coats, probably, about 6-8 coats as long as you wet sand it between coats. One more thing, I hope you did all your sanding while it was on the gun and before you cold (eeeew) blued it. Lots of guys try that trick on nothing but the stock, but all the corners are broken and very ill fitting where the stock dips below the metal AND recoil pad....................................Kingpin
|
|
|
There are times when a normal man must, spit in his hands, hoist the black flag, and begin slitting throats.
|
|
|
|
|
Peterbh
.416 Rigby

Joined: 31 March 2005 Status: Offline Points: 1008 |
Post Options
Thanks(0)
Quote Reply
Posted: 26 March 2011 at 14:55 |
|
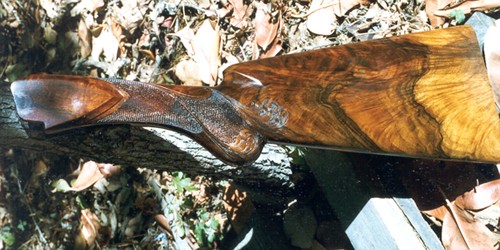
Hope this copies: Gunstock Finishing
by Peter B. Hiatt
|
|
|
|
|
|
|
Guests
Guest 
|
Post Options
Thanks(0)
Quote Reply
Posted: 26 March 2011 at 15:21 |
|
Peter that doesn't look like and H&R???? Beautiful |
|
|
|
|
Peterbh
.416 Rigby
Joined: 31 March 2005 Status: Offline Points: 1008 |
Post Options
Thanks(0)
Quote Reply
Posted: 26 March 2011 at 18:05 |
|
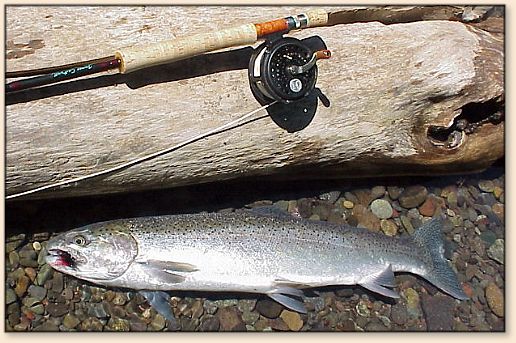
It is for a Browning Superposed 20 ga. It is a grafted piece of Claro and English walnut. Here is another piece

|
|
|
|
|
|
|
|
Post Reply
|
|
 Tweet
Tweet
|
| Forum Jump | Forum Permissions You cannot post new topics in this forum You cannot reply to topics in this forum You cannot delete your posts in this forum You cannot edit your posts in this forum You cannot create polls in this forum You cannot vote in polls in this forum |


 Topic Options
 CB900F wrote: