Fly Fishing Patterns
Printed From: The BaitShop
Category: Fishing
Forum Name: Gone Fishin'
Forum Description: Discuss freshwater, saltwater, ice fishing and fly fishing here. Where do you go, what do you catch, and how do you catch it?
URL: http://www.baitshopboyz.com/forum_posts.asp?TID=17643
Printed Date: 26 March 2026 at 17:52
Software Version: Web Wiz Forums 11.10 - http://www.webwizforums.com
Topic: Fly Fishing Patterns
Posted By: TasunkaWitko
Subject: Fly Fishing Patterns
Date Posted: 01 January 2008 at 08:19
|
From The Art of Fly Tying:

Designed to float on the surface, a dry fly is usually tied on a light-wire hook, and balances on the fibers of its tail and hackle.
Dry flies make up the largest and most diverse category of fly patterns. It includes attractors tied in bright colors; impressionistic searching patterns; and imitators, which mimic the adult forms of various aquatic insects, such as mayflies, caddisflies, midges and stoneflies.
Dry flies are designed primarily for fishing trout, which can be frustratingly selective in their feeding habits. This explains why flytiers have develped hundreds of dry-fly patterns.
When tying a dry fly to match a natural, consider size first. A pattern that is much larger than the natural may spook the fish.
Color is also important. Try to match that of the natural as closely as possible. Some materials, such as dubbing, will change color when they get wet. It's a good idea to choose a body material a few shades lighter than the color of the natural.
Other considerations are durability, buoyancy and visibility to the angler.
Flies made with hair wings and tails float well and stand up to rough water better than those with feather wings and tails.
Treating your flies with a floatant helps them stay on the surface longer. Waterproofers can be sprayed on newly tied flies for added flotation.
Flies that float high on the water are easier for the fisherman to see than those in the surface film. For low-riding flies, such as parachutes, use a light-colored or fluorescent wing material. In low-light situations, switch to a light-colored fly.
|
-------------
TasunkaWitko - Chinook, Montana

Helfen, Wehren, Heilen
Die Wahrheit wird euch frei machen
|
Replies:
Posted By: TasunkaWitko
Date Posted: 01 January 2008 at 08:19
|
From The Art of Fly Tying:
|
A fly angler who took up the sport twenty years ago may never have fished a tradtional wet-fly pattern. The fancy patterns of the late 1800s and early 1900s have all but disappeared from most fly shops and catalogs. Yet wet flies were the most popular patterns in America until the 1950s.
Traditional wet flies had colorful names like "Queen of the Waters" and "Wickham's Fancy" and were meant to be fished below the surface to suggest a variety of drowned mayflies. Most were attractor patterns with plenty of flash and color.
Wet flies went out of fashion as more realistic patterns, such as nymphs and dry flies, gained popularity. But wet didn't disappear entirely, and for good reason: they still catch fish.
Today, wet flies are making a comeback. Traditional wet flies like Parmachene Belle and Wooly Worm remain popular with flytiers and anglers, and the soft-hackle fly, a wet-fly/nymph hybrid developed in England, has found wide acceptance in America.
Though closely related, traditional wet flies and soft-hackle flies differ somewhat in the way they are tied. Wet flies often resemble dry fly patterns with hackle and wings sloping back over a dubbed body.
Soft-hackle flies seldom have wings and are more sparsely tied. They have a tightly dubbed body, and hackle made of partridge, hen or other soft-fibered feathers.
Wet and soft-hackle flies are most effective when fished unweighted on a dead-drift, or as a dropper fly rigged several inches below a dry.
Another type of wet fly is the salmon fly. These complex and beautiful fly patterns are related to both wet flies and streamers, but mnake up a distinct fly category.
Some salmon flies have elaborate and colorful feather wings. Called fully dressed, these patterns rarely see water. They are usually tied for the purpose of display and feature married wings. Often made of exotic and hard-to-find materials, fully-dressed flies are considered the pinnacle of the flytier's art.
|
-------------
TasunkaWitko - Chinook, Montana
Helfen, Wehren, Heilen
Die Wahrheit wird euch frei machen
|
Posted By: TasunkaWitko
Date Posted: 01 January 2008 at 08:20
|
From The Art of Fly Tying:
|
Designed to be fished below the surface, a nymph is usually tied on a hook that is slightly heavier than a dry-fly hook, and is often productive even when fish do not appear to be feeding.
Nymphs make up the second largest fly-pattern category, next to dry flies, and are an important part of any flytier's repertoire.
Anglers use the term "nymph" when referring to any of the larval, pupal and nymphal stages of aquatic insects. In fly tying, the term refers to imitations of these forms, or to imitations of crustaceans, such as scuds, shrimp and sometimes crayfish.
Nymphs are effective not only for trout, but also for panfish and bass. With immature aquatic insects and crustaceans making up a significant portion of the diet of most gamefish, as much as 90 percent in the case of trout, it's not surprising that nymphs work so well.
Not all nymphs are exact imitations. Some, called searching patterns, are impressionistic, suggesting a number of food items rather than a specific one. These patterns are a good choice when it is difficult to determine exactly which naturals the fish are eating.
Nymph patterns range in size from tiny imitations of midge larvae to large stonefly patterns. They can be tied using natural and synthetic materials in a variety of colors, shapes and sizes, depending on the naturals.
Nymphs should be fished at the depth that fish are taking the naturals. When fish are feelding deep, use a weighted nymph or add a split shot to your leader a few feet from the fly. Use an unweighted nymph for fishing just below the surface.
|
-------------
TasunkaWitko - Chinook, Montana
Helfen, Wehren, Heilen
Die Wahrheit wird euch frei machen
|
Posted By: TasunkaWitko
Date Posted: 01 January 2008 at 08:20
|
From The Art of Fly Tying:
|
A streamer is designed to imitate a baitfish rather than an insect. Traditional streamers have hackle-feather wings that extend back, or "stream," over the body of the fly.
Another popular type of streamer is the bucktail, which has hair wings, making it more durable.
Both types can be extremely productive for salmon, trout, steelhead, bass and even pike.
Some streamer patterns, called imitators, closely resemble a real baitfish. Others, called attractors, use flash, color and movement to draw a strike.
Streamers are generally tied on extra-long hooks to help give them the long profile of a baitfish.
Streamers and bucktails are often weighted with lead wire, and are fished deep by casting them with a weighted line, or trolling.
Streamers can be retrieved upstream or down, or across the current with a jerky, twitching retrieve to simulate a baitfish.
Fly-tying courses often begin with a steamer or bucktail pattern. Their large size and simple construction make these patterns easy to tie.
Many anglers believe that eyes increase the effectiveness of a streamer. Dab on eyes with a small dowel dipped in white acrylic paint. Use a smaller dowel to dab on the black pupil.
|
-------------
TasunkaWitko - Chinook, Montana
Helfen, Wehren, Heilen
Die Wahrheit wird euch frei machen
|
Posted By: TasunkaWitko
Date Posted: 01 January 2008 at 08:21
|
From The Art of Fly Tying:
|
Anglers across the country are discovering the thrill of catching bass, pike and even muskie on big artificial flies.
Most bass and pike flies imitate some kind of aquatic foods, such as minnows, frogs, crayfish, mice, leeches, worms and, occasionally, large insects. Other patterns rely on flash, color and noise to pprovoke an aggressive response.
The keys to tying effective bass and pike patters are size, color and action.
SIZE. Select a fly suitable for the size fish you are after. Smallmouth bass generally prefer 2- to 3-inch flies; largemouth, 3- to 5-inch. Pike and muskie, which often pursue baitfish one-fourth their own length, will often take a fly up to ten inches.
COLOR: In general, flies for clear water should be more subdued than those for murky water. But many fly fishermen prefer white or yellow for surface flies; blues and violets for subsurface. Don't be afraid to experiment with a variety of color combinations to find one that works best for you.
ACTION. Spun deer hair can be trimmed to produce a popping or gurgling sound when retrieved with a quick, short stripping action. Surface patterns are often tied with lifelike legs and tails to imitate mice, frogs or other aquatic foods.
Other patterns are designed to dive below the surface when retrieved, mimicking a struggling or injured minnow. Subsurface patterns are often tied with long tails made of marabou, rabbit strips, hackle feathers or synthetic hair that pulses like fins or gills under water.
|
-------------
TasunkaWitko - Chinook, Montana
Helfen, Wehren, Heilen
Die Wahrheit wird euch frei machen
|
Posted By: TasunkaWitko
Date Posted: 03 January 2008 at 16:20
|
From The Art of Fly Tying:
|
When the hot summer winds blow across the water, trout feed heavily on the increasing numbers of land insects, or terrestrials, that accidentally fall, or are blown into, lakes and streams. Then, a well-tied terrestrial imitation can be extremely productive.
But don't be afraid to try a terrestrial pattern in early and late season as well. Terrestrials such as ants and beetles are a staple in a trout's diet throughout the season, and their imitations can be used as searching patterns when no insects are emerging.
Even during a heavy mayfly hatch, some trout will rise to terrestrials that drift into their feeding window.
Cast a terrestrial along the bank or shoreline. Twitch it occasionally to make it look like a struggling insect. This will draw fish from farther away than will a fly drifting motionless.
Success with terrestrials imitaitions isn't limited to trout fishing. Panfish and bass will readily take a hopper or cricket pattern twitched on the surface of a lake or farm pond.
Terrestrial types include:
Ants. These small insects make up a large percentage of the natural terrestrials that find their way into the water. Trout feed on ants whenever they are available, making imitations effective from early spring thought late fall.
Hoppers and Crickets. Although they represent only a small percentage of a fish's diet, hoppers and crickets are commonly taken by trout, panfish and bass, especially in late summer. Many terrestrial patterns are tied complete with legs.
Beetles. The opportunistic trout will rise to a beetle even in winter, making beetle imitations year-round producers. Imitations are tied using deer hair or foam bodies, often with a small piece of fluorescent yarn.
|
-------------
TasunkaWitko - Chinook, Montana
Helfen, Wehren, Heilen
Die Wahrheit wird euch frei machen
|
Posted By: TasunkaWitko
Date Posted: 05 January 2008 at 06:22
|
Parmachene Belle (Parmacheene Belle)
From Herter's Professional Fly Tying and Tackle Making Manual:
|
Invented by Attorney Henry P. Wells in 1879 and named after Parmacheene Lake in Maine. The fly is supposed to be an imitation of the belly fin of a brook trout. Mr. Wells is also noted for designing grips for fly rods.
- Tail - Red and white rooster hackle fibers or small sections of red and white goose wing quill feathers
- Body - Yellow floss
- Ribbing - Medium flat silver tinsel
- Hackle - Red and white rooster neck hackle wound together at the same time
- Wings - White goose or duck secondary wing quill feathers with a small section of the same, but in red, on each side of the wing.
|
From The Art of Fly Tying:
- Hook - TMC 3761; 10-16
- Thread - Black 6/0
- Tail - Red and white hackle fibers, mixed
- Rib - Fine gold flat tinsel
- Body - Yellow floss
- Hackle - Red hen and white hen, mixed
- Wing - Married sections of red and white duck quill segments
|
Here is an example:

The original version by Wells shows that he preferred the wings to be split rather than married:

-------------
TasunkaWitko - Chinook, Montana
Helfen, Wehren, Heilen
Die Wahrheit wird euch frei machen
|
Posted By: varmintcaller
Date Posted: 06 January 2008 at 08:08


|
|
Brown Woolly Bugger
By Dave Hughes
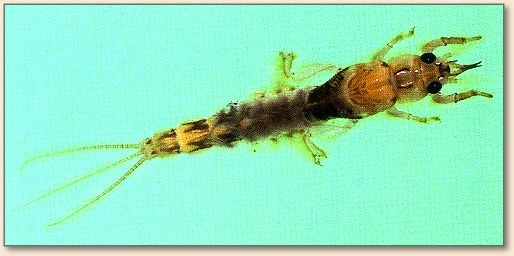
The largest mayflies fall into the burrowing category. Some reach two inches long when they're mature, and make quite a mouthful for any trout. Many, such as the eastern green drake (Ephemera guttalata) and midwestern and western Hex (Hexagenia limbata) have two- or three-year life cycles, meaning the nymphs are out there all year long in one instar or another. Trout always feed on them when given a chance at them.
 Burrowers, as their name implies, either dig tunnels into mud, marl, and clay bottoms, or work their way into sand or gravel bottoms until they're out of sight. They come out to forage along the bottom only at night, which limits the time they're available to trout, and also the time that they're useful as the basis for imitations, to the hours of darkness.
 When mature and ready to emerge, burrower nymphs leave their tunnels or free themselves from the sand and gravel, then swim boldly to the top, where the nymphal skin splits in the surface film and the dun escapes. This, like their feeding, usually happens after dark, though on a gloomy summer afternoon, say a day with thunderheads lowering and darkening the sky, they might begin emerging two to three hours before dark.
Though many more imitative dressings have been devised for these large nymphs, it's difficult to beat a Woolly Bugger in the appropriate size and color to resemble the natural. The marabou tail undulates in the water, and represents the swimming motion of the natural more realistically than the most exact but lifeless imitation might. With any insect that swims briskly and emerges in poor light, it's more important to copy the movement than it is the precise shape.
When mature and ready to emerge, burrower nymphs leave their tunnels or free themselves from the sand and gravel, then swim boldly to the top, where the nymphal skin splits in the surface film and the dun escapes. This, like their feeding, usually happens after dark, though on a gloomy summer afternoon, say a day with thunderheads lowering and darkening the sky, they might begin emerging two to three hours before dark.
Though many more imitative dressings have been devised for these large nymphs, it's difficult to beat a Woolly Bugger in the appropriate size and color to resemble the natural. The marabou tail undulates in the water, and represents the swimming motion of the natural more realistically than the most exact but lifeless imitation might. With any insect that swims briskly and emerges in poor light, it's more important to copy the movement than it is the precise shape.
Materials for the Brown Woolly Bugger:
Hook: 3X long, size 6 - 12.
Weight: 15-20 turns lead wire.
Thread: Brown 6/0.
Tail: Brown marabou with a few strands of red Krystal Flash.
Hackle: Brown hen, palmered over body.
Body: Brown chenille.
Tying Instruction for the Brown Woolly Bugger:

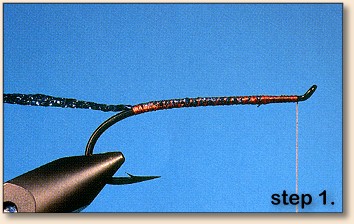
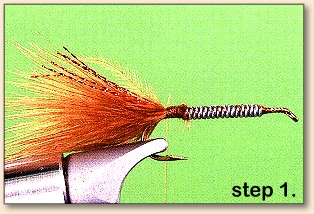
Step 1: Fix hook in vise, layer mid-shank with lead wire, and layer working thread to the bend. Measure a clump of marabou the full length of the hook, and tie it in at the bend of the hook. You can also tie the marabou long, then pinch it off at the right length. Tie in 4 to 8 strands of Krystal Flash, just short of the marabou length.

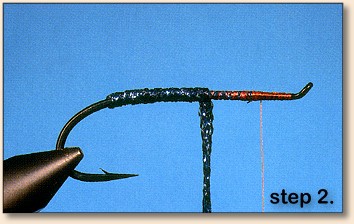
Step 2: Tie in the body chenille at the bend of the hook. Select a hackle with fibers about two times the hook gap. Tie it in by the tip, with the concave side against the body. Leave room for one turn of chenille behind the hackle tie-in point. Take your thread forward to the hook eye.

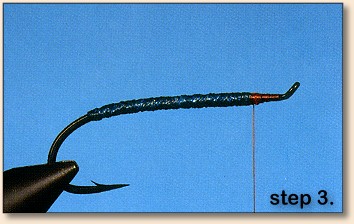
Step 3: Take a turn of chenille behind the hackle, then wind the body forward in front of the hackle to the hook eye. Tie it off and chip the excess.

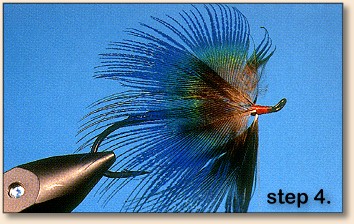
Step 4: Wind the hackle forward in evenly-spaced turns to the hook eye. The hackle fibers should tend to flare back, not forward. Tie off the hackle stem, clip the excess, form a neat thread head, and whip-finish the fly.
I |
-------------
Molon Labe "Come take Them"
|
Posted By: varmintcaller
Date Posted: 06 January 2008 at 08:19
Materials for the Peacock Spider
Hook: Size 2/0-2, salmon.
Thread: Red or reddish brown.
Body: Peacock blue Diamond Braid.
Hackle: Peacock breasts feathers.
Head: Thread.
Tying Instruction for the Peacock Spider:
Step 1: Place the hook in the vise and apply a thread base that starts at the eye and stops at the end of the shank. On this hook we identify "the end of the shank" as the position directly above the throat of the barb. Select a 10-inch section of peacock blue Diamond Braid and tie it to the top of the hook while advancing the thread back to the hook eye.
Step 2: Wrap the thread back from the eye to the start of the looped platform and leave it there. Wrap the Diamond Braid forward forming the body. Notice the material has a tendency to twist, but it is quite easy to place a counter twist as each turn of the diamond Braid is applied to the hook thus producing a nice, smooth body.
Step 3: Continue wrapping the body material forward to meet the thread. Tie it off and trim away the waste end.
Step 4: Prepare two (size 2 hook) or three (size 2/0 hook) peacock breast feathers by stripping away the fuzzy material at the base of the stems. Tie the feathers to the shank, staggering their position; in this case we are using a 2/0 hook so they are placed on the near side, top, and far side of the hook. This positioning is what surprised us. John's flies always looked so neat we just assumed the hackle was constructed from one feather only!
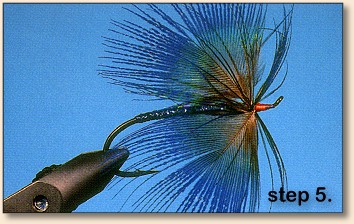
Step 5: Start with the offside feather and wrap it one turn around the hook. We suggest working that feather behind and in front of the other two while making the wrap. Tie it off and remove any waste end.
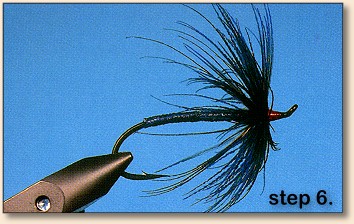
Step 6: Now select the top feather and wrap it the same as described in Step 5. Tie it off and trim the waste end. Wrap the last hackle in front of the other two, tie it off, and remove the excess. Build the thread head tight against the hackle to force all three feathers together. Whip finish and remove the thread. Apply a coating of Aqua Head or cement to the whip finish.
-------------
Molon Labe "Come take Them"
|
Posted By: TasunkaWitko
Date Posted: 06 January 2008 at 08:24
|
Here's a great one from VarmintCaller~
--------------------------------------------------

Brown Woolly Bugger
By Dave Hughes
The largest mayflies fall into the burrowing category. Some reach two inches long when they're mature, and make quite a mouthful for any trout. Many, such as the eastern green drake (Ephemera guttalata) and midwestern and western Hex (Hexagenia limbata) have two- or three-year life cycles, meaning the nymphs are out there all year long in one instar or another. Trout always feed on them when given a chance at them.
Burrowers, as their name implies, either dig tunnels into mud, marl, and clay bottoms, or work their way into sand or gravel bottoms until they're out of sight. They come out to forage along the bottom only at night, which limits the time they're available to trout, and also the time that they're useful as the basis for imitations, to the hours of darkness.

When mature and ready to emerge, burrower nymphs leave their tunnels or free themselves from the sand and gravel, then swim boldly to the top, where the nymphal skin splits in the surface film and the dun escapes. This, like their feeding, usually happens after dark, though on a gloomy summer afternoon, say a day with thunderheads lowering and darkening the sky, they might begin emerging two to three hours before dark.
Though many more imitative dressings have been devised for these large nymphs, it's difficult to beat a Woolly Bugger in the appropriate size and color to resemble the natural. The marabou tail undulates in the water, and represents the swimming motion of the natural more realistically than the most exact but lifeless imitation might. With any insect that swims briskly and emerges in poor light, it's more important to copy the movement than it is the precise shape.
Materials for the Brown Woolly Bugger:
- Hook - 3X long, size 6 - 12
- Weight - 15-20 turns lead wire
- Thread - Brown 6/0
- Tail - Brown marabou with a few strands of red Krystal Flash
- Hackle - Brown hen, palmered over body
- Body - Brown chenille
Tying Instruction for the Brown Woolly Bugger:
Step 1: Fix hook in vise, layer mid-shank with lead wire, and layer working thread to the bend. Measure a clump of marabou the full length of the hook, and tie it in at the bend of the hook. You can also tie the marabou long, then pinch it off at the right length. Tie in 4 to 8 strands of Krystal Flash, just short of the marabou length.

Step 2: Tie in the body chenille at the bend of the hook. Select a hackle with fibers about two times the hook gap. Tie it in by the tip, with the concave side against the body. Leave room for one turn of chenille behind the hackle tie-in point. Take your thread forward to the hook eye.

Step 3: Take a turn of chenille behind the hackle, then wind the body forward in front of the hackle to the hook eye. Tie it off and chip the excess.

Step 4: Wind the hackle forward in evenly-spaced turns to the hook eye. The hackle fibers should tend to flare back, not forward. Tie off the hackle stem, clip the excess, form a neat thread head, and whip-finish the fly.
-------------
TasunkaWitko - Chinook, Montana
Helfen, Wehren, Heilen
Die Wahrheit wird euch frei machen
|
Posted By: varmintcaller
Date Posted: 06 January 2008 at 08:36

|
|
The Sultry Shiner
By Joe J. Warren, Carson, WA
A smaller version of its cousin the Sultry Shad, the Sultry Shiner is a baitfish pattern I recently originated for bass that is suitable for any large piscivore (fish eater). The pattern is tied on a stinger hook which has a light wire and wide gap making it well-suited for beads. The Super Hair used on this pattern complements the beads by having a similar glow effect with light and forms a nice minnow-shaped fly. The hair fibers can be shaped to form the body by applying tension when tying the tail. The tighter you pull the Super Hair, the more streamlined the body will be; a slack pull creates a deeper-bodied fly. If you want to highlight certain parts of the fly with parr marks or spots use a black permanent marker. To firmly secure the rear beads I recommend using the bead lock technique.
The fly is well-balanced, rides upright, and does not drop or dip as a dead weight does. In fact, it sort of hovers on the pause of a retrieve. Attach the fly with a loop knot to allow it freedom of movement, and fish it with radical rod twitches to imitate an injured baitfish. ~ Joe J. Warren
Materials: The Sultry Shiner
HOOK: Daiichi 2722, sizes 1/0-2.
THREAD: Translucent Thread, fine.
SNOUT/HEAD: Two gold (sl) beads, medium; one gold (sl) bead, large.
BODY: Three to five gold (sl) beads, large.
BELLY: Green/chartreuse Super Hair.
TOPPING: Light green and olive (sparse) Super Hair.
EYES: Yellow Lazer Eyes, small or medium, glue with Marine Goop.
TAIL: Use olive 6/0 thread and tie off hair fibers about 1/2 to 3/4 inch back from end of hair tips and Super Glue.
Note: This pattern is two to three inches in length.
Tying Instructions: The Sultry Shiner

1. Pinch the barb flat and slide on 2 medium beads followed by 4 or 5 large beads. Advance the first three beads to the eye. Leave a space at least one bead length between the third and fourth beads. Tie in the thread behind the third bead and cover the shank with tight wraps.

2. Apply the bead locking technique by crossing with the thread underneath the beads, over and around the shank several times at the back of the beads.

3. Advance the thread forward with two wraps between each bead until finishing at the tie-in point. Use your forefinger to keep the beads in place as you wrap the thread.

4. Rotate the fly upside down and tie in the Super Hair fibers (about 3 inches long) for the belly. Return the fly to right-side up and add the topping, light fibers first and dark fibers last. Whip finish and trim.

5. Remove the fly from the vise. While clamping down with thumb and fingers to hold the fibers in place, grasp the fly at the side angle and pull the fibers back to form the shape of a minnor.

6. Tie in the thread by trappng the tag end with your thumb and wrap the thread four or five times with your free hand.

7. Grasp the fibers on each side of the thread allowing the bobbin to hand freely. Move your hands in small circular motions to twirl the thread around the fibers. This will form tight thread wraps. Whip finish the thread and trim.

8. Place the fly [back] into the vise and glue on the eyes where the Super Hair fibers are tied in place concealing the thread wraps. Add a drop of Super Glue to thread wraps at the tail and trim ends of the fibers to shape the tail. ~ Joe
|
-------------
Molon Labe "Come take Them"
|
Posted By: varmintcaller
Date Posted: 06 January 2008 at 08:49
The Chernobyl Ant

Text and Photos by George E. Emanuel
|
The Chernobyl Ant is one of those unique patterns which come along once every so often ,which, being designed for a particular species, demonstrates an ability to catch fish far beyond the intent of their creator.
The Chernobyl Ant is one such pattern. While it was originally designed for Cutthroat Trout in the West, it has demonstrated an ability to catch many other species in both warm, and cold water, all over this and other countries.
I personally have caught Green Sunfish, Red Breasted Sunfish, Blue Gills, Rock Bass, Crappie, Smallmouth Bass, Largemouth Bass, and Rainbow and Brown Trout on this fly. I have not yet tried it in saltwater, but I wouldn't bet against it even there!
This pattern and a few others have come up in the chat room on several occasions. I am constantly amazed at the lack of general knowledge about this great fly.
Now, once again let me admonish you, if you are a traditionalist, or a purest, this pattern has nothing to offer to you. If however you enjoy catching fish, and are of modest tying ability, get ready to have more fun than should be allowed by ones self in a pair of waders.
This thing catches fish!
OK, Ingredients:
Hook: 94840 Size 6 to 12(94845 Barbless is also recommended).
Thread: Black 3/0.
Body: Black Fly Foam.
Wingcase/indicator: Yellow Fly Foam.
Legs: Rubber Leg Material (original was black, I prefer white).
Tying Instructions:
1. Before I completely confuse you, I have adjusted my vise in the tying sequence pictures so that you might have a better view of the operations.
 2. Begin by laying a thread base on your hook, starting at the eye and progressing rearward to the shank directly opposite the point.
 3. Cut a piece of black fly foam approximately 3/8" wide. (Narrower for smaller hooks.) Nip the black foam at the rear end at about 45 degrees on each side leaving a generous flat at the extreme rear. Don't get real fussy here, the original pictures I have show a beautifully rounded rump and head, but the fish don't seem to mind the mitered look.
|

4. Now, tie the foam strip in allowing the butt to project maybe 1/8" or so beyond the bend of the hook. Tie it down well!
 5. Next, tie in the rubber legs on each side on the tie in point. (about 3/4" seems to be a good length for the legs on this size fly size 6) Note: the legs are not figure eighted as in some flies, they are two separate "V's, one on each side.
|
6. After you have tied in the rear legs, lift the foam at the front and run the thread under it to a point about 1/4" behind the eye, and tie down well.
 7. Now using the eye as a guide for your scissors, cut the fly free of the longer strip of foam. (you get a lot less waste this way! ) Again, "nip" the front of the body at about 45 degrees leaving the same flat area at the front as you did at the rear.
 8. Tie in legs on each side of the body at the front of the fly, just as you did at the rear.
|

9. Take a strip of yellow foam, a bit narrower than the black and tie in at the leg tie in point on the top of the fly. This will be your indicator, so feel free to size it according to your individual impairment, mine is rather average.
10. Now slip the thread under the head of the fly and tie off at the hook eye as on any other fly.
 The last step is to use "Dave's Fleximent" to glue the head, and as long as you have it out, put a drop at each of the leg/body tie-ins on the bottom side of the hook. This will prevent twisting and generally add a lot of durability to the fly.
Being a gluttonous creature I have landed as many as 50 fish on a single fly, which I retired as much from embarrassment as anything else. If tied well, these things last for a lot of fish.
As far as technique with this fly, a dead drift into typical holding areas will bring the fish like a dinner bell brings chow hounds! You might also want to "grease" your leader. And a dropper is not out of the question either. Good luck, and let me know how you make out with this thing where you fish, good and bad! (though I expect to hear nothing bad, frankly).
Tight lines, screaming reels, and remember, just lift the rod tip, don't rip their lips off ! ~ George E. Emanuel
The last step is to use "Dave's Fleximent" to glue the head, and as long as you have it out, put a drop at each of the leg/body tie-ins on the bottom side of the hook. This will prevent twisting and generally add a lot of durability to the fly.
Being a gluttonous creature I have landed as many as 50 fish on a single fly, which I retired as much from embarrassment as anything else. If tied well, these things last for a lot of fish.
As far as technique with this fly, a dead drift into typical holding areas will bring the fish like a dinner bell brings chow hounds! You might also want to "grease" your leader. And a dropper is not out of the question either. Good luck, and let me know how you make out with this thing where you fish, good and bad! (though I expect to hear nothing bad, frankly).
Tight lines, screaming reels, and remember, just lift the rod tip, don't rip their lips off ! ~ George E. Emanuel |
-------------
Molon Labe "Come take Them"
|
Posted By: varmintcaller
Date Posted: 06 January 2008 at 08:58

|
|
Stillwater Nymph
By Philip Rowley
Denny Rickards is an outstanding still-water angler. Based in Fort Klamath Falls, Oregon, Denny is owner/operator of Crystal Creek Guiding Service. He splits his time between guiding and providing seminars and demonstrations throughout the Western United States and Canada. Denny is a popular speaker and fly tier at the International Sportsman's Expositions held throughout the western states. During his 30 years fly fishing for stillwater trout, Denny has compiled a wealth of knowledge. Denny has just completed his first book, Fly Fishing Stillwaters For Trophy Trout, and two videos, one sharing the title of his book, the other, .
Denny is not a proponent of direct imitation but prefers to use his suggestive patterns coupled with a variety of different retrieves and depths to imitate the varied menu of stillwater trout. Denny uses only five fly patterns for his entire stillwater fly fishing. The Stillwater Nymph is one of these five and one of his favorites. Denny developed the Stillwater Nymph over ten years ago while fishing Diamond Lake in southeastern Oregon. Well aware that damsel fly nymphs and scuds are important items on the trout's menu, Denny set about developing a fly to simulate both food sources at once.
Denny began by tying in a sparse tail of olive marabou. Marabou provided the life and movement that are critical components to many successful stillwater patterns. Once tied in, Denny folds the marabou butts back over the tail (the marabou butts form the shellback later on). Next he ties in a grizzly hackle dyed orange to suggest the brood pouch of a scud. Denny has these grizzly hackles dyed for him by Jay Fair from Eagle Eake, California. Jay offers a full line of quality dyed grizzly hackles, both in full capes and individually-sized packages. Denny stresses the importance of tying the hackle feather in by the tip so the pattern does not spin during the retrieve. Wind the hackle a maximum of four turns to suggest segmentation. Tie in a rib of fine copper wire to provide added durability, segmentation and sparkle. Dubbed seal's fur forms the body. However, seal's fur is not always readily available. As an alternative J. Fair offers a product called "Dub-It" that is a great substitute. Dub-It is an African goat mix available in a spectrum of colors that blend well. With the body complete, bring the marabou butts over the top of the body to form the shellback. Trimming the hackle along the top and sides of the pattern provides the finishing touch.
Denny uses intermediate lines for 90 percent of his stillwater fly fishing. His favorite retrieves include the handtwist, a slow 2- to 4-inch pull or a short and rapid 1- to 2-inch strip. Expect aggressive takes with the short rapid retrieve. Denny feels the speed of the pattern is important to the success of any presentation. The stillwater nymph has proven to be a great summer pattern in many waters throughout the western United States and Canada. Use it throughout the entire fishing season.
Materials: Stillwater Nymph
Hook: Mustad Signature R72.
Thread: Olive 6/0 or 8/0.
Tail: Marabou.
Shellback: Marabou butts from tail material.
Rib: Fine copper wire.
Hackle: Grizzly hackle dyed orange.
Body: Seal's fur or substitute.
Tying Instructions: Stillwater Nymph

1. Place a debarbed hook into the vise and weight if desired. Secure weight in place with tying thread. Strip a sparse clump of marabou fibers from the stem. Tie in at the rear of the hook so the marabou is shank length. Once marabou is secure double the remaining butt material back over the tail and secure in place with the tying thread. These butts will form the shellback later.

2. Tie in a dyed orange grizzly hackle by the tip followed by a length of fine copper wire.

3. Dub a neat body.

4. Wind the copper rib forward, tie off and break excess.

5. Palmer the hackle forward over the body a max of four times. The hackle simulates the brood pouch of the nant shrimp and provides segmentation. Tie off and trir excess saddle feather.

6. Pull the marabou butts over the top of the fly to the shellback. Tie off and remove the excess material.

7. Build a neat head and whip-finish. Apply head cement. Trim the saddle fibers along each side of the fly so that only lower portions of the hackle remain. ~ PR
Credits: Excerpt from Fly Patterns for Stillwaters By Philip Rowley, published by Frank Amato Publications. We appreciate use permission. |
-------------
Molon Labe "Come take Them"
|
Posted By: varmintcaller
Date Posted: 06 January 2008 at 09:11
|

Tiger Weave Bitch Creek Nymph
By Al Campbell
Woven bodies create a look that is unmatched in other forms of tying. If you can weave a fly body, you can create another dimension in your fly that simple tying steps can't create. This added dimension results in a fly that looks more realistic to the fish.
Since the size of the fly is important if you are going to see detailed pictures of the steps, I'll be picking on larger insects in this series, but these tying steps can be used to create much smaller flies as well. A woven midge larva isn�t out of the question once you learn how to weave a certain style of weave.
My focus here is to show you how to perform the weave, not merely a pattern. It will be up to you to put on the thinking cap and use these new skills in other patterns as you see fit. The only limiting factor here is your imagination and willingness to experiment a little.
Although I have chosen materials that are easy to see in a photo, color and size of the materials you select should be based on what you are trying to imitate. If you're trying to imitate a damselfly nymph, shades of olive, yellow and brown will work well. Stoneflies are generally some combination of black and orange or yellow and brown, but investigation in your local waters with a nymph net might reveal a tendency toward tan and olive or black and yellow. Ultra chenille, punch embroidery yarn, wool yarn, poly yarn and antron are just the tip of the pile of materials you can use to create realistic, woven bodies. Use your imagination and the materials you have easy access to.
Weaving isn't as hard as it looks. It just takes a little practice to get good at it, but the fish won't be too picky if your fly doesn't look fit for a frame at first. What do you have to lose; time or a few materials? The skills you gain will more than offset your monetary investment and the time will be well spent learning new ways to create something a fish will eat. After all, isn't that why you're here in the first place?
Let's get started. |
|
List of materials: Tiger Weave Bitch Creek Nymph
-
Hook: Nymph, Mustad 80050BR; Tiemco 200R; or equivalent.
-
Thread: 6/0 or 3/0, color as desired for effect, traditional is black.
-
Tail: Rubber leg strands, any color will work. I'm using orange here.
-
Body: Woven strands of orange and black Ultra Chenille (vernille). Again, any color or texture of material can be used to create the body you want.
-
Thorax: Black Ultra Chenille.
-
Legs: Dun or black hackle wrapped around the thorax.
-
Antennae: Rubber leg material, same as tail.
Tying steps:
1. Start the thread on the hook. Tie in a loop of rubber leg material by the tips of the loop. Keep it spread apart as you tie it down to the hook shank. Tie all the way to the bend.
 2. Clip the loop with your scissors to form a split tail.

|
|
3. Tie the light colored body material to the far side of the hook.
 4. Tie the body material down all the way to the tail.

|
|
5. Next, tie the darker body material down to the near side of the hook.
 6. Again, all the way to the tail. I usually make several half hitches in the thread here so I can leave the thread dangling at the hook bend as I weave. If that isn't comfortable to you, you can half hitch the thread and cut it off, but you will have to start it later when your hands are full.

|
|
7. With your right hand, wrap the light colored material over the top of the hook as shown. Stop with the material where you see it here.
 8. With your left hand, wrap the dark material over the light material on the top of the hook, then under the hook and stopping on the near side of the hook as shown. Don't take your hands off either material during this weaving process.
 9. Now, wrap the light material over the dark material on the bottom of the hook as shown.
|

10. Then continue over the top of the hook with the light material.
 11. Next, wrap the dark material over the light material on top of the hook.

|
|
12. And, under the hook like you did before.
 13. Repeat this process, (dark over light on top of the hook, and light over dark on the bottom of the hook), until you have the body length you want (about half the hook shank in length).
 14. Holding both body materials in your left hand to keep tension on them, bring the thread forward over the hook in front of the body materials. (If you cut the thread, you will have to start it over here while keeping tension on the body materials).
 15. Now, switch hands with the body materials and tie them down with the thread.

|
|
16. Inspect the body. Is the light material on the bottom and the dark material on the top?
 17. Clip the light material, but leave the dark material attached to the hook.

|
|
18. Make sure everything is tied down securely. A couple of half hitches here wouldn't hurt.
 19. Tie in a long, soft hackle, curvature down.
 20. Wrap the dark body material forward to create a dark thorax.

|
|
21. Tie off the body material and trim, leaving plenty of room for a head.
 22. Wrap the hackle forward, spacing it as evenly as possible.
 23. Tie off the hackle at the head and trim.
 24. Tie in a strand of rubber leg material behind the hook eye.
 25. Bring the other side of the rubber strand forward and tie it down to form a split antenna.
 26. Create a nice head that covers all of the rubber leg material.
 27. Whip-finish and trim the thread. Trim the antennae to length.
28. From the top, your finished fly should look like this.
 29. From the bottom, it should look like this. You can trim the thread you see on the bottom of the body if you want, but the fish won't complain if you don't.
 You can modify this process by using different materials to create nymphs of other species. Just be sure to practice the weave until you're happy with the results.
 |
-------------
Molon Labe "Come take Them"
|
Posted By: varmintcaller
Date Posted: 06 January 2008 at 09:20
The Madam X
By Skip Morris
Not long after the Madam X made its debut in Doug Swisher's videotape, "Tying Attractor Flies," I happened to be standing in a trout stream with a friend who began raving about the deadliness of this peculiar new dry fly. "The fly shop's out of it again," he said, as if to validate his account. Still uncertain I was properly impressed, he added, "They just can't keep it in stock!"
Few flies burst onto the scene with such bravado. I was impressed...but, it seemed, so was everyone else. Everyone still seems impressed with the Madam X.
Just who created the Madam X I'm not sure. Doug Swisher probably developed the fly, and is usually given credit for it, but in his video he never plainly says so.
He does say that he was "almost afraid" to tell anyone about the Madam X for quite a while. It is an alarming trout fly, with its crisscrossed ribs, thick tail, and gangly cross of legs. He finally did tell because the Madam X kept catching trout. Doug says that he usually fishes it along stream banks and back under overhanging grasses and cut banks. He fishes it either dead drift or with twitches. When a trout takes a Madam X, he says, the result is "usually explosive." Its long springy legs may be what sets the Madam X apart from other attractor dry flies; Doug says that because of those legs, the fly "vibrates."
There is nothing particularly delicate or graceful about the Madam X; it has more the coarse bulk of a bass bug than the intricate lightness of most trout flies. Doug completely eradicates any possible resemblance to a normal dry fly by tying it on really big hooks. He explains his choice of hook on the videotape: "Fish like a big bite, not a small bite," he says.

Variations: on the left, a Madam X with an all-floss body (and the yellow legs Skip often substitutes for the standard white); on the right, an orange version with a saddle hackle palmered up the body.
Most popular fly patterns spawn a seemingly endless procession of variations�who hasn't seen a dozen versions of the Woolly Bugger? In general, this is a form of flattery; without question, it signals a fly's popularity. Some of the fly-pattern books in my collection describe Madam Xs with bodies of a solid layer of thread or floss over the deer hair, instead of the original spiraled thread-crosses up a deer-hair body. Others list orange thread as an option to replace the standard yellow. I've even seen a pattern with a brown hackle palmered up the body. My own touch is to use yellow rubber-strand legs in place of the standard white.
I'll show you how to tie the Madam X as I tie it, my personal style, though this fly's form largely dictates the method of its tying.
Materials for The Madam X:
Hook: Light wire, 2X or 3X long, sizes 8 and 6.
Thread: Yellow 3/0.
Body and Tail: Natural deer hair (or elk).
Wing and Head: Natural deer hair (but I prefer elk hair, because it makes a tougher head).
Legs: Round white rubber-strand.
Tying Instructions:

1. Start the thread at the hook's bend; then wind it tightly up two thirds of the hook's shank. Comb and stack a small bunch of deer (or elk) hair. Bind the hair by its butts at the two-thirds-up-the-shank point. The hairs' tips should extend beyond the rear of the shank a distance roughly equal to the hook's gape.

2. Trim the butts closely. Hold the hair down around the shank as you wind the thread down the hair in tight open spirals to the bend. At the bend, add two turns; then spiral the thread back up to the front of the hair. Take a few tight thread-turns at the front of the body to lock the spiraled turns in place. The hair-body should now have a pattern of thread-Xs along it.

3. Comb and stack another small bunch of deer (I use elk) for the head and wing. Hold the hair so that its tips are even with the tips of the tail; then cut the hair's butts straight across about 1/4 inch beyond the hook's eye.

4. Bind the hair, by its butts, from the eye back to the front of the body. The tips of the hair should point forward, over the hook's eye. Try to keep the hair entirely atop the hook's shank as you bind it on.

5. With the thread hanging at the front of the body, stroke the wing-hair up, and then pull it back and down. Bind the hair in place with a few tight thread-turns. You now have a wing and a sort of half bullet-head, both atop the hook. Ideally, the wing's tips should be even with the tail's tips.

6. Bind a short length of rubber-strand along each side of the thread collar with tight thread-turns at the rear of the head. Draw back the legs and whip finish the thread just in front of them. (Doug prefers to whip finish the thread at the hook's eye, in front of the bullet head.) Trim the thread.

7. Trim the legs long�for example, when the rear legs are pressed back against the sides of the fly, they should reach to the tips of the tail, or even slightly beyond. Add head cement to the whip finish. ~ Skip Morris
Credits: The Madam X is an excerpt from Skip Morris' book, Morris on Tying Flies. Skip has taken his favorite patterns and updated them with new materials and techniques. An excellent book, published by Frank Amato Publications.
|
-------------
Molon Labe "Come take Them"
|
Posted By: varmintcaller
Date Posted: 06 January 2008 at 09:25
Humpy
Fly and Photos by Martin Westbeek
Oisterwijk, Netherlands
Materials: Humpy
Thread: 8/0, lt. Cahill*.
Hook: TMC 100, #12.
Tail: Moose.
Body: Thread.
Overbody and wing: Elk cow.
Hackle: Silver Saddle, furnace and grizzly.
Tying Instructions: Humpy1. Start the thread* halfway the hook shank. This is important, as it is the reference point for the body. Wrap to the bend, tie in tail, wrap to halfway point. (*You can use 6/0, but I've found that 8/0, because of its smaller diameter, "bites" into the material better than 6/0.)

2. Take a bunch of Elk, remove all underfur, stack well, size (correct size is from tip of the tail to hook eye), and cut to length.

3. Tie the Elk to the hook, wrap towards the bend, keeping the Elk on top of the hook. Wrap until you've completely covered the thread wraps for the tail. Never mind the stubs at the tie-in point - they will disappear later on.

4. Wrap the underbody with thread. Pray that it doesn't break, which happened to me... Lift the Elk, give it a quarter turn, fold it over and tie down on top of the hook shank. This should be at the halfway point. After three thread wraps I lift the wing and put two wraps under the wing around the shank, then three wraps over the wing again. I finish with one wrap around the shank only.

5. Divide the wing, put thread wraps around the base of each wing, post the wings. Lay a thread foundation in front of the wing, making a smooth taper towards the eye. Without this thread foundation the hackle will be all over the place due to the big difference in diameter behind and in front of the wing.

6. Tie in the hackle(s), dull side facing forward. Don't tie the hackle down where the barbs start; leave a short length of bare stem, which will produce a cleaner start of the hackled collar. The ugly spot, where the thread broke, will be covered with the first wrap of the furnace hackle.

7. Palmer the hackles forward, starting with the hackle that was tied in last (here: the grizzly one). Tie off hackles and whip finish.

Done! ~ MW |
-------------
Molon Labe "Come take Them"
|
Posted By: varmintcaller
Date Posted: 06 January 2008 at 09:32
Black Widow
By Richard Komar
The Black Widow is the sub-surface sister to her brother the Hard-Hackle Spider, a top-water arachnid. When the surface activity slows down, try the Black Widow for non-stop action underwater! The Black Widow's legs are formed using a "reverse hackling" technique. This method, coupled with good quality genetic hen hackle, gives her unbelievable life-like action, whether she is just slowly sinking down, being nudged along in short twitches or just floating with the current like her cousins, the soft-hackles. The red bead takes on different hues depending on the light and depth. So if you're ready, let's tie this lethal beauty!
Materials List:
Hook: Mustad 3906B, sizes 6-14.
Thread: 6/0 or 8/0 black.
Thorax: Glass or Plastic Bead, Red.
Body: Ultra-Chenille, Black.
Hackle: Genetic Hen, Black.
Instructions - Black Widow:

1. Slip the bead on the hook and position it at the eye out of the way for now. Lay a thread base along the length of the hook shank starting just behind the bead to the hook bend.

2. Tie in the chenille and advance it toward the hook eye about one-third the length of the hook shank.

3. Select an appropriate sized genetic hen hackle (saddle or cape). Tie the feather in by the base, with the concave (cupped, dull) side facing the hook bend. Strip off the barbs on the side of the feather farthest away from you (other side of hook).

4. Wind the hackle away from you, tie off, trim and whip finish a couple of turns to secure the thread and cut it.

5. Slide the bead snugly against the hackle and build up a small hump ahead of the bead to secure it in place on the hook shank.

6. Tie in the second genetic hen hackle by the base, directly behind the bead, with the concave (cupped, dull) side facing the hook EYE. Strip off the barbs on the side of the feather farthest away from you (other side of the hook).

7. Using a "reverse hackling" technique, wind the feather away from you, trim and secure it with a couple of half hitches.

8. Slip a "soda straw" hackle guard over the hackle. Tie in the chenille to cover the front third of the hook shank.

9. Tie off the chenille, trim, whip finish, apply head cement (if desired), remove the hackle guard, and Viola! The Black Widow is ready to fish!

How to Fish the Black Widow:
The Black Widow is best fished when the surface action has slowed down. She can be fished like a traditional soft-hackle, or allowed to slowly sink ever so tantalizingly or you can strip her in with little twitches, pausing ever so momentarily between tugs. She can be tied in as large as 1/0 for largemouth bass (black widows are not small spiders!) and as small as size 18 for trout. Use fine chenille in the larger sizes and floss or just thread in the smaller sizes for the body. Use your imagination and available feathers to make Brown Widows, Dun Widows, Grizzly Widows, and Grey Widows, but keep the signature red bead!
With the Hard-Hackle Spider brothers playing on the surface and the Black Widow sisters frolicking below the surface, these deadly duos may be just the ticket to a successful day! ~ mailto:r.komar@gte.net - Richard |
-------------
Molon Labe "Come take Them"
|
Posted By: varmintcaller
Date Posted: 06 January 2008 at 15:33
The Velcro Crab
By Jeff Pierce - AKA "Dr. Fish"
The Velcro Crab is another simple fly to tie that is very effective on a wide range of species and is ultra durable. I have Velcro Crab's in my fly box that have caught over 40 fish and still look great.

Materials List: Velcro Crab
Hook: Mustad Signature All Around hook from a size 2 to 4/0 (S71S SS). The Mustad Signature Circle Streamer (C71S SS) is also a very good hook for this pattern..
Thread: Danville Flymaster Plus in White.
Body: Loop Velcro.
Legs: Rubber legs / Silly Legs cut to length and knotted.
Claws: Rubber Band cut to length and knotted.
Eye's: 50lb monofilament cut and burned.
Head: Rabbit strip in Red
Tying the Velcro Crab

1. Start behind the eye and wrap a base of thread back to the start of the bend.

2. Tie in a small clump of tan PolyBear or Antron or Sea Fibers extending out past the bend � the shank length.

3. Tie in a small clump of tan PolyBear or Antron or Sea Fibers extending out past the eye � the shank length.

4A. Double over a piece of adhesive backed loop Velcro. Trim a piece that when opened up appears to be a flattened 8.

4B. Peel back � the adhesive backing and stick the Velcro to the hook shank.

5. Now it is time to prepare the guts and add them to the body.
Legs - Cut 4 pieces of rubber legs to a length of 1 inch. Tie a single overhand knot in each piece just slightly off center.
Claws - Cut 2 pieces of rubberband to a length of 1 inch. Tie an overhand knot in each piece so that the knot is about 1/3 of an inch from one end. Trim the shorter leg to look like a pincher. You can use markers to color the claws to match the local species.
Eyes - Cut a couple 1-inch pieces of 40lb or 50lb monofilament. Use a lighter to burn one end of each piece to form an eye. Use a pair of pliers to form a 90-degree elbow � inch from the other end. This will help hold the eyes in the body better.

6. Ever order stuffed crab at a restaurant? Well, now it's time to stuff your own. Place the legs into the adhesive. Place 2 legs on each side of the crab, next to the hook shank. Position the legs so that the legs will angle down. Now you can add the claws and then the eyes. I like to add a little PolyBear, Antron or Sea Fibers between the eyes to act as the mouthparts.
If you are trying to imitate a Blue Crab you can add one extra set of legs on body on the opposite side of the hook shank. These legs are the swimmers so wide rubberband can be used effectively.
You can also insert a rattle at this time if you wish. This had proven very effective when targeting Redfish in stained water.


7. Peel the rest of the adhesive backing off and fold over the top of the Velcro body and press firmly.

8. Use markers to color the crab so that it closely resembles the crabs in the area you will be fishing the fly. You will be surprised just how finicky the fish can be, refusing crab flies that are not colored exactly like the local prey species.
Fishing Suggestions:
The Velcro Crab is a very effective pattern for many saltwater species as well as a few freshwater species. I have had great success with the Velcro Crab on Tarpon, Bonefish, Permit, Cobia, Dolphin, Triple Tail, Bluefish, Striped Bass, Redfish, Jack Crevalle, Snook and well as others.
This is primarily a cast and wait fly. Better than 90% of the time I'm fishing the VC I cast the fly and let it sink without any action. The fish will take it on the sink or as it rests on the bottom. Stripping the fly will often spook the fish. If you watch how a crab reacts to an approaching fish you will see just what you need to do. Generally, if a crab is moving along the bottom and it spots an approaching predator it will freeze and attempt to blend into the bottom. If that fails to work, it usually stands its ground and tries to defend itself.
So, if a fish approaches your fly it's best to let it sit or give it a very, very slight strip, just enough to move the crab a tiny bit. If you strip the fly too much or at the wrong time it may appear to the fish that the crab is coming at them and this will spook them as this is not normal crab behavior.
If a fish passes by or over the VC without reacting I have triggered some strikes with a couple short, quick strips. This has been especially effective with Striped Bass. This can also trigger a strike after a fish inspects the fly and refuses it. Just be sure to wait to strip the fly until the fish has turned off the fly, not while they are looking at it.
I've had great luck with this fly-casting around shrimp boats that are culling catch. Jack Crevalle, Redfish, False Albacore, King Mackerel, Tuna and Sharks till all take the fly under these conditions. Casting the VC to a piece of floating debris is also effective for Tripletail and Dolphin. Whatever species you target with the VC you will be very happy with just how well it holds up. It's nearly impossible to destroy the fly.
Tie up a few for your next saltwater outing and be ready for some action. Happy tying! ~ Jeff Pierce |
-------------
Molon Labe "Come take Them"
|
Posted By: varmintcaller
Date Posted: 06 January 2008 at 15:46

|
|
Rich Murphy's Pamet Special
By Rich Murphy
I developed the prototype of this pattern while on an October vacation to Truro, Massachusetts in 1989. My intent then was to develop a large sand eel imitation I could use to capitalize on the striped bass blitzes that are routine during the fall months at the mouth of the Pamet River when, during the ebb of the tide, literally tons of sand eels are flushed into Massachusetts Bay.
The prototype lay-up used a non-descript 3/0 stainless hook, three saddle hackles in the tail construction, an olive over pink bucktail wing and a five minute epoxy head with pearl and red Krystal Flash highlights. The prototype swam and breathed very well, and caught lots of fish.
The current model, Rich Murphy's concept, uses natural hair instead of hackles as a primary tail material (yak, polar bear, or buck tail) The illustrated example is tied with natural polar bear. Hair is more durable, less prone to fouling and mung accumulation than feathers. The current model also uses an EZ Body head that can be replaced as required without trashing the rest of the fly. I prefer to tie it on 3/0 or 4/0 high carbon steel hooks, like TMC 600s, Owner AKI, Gamakatsu SC15-2H, or Trey Combs Big Game. High carbon hooks are harder than stainless hooks so they will hold a keener cutting point longer.
Materials: Pamet Special
Hook: 3/0 or 4/0 hook. An 3/0 Owner AKI is used in the procedure illustrations
Thread: Fine monofilament.
Tail: Bucktail, polar bear, or yak and Crystal Flash.
Wing: Bucktail, olive, dark olive and pale lavender.
Body and throat: Krystal Flash.
Head: EZ Body.
Tying Steps:
1. Select a 3/0 or 4/0 hook of your choice. I prefer using TMC 600, Owner Aki, Gamakatsu SC15-2H, or Trey Combs Big Game hooks myself. An 3/0 Owner AKI is used in the procedure illustrations. Barrel wrap the hook shank with fine monofilament thread from the base of the hook eye to the beginning of the bend of the hook.
2.Tie in a tail consisting of a 1/8" diameter bunch of light pink bucktail (3 � - 5" in length) over seven strands of gray ghost Krystal Flash over a � " diameter bunch of natural yak, polar bear, or white bucktail, 4-8 " in length. Add a drop of super glue to the joint. In Figure 1 and the rest of the illustrations, natural polar bear is used as the primary tail material.
 3. Tie in a wing consisting of a 1/16" diameter bunch olive pale olive bucktail (4-6" in length) over a 1/16" diameter bunch of dark olive bucktail (4-6" in length) over of a 1/16" diameter bunch of pale lavender bucktail (3 � - 5 " in length) over the tail assembly as shown in Figure 2. Add a drop of superglue to the joint.
|

4. Add six strands of sand ultraviolet Krystal Flash (from Hareline Dubbin) over six strands of shrimp pink Krystal Flash (3-5" in length) to both sides, seven strands of peacock Krystal Flash to the top (3-5" in length), and seven strands of red Krystal Flash (1-2" in length to the bottom as color highlights. Add a sparse drop of superglue to the joint. (See Figure 3).
 5. Select a 3" long piece of medium EZ Body and remove the two polyester reinforcing strips from the tubing. Slide the EZ Body over the hook eye and tie down on the hook shank as indicated in Figure 4. Wrap the thread forward towards the hook eye about �" to cinch the tubing to the rest of the pattern material . Whip finish and add a drop of Super Glue to the joint.
|

6. Shape the EZ Body into elliptical head shape as shown in Figure 5. (EZ Body is a very cool material in that in has a long term memory for shapes into which it has been manipulated.) Tie off the EZ Body by whip finishing and adding a drop of super glue to the joint.
 7. Use a soldering iron or a wood burning tool to neatly cut off the excess EZ Body beyond the tie down point. (EZ Body is primarily nylon, a material that is about as strong as steel per unit weight but has a much lower melting point. If sufficient is applied to EZ Body, it will melt like butter.) Melt the remaining thread and EZ Body at the joint into a neat bevel along the base of the head. This eliminates the "bottle-neck" effect that will result from attempting to trim the excess EZ Body from the head mechanically with scissors or a straight razor. In Figure 6, I am using an ancient wood burning tool (putting out about 20 watts) with it�s tip filed flat to do the operation.
|

8. Add color to the completed head using permanent ink markers (dark olive (top edge)over lavender (top quarter) over bronze (top half)) as shown in Figure 7.
 9. Cover the forward quarter of the head with a sparse coat of five minute epoxy that has just begun to gel. Allow the epoxy to set. Apply and align 3.0 mm (excuse the mixing of unit systems) black on silver stick-on prismatic eyes as shown in Figure 8. Apply a sparse finish coat of five minute epoxy and allow to cure before using.

~ Rich Murphy
|
How does the Pamet Special work? During the height of a Northeast gale on the morning of August 29, 1997, I used six Pamet Specials similar to the these to land and release 10 striped bass over 36" long at the south end of Longnook Beach in Truro. (I bit off the 15 pound tippet and added 3 feet of 30 pound test to the leader as a substitute after losing the first big fish.) The largest measured about 45" and weighed 35-40 pounds (no scale at the point of release). I estimate that I hooked up with 16 fish over 36" that morning. Of those, I lost 4 to bad hookups. The remaining two were too big to land through the 3 to 5 foot swells. It was an astoundingly rare and brutal morning with mature sand eels densely littering the surf rack line.
|
-------------
Molon Labe "Come take Them"
|
Posted By: varmintcaller
Date Posted: 06 January 2008 at 15:51

|
|
Prince Nymph
Text and photos by Jim Schollmeyer
Peacock bodies flies have long been a favorite of fly tiers. The fly shown here is a good searching pattern. The Prince nymph works very well on rivers that have hatches of black caddis.
Materials List:
Orginator: Doug Prince.
Hook: Nymph, 2X heavy, 2X - 3X long, sizes 6-14.
Thread: Black.
Tail: Brown goose biots.
Body: Peacock herl.
Rib: Fine gold tinsel.
Wings: White boose biots.
Hackle: Brown.
Head: Optional, brass bead (not shown).
Instructions - Prince Nymph:

1. Mount a hook in the vise and form the weighted underbody. Use the split tail method...to mount the biots at the rear tie-in position. Mount the rib tinsel and trim the excess.

2. Form the body by mounting 2-4 herls, a short distance back from their tips, at the tie-in position. Then trim the excess. Use a dubbing loop method to form a thread loop that is as long as the herl and thread together, draw them downward, and grip them with hackle pliers. Use the hackle pliers to gently spin the herls in a clockwise direction to form a fuzzy chenille next to the hook shank. Do not spin the herl too tight or you may break one or more of your strands. Wrap the herl forward 1-3 wraps; then twist the herl clockwise to form the fuzzy chenille again. Continue this short wrap-and-spin cycle until the body is wrapped. Secure the herls with 3 thread wraps and trim the excess.
- Prepare and mount a feather by its stem for the hackle. Grasp the tip of the feather with hackle pliers, and using close, tight wraps, take the desired number of turns forward. While maintaining tension on the hackle, take the bobbin the your left hand and secure the feather with 3 tight wraps. Trim the excess and bind down the tag ends.
Counter-wrap the rib over the body. Prepare and mount the hackle, and take 2-3 wraps of hackle. Secure the hackle and trim the excess.

3. Mount 2 biots on top of the hook shank as shown. Then trim the excess, tie off the thread, and finish the head.

|
-------------
Molon Labe "Come take Them"
|
Posted By: varmintcaller
Date Posted: 06 January 2008 at 15:55

Mickey Finn
By John van Vliet
|
|
|
Mickey Finn
"One classic, but still popular and effective, bucktail pattern is the Mickey Finn. Designed by John Alden Knight in the 1930s, it was named for the infamous drugged drink.
A streamer is designed to imitate a baitfish rather than an insect. Traditional streamers have hackle-feather wings that extend back, or "stream," over the body of the fly.
The Mickey Finn is an excellent baitfish imitation. The red stripe of bucktail resembles the lateral line of a small minnow or trout. This fly can be extremely productive for salmon, trout, steelhead, bass and even pike.
Materials
Hook: Mustad 9672; 2-12.
Thread: Black 3/0.
Weight: (optional) Fine lead wire.
Ribbing: Oval silver tinsel.
Body: Flat silver tinsel.
Hackle: Yellow and red bucktail, or calf tail.
Tying Steps:

1. Tie in a four-inch length of oval silver tinsel ribbing on top of hook shank, starting thread just behind hook eye and wrapping back to bend to secure tinsel.

2. Wind thread forward again to tie-in point behind hook eye. Tie in a 6-inch length of flat silver tinsel body material.

3. Wrap flat tinsel back to bend of hook. Each wrap should touch prevous wrap so there are no gaps.

4. Reverse direction and wrap tinsel forward to tie-in point, overlapping first layer. Secure with several turns of thread.

5. Wrap ribbing on hook, starting near bend, and wrap forward.

6. Cut a small bundle of yellow bucktail, and another of red. Comb out underfur with dubbing needle.

7. Stack bucktail fibers to align tips. Divide yellow bucktail into two equal bundles.

8. Measure first bundle to approximately 1 1/2 times hook-shank length.

9. Tie in first bundle of yellow bucktail with several soft loops. Apply moderate thread tension for first few warps, then increase tension for several more wraps. If you are having problems getting bucktail to stay on top of hook, reduce amount of bucktail

10. Trim butt ends of bucktail at an upward angle, as shown; then wrap thread forward to cover tapered ends.

11. Measure bundle of red bucktail to same length as first yellow bundle and place it directly on top of yellow bundle. Tie in as in steps 9 and 10.

12. Measure second bundle of yellow to same length as first and tie in as in steps 9 and 10. Whip finish and apply head cement.
13. Eyes are not traditional of this fly, but painted eyes can be added for an extra touch.
How to fish the Mickey Finn:This streamer can be retrieved upstream or down, or across the current with a jerky, twitching retrieve to simulate a baitfish. ~ John van Vliet
Credits: From the Art of Fly Tying by John van Vliet, published by Cowles Creative Publishing. We greatly appreciate use permission.
|
-------------
Molon Labe "Come take Them"
|
Posted By: varmintcaller
Date Posted: 07 January 2008 at 09:12
Sam's L-Eye-Bee
Created by Craig E. "Sam" Blevins
By Warren Patterson
Upon the request of some of the members on FAOL, I have been asked to submit Sam�s bass popper and the following is a short history of the popper as quoted from Flyfishing & Tying Journal, Summer 2002:
"The L-Eye-Bee was first tied back in 1988 as a bream or bluegill and sunfish fly. When I tested it at Lake Guntersville, a TVA Lake on the Tennessee River in Alabama, I made ten casts and caught ten largemouth bass. I said, "Well, I�ll be a sun-of-a-gun!" Hence the name L-Eye-Bee."
Materials List, Sam's L-Eye-Bee"
Hook: Mustad 9674, size 8, Straight-Eye Streamer.
Thread: Danville�s 6/0 Fly Master, Black.
Tail: 6 strands Rainbow/Pearl Krystal Flash; marabou, fluorescent fire orange, fluorescent chartreuse, and brown.
Head: Live Body, yellow 3/8� diameter, with black �� diameter (sliced thin), with plastic movable doll eyes (5mm) all glued together with cyanoacrylate adhesive (warning: use extreme caution when handling this adhesive, it is an eye irritant and will bond skin instantly.)
Thorax: Red rooster saddle hackle, palmered.
The above is the material that Sam used. As with all fly tying, I feel you can substitute if you do not have what the pattern calls for, and in this case I did not have all that he recommended and for that I apologize. I did not have the foam in 3/8" but I did have it in 1/2" which I used for this demonstration. I increased the hook size to a #6 since my foam was larger. I did not have the doll eyes he recommended so I used white fabric paint with a dot of black fabric paint for the eyes.

1. Pre-assemble head: cut 3/8" diameter yellow foam into a cylinder approximately 3/8" wide (I only had 1/2" foam for this); cut 1/4" diameter black foam into cylinders approximately 1/16" thick; glue doll eyes to black cylinders (I used white and black fabric paint); let dry and then glue black 1/4" cylinders with eyes to sides of yellow 3/8" cylinders. Let dry. When heads are assembled and dry, cut a slot 3/4 of the way through the yellow cylinder to allow for placement on the hook.

2. Do a thread base with your tying thread and attach 3-4 strands of Pearl Krystal Flash at tail tie-in point above barb of hook. Length of Krystal Flash about 3/4" behind bend of hook.

3. Tie in orange, chartreuse and brown marabou separately with approximately ten turns of thread. Place orange marabou below hook shank, chartreuse and brown above hook shank.

4. Wrap thread tightly toward hook eye to secure all butt ends of marabou and build a smooth transition ramp toward hook eye. Tie off and whip finish.

5. Attach head to hook just behind eye, glue, clamp and let dry.

6. Attach thread behind head and tie in red rooster saddle hackle. Palmer hackle and tie off. Whip finish behind head. Trim off head below hook shank to maximize hooking ability.
|
-------------
Molon Labe "Come take Them"
|
Posted By: varmintcaller
Date Posted: 07 January 2008 at 09:15

|
|
Knudson White Streamer
By John Shewey, OR
Originated by Al Knudson
Al Knudson ranked among the very first steelhead anglers to enjoy consistent success taking winter steelhead on flies. He was also among the first to use over-sized�-huge by 1930s standards�flies that could tempt the elusive winter fish into giving chase. Better known for his Knudson Spider and Knudson Cutthroat patterns, this pioneering angler lived in Everett, Washington for a time before moving to southern Oregon in 1929 amid reports of superb fly angling on the Rogue and North Umpqua rivers. He eventually moved back to Everett and his beloved Washington rivers. Knudson's large streamer patterns are as deadly today as any modern over-sized streamers, but little known among modern anglers
Materials, Knudson White Streamer:
Hook: Heavy wire, sizes 2-2/0.
Tag: Small or medium silver oval tinsel.
Tail: Red hackle fibers.
Body: Large silver oval tinsel over an underbody of floss.
Throat: Orange hackle fibers.
Wing: 4 or 6 large white hackles.
Cheeks: Jungle cock (optional).
Head: Black.
Method, Knudson White Streamer:

1. On large hooks, use single-strand floss (Flat Waxed Nylon, UNI-Cord, or 210 Denier) as a tying thread. At the front of the hook, just behind the return-loop eye, attach a length of small or medium-size silver oval tinsel and bind it down along the entire length of the shank. When you reach that portion of the shank that will be occupied by the tag, make certain that the material is bound down firmly to the hook shank with thread wraps placed close together as shown.

2. Fold the tinsel firmly over itself and make 8 to 10 turns to form the tag. Tie off the end of the tag securely and do not clip away the excess.

3. Make the tail from a dense bundle of bright red hackle fibers, and then wind the thread forward to the front of the hook, binding down the end of the tinsel used for the tag. At the front attach a long piece of large silver oval tinsel.

4. Wrap back toward the base of the tail, binding down the oval tinsel along the shank.

5. Reverse direction and return to the front, forming a fairly thick, even underbody. Use overlapping wraps as needed to create a uniform diameter to the underbody.

6. Continue using the thread to create a smooth, uniform-diameter underbody until you reach the front.

7. Now burnish the thread underbody, rubbing away the ridges and uneven spots in the thread work...

8. Wrap the large oval tinsel forward, forming a tinsel body. Add one or more layers of cement or varnish.

9. Once the varnish dries, switch to a small-diameter black thread and add a dense throat of long orange hackle fibers.

10. Take 4 to 6 wide, webby white saddle hackles and measure them against the fly's body. These hackles should extend back almost twice the length of the hook shank. Match the feathers with the glossy sides facing outwards, 2 or 3 feathers on the left, and 2 or 3 on the right. Strip away the unneeded fibers from the feathers and tie them in all at once atop the head of the fly. After securing the wing so it cannot shift positions, feed the hackle stems through the eye of the hook.

11. Fold the hackles' stems sharply backward and bind them down with thread to secure them in place.

12. Clip away the excess stem portions and build up a fairly large, tapered head.
~ John Shewey
Credit: This fly is one of many in the book Steelhead Flies by John Shewey. A well written and researched book, with hundreds of sharp color photos, including step by step instructions. Published by Frank Amato Publications, in both Spiral Hardbound and Hardbound. $49.94 US.
|
-------------
Molon Labe "Come take Them"
|
Posted By: varmintcaller
Date Posted: 07 January 2008 at 13:31

Eastern Green Drake
By Marty Bartholomew
|
|
Materials:
Hook: 2X dry fly, size 10 Tiemco 2312.
Thread: Black 6/0, Danville.
Tail: Micro Fibetts, dun.
Body: Aussie Possum dubbing, cream.
Wing: Grizzly hen back, dyed olive.
Hackle: 1 Ginger, 1 grizzly, and 1 grizzly dyed olive...

Start thread at the front of the hook and wrap back to the 1/2 point making a smooth thread base. Move thread forward to the 5/8 point. Take care with proportions on this fly, as it is a 2X long hook.

Prepare two grizzly hen back feathers, dyed olive, by putting the concave sides of the feathers together. Make sure the tips are even. Measure the wing to a full hook shank length. Switch hands and trim butt ends of the feathers.


Tie in wing at the 5/8 point of the hook with the tips towards the back of the hook being tied in this way keeps the wing from slanting forward; you always want mayfly wings to cant back in their more natural position. Pull the wing forward and make a few wraps of thread behind the wing to stand it up.

Form a dubbing ball at the back of the hook so the tails can be split.


Measure ten micro fibbets to a full hook shank length. Trim the butt ends, tie in at the 1/4 point on top of the hook and make a few tight wraps back. Use a fingernail to stand the fibbets up so they can be counted and split evenly. Position 5 fibbets on each side of the hook and wrap them up against the dubbing ball to produce a 90 degree split of the tails.

Dub the body to the 1/2 point.

Size and prepare one ginger, one grizzley dryed olive, and one drizzly dry-fly quality hackle. Tie in hackles behind the wing with the concave sides away from you.


Wrap the two grizzly hackles first and at the same time. Making a half or even a full wrap of the hackle before you attach the hackle pliers will aid in getting the hackles to wrap together. A good pair of hackle pliers helps considerably. Dorin Teardrop hackle pliers are Ken's favorite. Secure hackles. Now wrap the ginger hackle. Weave it through the other hackles as you wrap it forward. Use this third hackle to tweak the wing into position if need be. Secure hackle.

Dub a small cream head and whip finish. Mark the back of the abdomen with a black permanent marker. You and I both know the fish are not going to see these marks, but let's face it, if there was a fly with markings on it and another without, which one would you buy?

Depending on the type of water you plan on fishing, a V can be trimmed on the bottom side of the hackle to let the fly ride more flush in the water. Flat, smooth water types would be ideal for this method. The fly should be left with its full hackle when fishing in riffles and faster water types.
This pattern can be modified slightly to make a very passable Coffin Fly, which is a green drake spinner. Omit the hen back wind, use over-sized dark grizzly and dark ginger hackle, use white dubbing instead of the cream dubbing used on the dun, and simply trim the bottom and top of the hackle so it flies flat on the water. ~ Marty Bartholomew
Credits: The Eastern Green Drake is an excerpt from Marty's terrific book, Tying Flies Like a Pro. |
-------------
Molon Labe "Come take Them"
|
Posted By: varmintcaller
Date Posted: 08 January 2008 at 07:32
Black Woolly Worm
Tied and Photographed by Peter Frailey, text by Gary Soucie
Like the basic black dress, the Black Woolly Worm is at home almost anywhere and is rarely a bad choice. (Just as chic women accessorize their "little black dresses" with colorful scarves, fancy belts, single-rope pearl necklaces, or gem-studded pins, so do fashion conscious fly tiers dress up their basic Black Woolly Worms with red tails, silver ribs, shiny bead heads, or other fish-attracting fillips.)
Materials List: Black Woolly Worm
Hook: 2X- or 3X-long, standard to 2X-heavy wet-fly, sizes 2 to 16, say (6 to 1 2 being the sizes most often cited).
Thread: Black, in a size appropriate to the hook: 8/0 for sizes smaller than 16, say, 3/0 for a size 4 or larger, 6/0 for most sizes.
Tail: Red or grizzly hackle fibers or point(s), a quill slip, or a short tuft of red yarn; some tiers consider the tail optional in a standard Woolly Worm2
Body: Black chenille�fine, medium, or large, to suit the hook.
Hackle: Long grizzly hen hackle�neck or saddle, your choice � palmered the length of the body, with the dull underside of the feather facing forward and the barbs angled forward.
Head: Tying thread, tied fairly large; cement, varnish, lacquer, fingernail polish, or other protective coating is optional.
Tying Instructions: Black Woolly Worm
In the photo sequence that follows, the body color has been changed to make the tying steps more easily visible.

1. Tie on behind the eye of the hook and lay the tail material�if used�along the top of the shank and wrap the thread down to the bend, binding the tail material to the shank to form a smooth underbody.

2. Strip one end of the chenille by pinching and pulling the fuzzy stuff away with the nails of your thumb and forefinger, exposing about 1/4 inch of the string core.

3. Tie in the stripped end of the chenille at the bend, with the rest of the chenille hanging back behind the rear of the hook.

4. Prepare the hackle feather by stroking most of the barbs perpendicular to the hackle's center stem, then trim the feather square at its tip, leaving a small triangle.

5. Trap the aft-facing hackle feather (its dull, concave side facing up) by its triangular tip to the top of the hook at the rear of the shank, just ahead of the tied-in body material. Wrap the thread back up the shank in neat, close spirals, forming a thread base that will keep materials from slipping around on the slippery steel shank.

6. Holding the hackle up and out of the way, take one wrap of chenille behind the hackle.

7. Wrap the chenille forward in close spirals, each abutting the preceding wrap without overlapping it. Just behind the eye, tie off the chenille and clip the excess. Be sure to leave enough room between the chenille and the hook eye to tie off the hackle and build a head in step 8.

8. Wind the hackle forward in evenly spaced, close, open spirals. Wrap with the shiny, convex side of the feather toward the rear, if you want most of the hackle barbs to angle forward. (Seven turns are traditional, but Charlie Brooks liked to use just five turns for a sparser look. When in doubt, opt for the fewer number of turns.) When you reach the front of the body, secure the hackle with three or four tight wraps, and clip the excess feather. It's a good idea to anchor the hackle with a half hitch or two before clipping the excess. Build a neat, smooth, rather large head (larger than for most trout flies) with the tying thread. Whip-finish or use three half hitches. Clip the excess thread and - if you wish, it's not altogether necessary - apply a drop of head cement ("lacquer") to the thread. Once the head cement has dried, go out and catch a fish! ~ Peter Frailey
Credits: Excerpt from Woolly Wisdom, By Gary Soucie, published by Frank Amato Publications, Inc., P.O. Box 82112, Portland Oregon 97282; Phone: 503-653-8108
|
-------------
Molon Labe "Come take Them"
|
Posted By: varmintcaller
Date Posted: 09 January 2008 at 10:33

|
|
Blue-Wing Olive
By Dave Hughes
Endless color and size variations of the traditional hackled style have been tied. You should start with a few that cover the repeated color themes of natural mayflies. Don't hesitate, however, to tie others if you find yourself fishing over hatches that fall outside the most common color spectrum.
Blue-Wing Olive Materials:
Hook: Standard dry fly. 1X fine, size 12 to 20.
Thread: Olive 6/0 or 8/0.
Wings: Mallard wing feathers sections or hen hackle tips.
Tail: Blue dun hackle fibers.
Body: Olive fur or synthetic dubbing.
Hackle: Blue dun.
Instructions Blue-Wing Olive

1. Fix hook in vise and layer front half with thread. Select matching primary or secondary wing feathers from the right and left wings of a mallard or teal. Clip segments from each that are the width of the gap of the hook. Pair these together with their tips aligned and flared away from each other. If you're using hen hackle tips, pair them back to back, and strip excess fuzzy fibers from the bases of the stems.

2. Measure the paired feather sections the length of the hook shank, and hold them over the shank one-quarter the shank length behind the eye, with the tips forward. Pinch them tightly with your thumb and forefinger. Work thread up between the wing quill and your thumb on one side, over the wings, and down between your forefinger on the other side. Draw your thread straight down, to compress the feather sections to the top of the hook. Take one or two thread turns to lock them in place.

3. Take several turns of thread back over the butts to secure the wings, and clip the excess butts on a slant. Hold the wings upright and take several turns of thread in front of them to prop them in position. If necessary, take one or two figure eight turns between the wings to seperate them. This will not usually be needed. Wrap thread over the wing butts and to the bend of the hook.

4. Measure eight to twelve stiff hackle fibers the length of the hook, and tie them in at the bend of the hook. They should be straight, and gathered, not splayed. Twist a fine skein of dubbing to the thread, and wind a neatly tapered body forward to the base of the wing.

5. Tie in a hackle with fibers the length of two hook gaps. Secure the hackle stem to the hook eye, and clip the excess. Wrap three to four turns of hackle behind the wings, four to five in front. For a more classical sparse tie, use just three turns on each side of the wings. Tie off the tip and clip the excess. Form a neat thread with a minimum number of thread turns. Whip finish and clip the thread.

6. The traditional tie, when set on a tabletop, should perch on the tip of its tail and its hackle points, with the hook held just off the table. It will be quite an attractive apparatus to you, if properly tied, and will attract a surprising number of trout. It's shape captures perfectly that of the natural mayfly dun emerging and floating on slightly rough to very rough water.
Credits: From Matching Mayflies by Dave Hughes, published by Frank Amato Publications. We appreciate use permission.
|
-------------
Molon Labe "Come take Them"
|
Posted By: varmintcaller
Date Posted: 13 January 2008 at 11:38

|
|
Spectra Streamer
Copy and photos by Barry Ord Clarke
This is a quick, easy and realistic method for tying patterns to represent any bait fish with a slim streamlined body, such as stickle backs and sand eels. I suggest that if buying the material Ghost fibre you only require white, as this can be coloured with waterproof felt pens to any colour that you may require. In the pattern illustrated I have used a Partridge Sebastien Rat carp hook. The short curved shank, wide gape and in-turned point balance the pattern well and creates a fine bait fish movement when fished. All this said, any other salt water streamer hook can also be used.
The softex head coating that I have also used in this pattern is an excellent material as it still remains soft to the touch after drying, but this can also be replaced by clear Silicone, melt glue and epoxy. This pattern and material is well worth experimenting with, if you vary the colour combination and size, you can cover just about any pattern for imitating bait fish.
Materials List:
Hook: Sebastien Rat Carp Z2005SR #6.
Thread: Clear mono.
Body: Roman Moser Ghost Fibre (White) silver mobile (or substitute).
Gill Covers: Orange floss.
Eyes: Prisma tape eyes.
Head: Softex coating.
Colour: Waterproof felt markers.
Instructions - Spectra Streamer:

1. Attach the clear mono tying thread to the hook and run along the shank until the mono hangs plum with the hook point.

2. Tie in a bunch of white ghost fibre about half way down the straight part of the hook shank. When you remove a bunch of ghost fibre from it�s hank, you separate the amount and length that you require. Now holding the hank in one hand, take hold of the bunch you have selected with the finger and thumb of your other hand and PULL. The fibres will pull away from each other into a fine tapered tail. If you find this difficult you can also use dubbing brush to achieve the same effect.

3. Top the white ghost fibre under body with a few strands of mobile or crystal hair. This will add a little sparkle to the pattern.

4. Pull another bunch of ghost fibre (about 1/3rd the amount used for the under body) and colour it blue with a waterproof felt marker. The best way to colour ghost fibre with felt markers is: Place a sheet of paper on the table and lie the ghost fibre on it with the tapered end pointing away from you. Hold the ghost fibre in place by placing your thumb on the end to be tied in, now with your marker make single stokes beginning at your thumb and moving away from you. Once you have done one side turn over the fibre and repeat on the other side. Tie this in on top of the mobile, about 5 mm longer than the white fibre.

5. Take a length of floss 30 cm long and fold it 4 times, cut off the ends and roll in between finger and thumb to mix the fibres. Now you can cut this into two equal lengths and tie in as shown each side of the head to form the gill covers.

6. Pull yet another bunch of ghost fibre about the same amount as the last one and colour this dark green. Tie in on top of the blue fibre about 2 mm longer that the blue.

7. Finish off with a good tight half hitch knot so the mono thread doesn�t slip, and attach the prisma eyes.

8. Before you apply the softex or epoxy whichever you use, comb all the fibres in the fly with a dubbing comb. This will blend the three layers and colours together creating a more realistic body. Now you can cover the head with your chosen medium.

9. The finished spectra streamer, a real killer not just for sea trout but all predatory fish. ~ Barry Ord Clarke
Credits: This fly is from a collection of flies produced for the http://www.partridge-of-redditch.co.uk/ - Partridge of Redditch Limited website. We thank them for use permission. |
-------------
Molon Labe "Come take Them"
|
Posted By: TasunkaWitko
Date Posted: 19 January 2008 at 06:26
|
Elk-Hair Caddis
From The Art of Fly Tying:
- Hook - TMC 100; 10-20
- Thread - Tan 6/0
- Body - Tan rabbit dubbing
- Hackle - Ginger, palmered
- Wing - Tan elk hair
|
Here are a couple of examples:


-------------
TasunkaWitko - Chinook, Montana
Helfen, Wehren, Heilen
Die Wahrheit wird euch frei machen
|
Posted By: TasunkaWitko
Date Posted: 19 January 2008 at 06:36
|
Brassie
From The Art of Fly Tying:
- Hook - TMC 200R; 10-18
- Thread - Black 6/0
- Body - Copper wire
- Thorax - Gray muskrat dubbing, with guard hairs
|
Here is an example:

the brassie can also be weighted:

-------------
TasunkaWitko - Chinook, Montana
Helfen, Wehren, Heilen
Die Wahrheit wird euch frei machen
|
Posted By: varmintcaller
Date Posted: 22 January 2008 at 17:06
Natant Nylon Nymph
By Jim Schollmeyer and Ted Leeson
Though this design lacks the buoyance of the Goddard/Clarke Suspender Midge Pupa, it is easy to tie with readily available materials. Like all Charles Brooks patterns, this is a simple, no-nonsense fly that catches trout. It can be adapted to match a variety of mayfly species.
Materials for the Natant Nylon Nymph:
Originator: Charles Brooks.
Hook: 2XL dry-fly hook, #8 - #18.
Thread: Brown 8/0.
Tail: Mottled brown hen hackle.
Body: Brown wool yarn.
Ribbing: Gold wire.
Suspender pod: Ball of tan poly dubbing wrapped in nylon stocking mesh.
Legs: Mottled brown hen hackle.
Tying Instruction for the Natant Nylon Nymph:

Step 1: Wrap a thread foundation over the front half of the hook shank, and position the thread 1/4 of a shank-length behind the eye. Roll a pinch of poly dubbing between thumb and forefinger to produce a firm, but not tightly compressed, ball about 1/2 the hook gap in diameter. Center the ball in a square of nylon stocking material.

Step 2: Draw the stocking material around the dubbing to form a pouch. Don't compress the dubbing too tightly inside the nylon or the buoyancy of the suspender pod will be reduced. Mount the suspender pod as shown... Wrap the thread to the tailing point.

Step 3: Align and strip a bundle of hackle fibers. Mount them atop the shank to form a tail about one hook-gap in length. Secure the ribbing atop the tail-mounting wraps. Tie in a length of wool yarn atop the rib-mounting wraps.

Step 4: Twist the yarn tightly (clockwise when viewed from above), and wrap forward to produce a segmented body. Wrap the yarn to the rear base of the nylon, then under the pod, and continue wrapping ahead of the pod. Stop about 6-7 thread-wraps' distance behind the hook eye. Tie off and clip the yarn.

Step 5: Counter-rib the entire length of the body. Secure and clip the ribbing at the front of the yarn.

Step 6: Mount the legs...Bind and clip the excess. Form the head of the fly and whip finish.

Finished fly. ~Jim Schollmeyer and Ted Leeson
Credits: The Natant Nylon Nymph is from Tying Emergers, published by Frank Amato Publications, (2004). The variety and number of nymphs is mind boggling. Everything you ever wanted to know about nymphs and how to tie them is in it. ~ DLB
|
-------------
Molon Labe "Come take Them"
|
Posted By: varmintcaller
Date Posted: 26 January 2008 at 18:08

|
|
R.A.G. Fly
By mailto:haydenreels@flyreels.com.au - Terry Hayden , Victoria, Australia
If it wasn't for Rich Lewis and his connection to friend Terry Hayden, we may not have found this unique fly. Rich talked Terry into sending it.
The R.A.G. Fly (Rough As Guts) is a pattern that is very simple to make and the most effective bait fish fly that I have used. It is a distortion of a fly called the "Shaggy Dog," which was developed by Peter Coulson in Melbourne and so far, I have caught 27 species on this version, including Queenfish, Barramundi, Longtail Tuna, Coral Trout, Mangrove Jack, Golden Trevally and GT's.
It works whilst sinking as well as when being stripped due to the fact that the fibres pulse as the fly sinks. It is best used with a fast sinking line, which enables it to be fished at any chosen depth.
I make the fly on 2/0 & 4/0 "34007" Mustad hooks mainly, but there is no reason that it cannot be made bigger or smaller.
Materials: R.A.G. Fly
Hook: 2/0 & 4/0 "34007" Mustad shown.
Tail, body and wing: White Tiewell "Belly Shine" US version use Angel Hair.
Eyes: Stick on.
Tying Instructions: R.A.G.

1. Bind some thread the length of the shank of the hook to the bend.

2. Select a full length of White Tiewell "Belly Shine" the required thickness to make the fly. I make them almost exclusively in white but have used gold and green quite successfully.
Stagger the end of the material by laying it on the bench and pulling the ends, so that it is no longer square. Place it on the bend to the required tail length and wind the thread around the hook three times loosely and then pull tight allowing the material to settle around the hook.

3. Bind in and cut off the "Bellyshine". Whip finish at this stage. Wind the thread forward a third of the way along the shank.

4. Reverse the "Bellyshine" so that you have the other staggered end of the material and repeat the above process ensuring that the material is shorter than the previous lay and all the way around the hook. Bind in and whip finish again.

5. Move along the hook again and repeat process.

6. Wind the thread to the eye of the hook and this time tie the material on the top of the hook at the required length. Separate the material and pull it under the eye and tie off.

7. Cut material off and finish the binding and then cut the thread.

8. Trim the fly to shape with a pair of scissors. Fit flat stick on eyes. Epoxy over the eyes with a couple of layers of epoxy.
NOTE: It is important to lay three sections of fibre along the hook to maintain the shape. If you only do 2 sections, then the fly will look very sparse in the center.
If you are not happy with a plain white fly, then purchase a permanent Texta (permanent markers) in green, black, blue and red and you will be able to change the fly to suit fishing conditions, but I have found that it is unnecessary to use them 99% of the time. ~ Terry Hayden

About Terry:
Terry is a man of many talents, with a great enthusiam for fishing, both fresh and saltwater. He is the owner (and only employee) of Hayden Fly Reels. Check out his website at: http://www.flyreels.com.au/ - www.flyreels.com.au ~ dlb
|
-------------
Molon Labe "Come take Them"
|
Posted By: varmintcaller
Date Posted: 09 February 2008 at 20:06
|
Simple Streamers

By Al Campbell
If you've been trying to keep up with this series to this point, it's very important that you learn the patterns or procedures used in the next two weeks of tying. What you learn here will help you tie the flies coming up in a couple of weeks. There's nothing particularly hard about these flies, but there are a few tricks that will be helpful later.
Streamer flies are capable of catching just about everything that swims and has fins. They imitate small minnows and such, and that's what a vast majority of fish eat when the opportunity presents itself. Even little fish will pounce all over a streamer that's small enough to fit in it's mouth.
The first fly this week is one that has caught many different types of fish for me. They range from a 32 inch brown trout, caught in the Missouri river in Montana, to many four pound plus smallmouth bass caught in South Dakota. A few walleyes and a pile of northern pike round out the selection.
As usual, you have the option to modify, fine tune, or adjust the pattern to suit your needs. In fact, I tie a whole series of little trout streamers designed to look similar to juvenile trout in the many forms they appear.
The idea here is to represent the fish in a basic form rather than an exacting imitation. Many times that works better than having a fly that looks exactly like what a minnow looks like to our eyes. Fish see things differently than we do, and many times it's better to have flies that are more general in appearance than the exact representations you sometimes see in books and magazines or in fly shops.
You'll notice I'm using a different type of mylar tubing than you usually find in a fly shop. I like the looks of multi-colored tubing, and I found that craft shops usually carry a good selection of the multi-colored stuff I'm using here. The color of the tubing is part of the allure of the fly, so it's a good idea to have a good selection on hand. Experiment a little to find the colors that excite your local fish.
|
List of materials: Little Rainbow Trout Streamer
Hook: Any straight-eyed streamer hook that's 2X long or longer. Sizes 1 to 12.
Thread: Red monocord and black monocord, 3/0.
Body: Mylar tubing. Select colors to match the natural color of the minnow you want to imitate. For the Little Rainbow Trout, I'm using red and silver mylar tubing.
Wing: A mix of white calf tail, red dyed squirrel tail and green dyed squirrel tail. Again, select colors that match the natural you wish to imitate.
Eyes: None, or if you like, you can paint some on in red or yellow.
|
Tying steps:

1. Start the red thread and wrap it back to the bend of the hook. If you want to add weight, wrap lead wire on first, then tie it down with the thread. A drop of super glue is always a good idea to hold the lead firmly in place.
 2. Cut a piece of red and silver mylar tubing a little shorter than the hook shank and slip it over the hook as shown.
|

3. Using loose wraps of thread, start tying the mylar tubing down to the hook. As soon as you have it secure, tighten the thread and finish covering the ends of the tubing with thread.
 4. If you know how to whip finish by hand, you can use that to tie off the red thread. If not, make a loop of fine monofilament and wrap over it six to ten times with the tying thread. Hold the tying thread in place with your finger, trim the thread and put the end of the thread into the monofilament loop. Pull the loop through, under the thread wraps you just made and cinch it tight. This is the same knot a whip finish creates. Trim the tag end of the tying thread.
|

5. Start the black thread behind the hook eye.
 6. Make several loose wraps of thread over the end of the mylar tubing, then slide the tubing forward to tighten it. Now cinch the thread fairly tight.
|

7. Finish tying the end of the tubing down to the hook.
 8. Select a small bunch or white calf tail hair and tie it in so that the tips extend just past the bend of the hook.
|

9. If the calf tail hair wants to lay too flat on the hook, you can resolve this problem by making one wrap of thread behind the hair then pull the thread forward until the hair is at the right angle.
 10. Make a couple of extra wraps of thread around the hook to secure the hair in place.
|

11. Tie a small bunch of dyed red squirrel tail hair directly on top of the calf tail hair.
 12. Tie a slightly larger bunch of dyed green squirrel tail hair directly on top of the red hair.
|

13. Make a smooth head with your thread, whip finish, trim the thread and cement liberally on the head and base of the wing.
Dace minnows are common to just about any stream on our continent. Actually, the procedures used to tie this next fly can be used to tie just about any minnow streamer. Mix and match the body, wing and hackle colors to match the natural minnow you want to imitate.
List of materials: Al's Dace Streamer
Hook: Any straight-eyed streamer hook that's 2X long or longer. Sizes 1 to 12.
Thread: Red flat waxed nylon (single strand floss that has been waxed) and black monocord, 3/0.
Body: Mylar tubing. Select the colors to match the natural color of the minnow you want to imitate. For Al's Dace, I'm using black and silver mylar tubing.
Wing: Two furnace hackles, married to each other. (To marry materials, you work them together by hand before you tie them to the hook. In the case of hackles, face them together, curvature in, and work them together until they form one wing. A light shot of hair spray from a pump type spray bottle will help hold the wing materials together.)
Hackle: Any soft hackle. I'm using a soft Cree hackle from a cheap imported neck. (Here's a good use for those cheap necks you bought because you thought they would save you money, only to discover they don't work very well on dry flies.)
Eyes: None, or if you like, you can paint some on in red or yellow.
|
Tying steps:

1. Start the red thread and wrap it back to the bend of the hook. If you wish to add weight, wrap lead wire on first, then tie it down with the thread. A drop of super glue is always a good idea to hold the lead firmly in place.
 2. Cut a piece of black and silver mylar tubing a little shorter than the hook shank and slip it over the hook as shown.
|

3. Using loose wraps of thread, start tying the mylar tubing down to the hook. As soon as you have it secure, tighten the thread and finish covering the ends of the tubing with thread. Whip finish the same way you did in the last fly. Trim the tag end of the tying thread.
 4. Start the black thread behind the hook eye and tie the front end of the tubing down like you did in the last fly.
|

5. Marry two hackle feathers together making sure the tips are even and the curvature of the feathers is to the middle of the wing so the feathers will stay together. Tie them in to form a single wing as shown. If the feathers want to twist on the hook, use a pinch wrap to secure them. (A pinch wrap is performed by holding the feathers with the back parts of the pads of your fingers near where the thread will be wrapped. Make one or two very loose wraps of thread around the wing, then roll your fingers forward over the thread and pinch the thread and wing materials as you cinch the thread. This will allow the wing to be pulled down into place without rolling or twisting. This is also the method used to secure quill wings to the hook.)
 6. Select a soft hackle feather and tie it to the hook in front of the wing, curvature down and back.
|

7. Wrap the hackle in front of the wing as shown.
 8. Pull the hackle back and wrap over it with the thread to hold it back in a swept position. Form a smooth head, whip finish, trim the thread and cement liberally. Your finished fly should look something like this.
|
|
In case you wondered why I saved these simple flies to this late point in the series, I want the procedures to be fresh in your mind when we get to the flies that are coming up in a few weeks. They will be a little more complex, and will use multiple materials and married materials in the wings. For now, get creative and tie up a selection of streamers in your favorite colors.
|
-------------
Molon Labe "Come take Them"
|
Posted By: varmintcaller
Date Posted: 02 March 2008 at 15:39

Dry Flies
|
Lesson 2 - Royal Wulff
Lee Wulff as most Fly fishers and Tyers know was one of the more innovative and influential Fly fishers and Tyers of the 20th Century. The effects of his studies and work will effect what we do for a great many years to come. The Wulff series of flies I guess would have to be his more recognizable and enduring patterns to this day. Lee developed only three of the many Wulff's that followed. His first was the Royal Wulff, which is his adaptation of the Royal Coachman. His twist was using a white Deer hair tail and white Deer tail divided wings. The pattern can be scaled up for Salmon or down for Trout.
Lee's two other Wulff style flies are the White Wulff and the Grey Wulff. The White Wulff is a very bright fly since it is tied with all cream-colored materials. The Grey Wulff reminds me of an Adams on steroids. No dainty Adams this though!
These flies are tied very full for big water yet, are at home on more quiet waters too.
Dan Bailey designed The Grizzly Wulff, The Blond Wulff and, The Black Wulff. Francis Betters designed the Ausable Wulff. I am sure there are other Tyers who have tinkered with Lee's pattern too.
I selected the Royal Wulff to show the tying steps even though Al Campbell also shows the Royal Wulff in his tying series here at FAOL. I am presenting this version because I do it slightly different than Al shows and, it is generally tied much fuller for Salmon fishing. I suggest you check out http://flyanglersonline.com/flytying/beginners/part19.php - Al's version to get another perspective on the same pattern.
You would think patterns that Lee Wulff developed would be well documented due to all of the things Lee wrote and taught during his lifetime. They are in fact but there is still incorrect information out there in books and magazines. I hope I do not add to it but risking that, I offer the following dressing and information.
During my research doing this series, I have necessarily read quite a few books to try to offer you accurate information as best I can. When I decided to do the Royal Wulff as one of the step patterns, I noticed that at least four books in my library have the tailing material as at least four different kinds of hair! The wings also list a couple different ones as I note in the recipe below. Some of the tailing materials include Deer hair (which used here), Moose, Elk, white bucktail, calf tail and more.
I believe the original hair was Deer but I could be wrong. I use Deer because it is very buoyant and these flies are typically used in rough water where maximum flotation is a plus.
So, let's get tying!

Royal Wulff by Lee Wulff
Tied by Ronn Lucas, Sr.
Hook: Light wire of choice, I used Partridge Single Wilson.
Thread: Black.
Tail: White Deer hair or white calf tail.
Body: Rear 1/3 herl, next 1/3 red floss, next 1/3 herl.
Hackle: Brown, very heavy.
Wing: White Deer hair or white calf tail. I used white calf body.
Instructions: Royal Wulff

1. Lay down a tight thread base on which to secure the wings. This will help keep the wings from rotating. Take a pretty good size bunch of wing material, in this case calf body just because it is much easier to stack than the tail. Remove the short under fur and stack. Using the http://www.flyanglersonline.com/flytying/atlantic/dryflies/greasedliner.php - EHC wing technique , secure the bundle of wing material to the hook shank a fairly good distance from the hook eye. The wing should be situated in the middle of the hackle on the completed fly. Be sure to leave enough for the wings when they are stood up. While holding the butts of the wing above the hook shank, trim them at an angle as shown. This will help provide a nice taper to the body. Note that I trimmed it a little steeper than I should have. Yes, I goof up on occasion!

2. Lift the wing and crimp the front base with a fingernail and lay down a little thread to help prop the wing up.

3. Separate the wing into two equal bunches and do a couple figure 8 turns of thread between them to separate them. Take two or three tight turns around one of the wings base and run the thread through the butts as shown to pull the wing up and into position. Do the same to the other wing and lay a couple turns around the thread turns in the butt.

4. Advance the thread in tight flat turns to the rear of the hook ending at the beginning of the bend.

5. Stack a fairly good size bunch of Deer hair for the tail, cut the butts at a slight angle. Leave the tie in area on the tail butts the same width that the herl will be. This will leave a bare hook for the floss section to be on to make a very smooth body section. If you prefer, you can tie in the tail butts behind the tapered wing butts and bind them all the way to the rear of the fly. This method is a little harder to get a smooth floss section but, not too hard.

6. Attach a bunch of herl by their tips and form a thread loop.

7. Advance the thread. Twist the herl and thread loop rather tightly but not so tight that the herl tips break.

8. Wrap a couple turns of the herl "rope," tie off and trim. Note; if the Deer hair tail had flared more than you wanted, you can take one loose turn of herl over the tail to "bind" it a bit. Advance the thread in flat close turns to the rear of the wing.

9. Apply the red floss and trim waste. I made two trips to the rear of the floss section and back to the front to build up the body and hold the color a little better than once. You could even lay a bed of flat silver tinsel under the floss to really brighten it up and retain the color when wet.

10. Apply another herl component as you did at the rear of the fly, tie off and trim.

11. Attach two (or three if you prefer) hackles convex sides together. Advance the thread to the front of the ly but not too close to the eye. Or, you can tie one hackle on each side as I did here.
12. Advance both hackles, one at a time, tie off, trim and apply the head. You see here that it is possible to get a tiny head even when using fairly bulky neck hackles if you just use two turns to hold each in place plus the whip finish. This is one reason I use the UNI-Thread 8/0, it doesn't build bulk like larger threads.

White Wulff

Grey Wulff

Royal Wulff
|
-------------
Molon Labe "Come take Them"
|
Posted By: varmintcaller
Date Posted: 22 March 2008 at 18:01

"1,000 Legged Worm"
By Richard Taylor
|
|
|
Fished a small mountain stream last year and wasn't having too much luck. Saw a small trout slide under a big rock as I tried to sneak up on a little pool. Couldn't entice it out with anything and was about to move on when I spied a "1,000 Legged Worm" crawling near the pool. Decided to pitch it in and see if there was any reaction. As soon as it came even with the protruding edge of the rock, the trout shot out of there, snatched the worm and returned to it's rocky lair before I could hardly blink. A little further upstream, found another worm, and repeated the scene with the same results. Filed that away for future use and the attached creation is the result of my poor attempt at an imitation "1,000 Legged Worm." Just finished yesterday; so, will have to give it a test and see how it does as soon as we get some rain in my area.
Materials 1,000 Legged Worm
Hook: Tiemco@ - TMC 9395 - Size #8 Streamer - Straight eye - 3X Heavy, 4X Long, Forged, bronze.
Thread: Gudebrod@ - 6/0 - Dark Yellow.
Body: Chenille, bright yellow.
Legs: Dry fly hackle, Med. dyed dun, Size #18.
Coloring Pen: FabricMate@ - Chisel Tip - Brown (Pigment fabric dye - Permanent after 24 hrs.)

1. Place hook in vise and wrap thread front to back twice.

2. Tie in chenille at back, advance thread to the hook eye, wrap chenille to just behind hook eye and tie off.

3. Return thread to bend and tie in hackle, advance thread to hook eye, wrap hackle to just behind hook eye using two wraps of the hackle in each section and try to place it between the wraps of the chenille.

4. Tie off a small head of thread just behind the hook eye.

5. Scissor trim the hackle from the top and bottom of the fly so that the remaining hackle protrudes from only the sides creating the multiple legs.

6. Color the top of the trimmed chenille with the brown pen and a little bit down on each side.


The finished fly should approximate the size and coloring of the "1,000 Legged Worm" that I saw that day. ~ Dick Taylor aka Grn Mt |
-------------
Molon Labe "Come take Them"
|
Posted By: TasunkaWitko
Date Posted: 20 August 2009 at 11:38
Marabou Damsel Nymph
By Al Campbell

If you live near a lake or slow moving stream, you likely see damsel flies and maybe dragon flies near your home. These are aquatic insects too. In lakes, they make up a large part of the diet of insects the fish eat. In fact, you might be surprised at how important they are.

During the summer of 1997, several biologists from South Dakota completed a project of identifying the food sources of the major game fish in a sampling of local lakes. What they found should open the eyes of many local fishermen. You would do well to pay attention to their findings as well.
|
|
For the months of June, July and August, the most common item in the stomachs of trout, bass (small mouth and largemouth), walleye and panfish like crappie, perch and bluegills was a mix of adult and nymph damsel and dragon flies. Yes, I said walleyes. And, the nymphs were still prominent in stomach samplings during the spring, fall and winter months. Reason enough for me to fish a damsel or dragon fly nymph on the local lakes.
Even the biologists were surprised that fish noted as minnow eaters like walleyes, crappie and largemouth bass were eating more nymphs than minnows. Another thing that caught their attention was the number of northern pike that had a fairly large percentage of damsel and dragon fly nymphs in their stomachs. Seems these fish are opportunistic too.
Why not? Dragon and damsel flies live in the weeds and grow to meal sized treats fairly fast. Fish like to look for food in the weeds, so why wouldn�t they eat the most common big nymph in their dining room? Maybe the pike think of them as desert?
With this in mind, maybe it�s a good idea to have a few imitations of these two treats in your fly box. You might be surprised at how easy they are to tie. It only takes a few materials to do the job.
Before we get to the tying steps, it has been brought to my attention that there is a web site that has hook conversion charts and fly patterns that you might enjoy looking at. As you learn the basic techniques of each style of fly, you might enjoy trying a few others in the same category that use the same techniques. When you have a moment, check out this http://www.magiclink.com/web/wesn - site.
Now, to the nymph patterns you panfishermen have been looking for.
List of materials: Marabou Damsel:
Hook: Nymph, 1xlong; Mustad 9671, Tiemco 5262 or 200R, Eagle Claw L063 or equivalent. Size 10 to 18.
Thread: Gudebrod 3/0 black, brown or olive, or equivalent.
Thorax: Marabou, same as body.
Rib: Clear Angler�s Choice Body Stuff, midge Larva Lace, V-Rib or equivalent.

Wing Case: Strip of fibers from a turkey tail feather or pheasant tail feather. If you want some flash, you can use pearl tinsel for a wing case.
Eyes: Pearl or black plastic craft bead string, brass bead chain or melted monofiliment.
Tying steps:
1. Start thread and tie rib material to the hook.

2. Attach a pair of eyes to the front of the hook using a figure 8 wrap. (If the eyes turn a little on the hook, you can straighten them out by hand before you continue.)
 Note the size of the eyes!
Make plenty of wraps to ensure the eyes stay firmly in place. A drop of super glue will help hold the eyes in place.

3. Attach a small bunch of marabou to the hook, tying it down to the place where the body will end (approximately 1/3 hook shank length back from the eye). It should extend beyond the hook bend about half the length of the hook shank. You can either tie it down where the body will end (see picture) or tie it down from the eyes to that point, whichever is easier for you. I usually use the thread tie down point as a visual reference for body dimensions, thus I tie it in where the thorax begins.

|
|
4. Wrap the ribbing material forward creating even segments, tie off at the place where the thorax will start.

5. Tie the marabou down to behind the eyes if you haven�t done this already.

6. Tie down the wing case material at the back of the thorax area.

7.Wrap the remaining marabou in the thorax area, using as much of it as you can to create a full, thick thorax.

8.Tie the marabou off behind the eyes and trim the excess.

9. Pull the wing case material over the thorax and tie down behind the eyes with four to six wraps of thread.

|
|
10. Pull the wing case material over and between the eyes and tie it down at the hook eye.

11. Trim the wing case material, create a smooth thread finish, whip finish and cement the thread. Using an old tooth brush, brush the marabou thorax gently to fluff it out.

12. Your finished fly should look like this.

I use marabou for this fly because it �breathes� so well in the water. If you wish, dyed ostrich herl will work the same way. Or, if you want to vary it a little, maybe ostrich herl for the thorax and marabou for the body? It�s your fly, experiment a little and find the style you like.

Dragon fly nymphs are fatter than damsel fly nymphs. You can use this pattern though by wrapping a fat underbody of yarn, similar in color to your marabou, after you attach the eyes and rib, but before you attach the marabou. The rest of the tying steps remain the same except trimming the tail (dragon nymphs have very short tails). I leave the tail a little long and trim it on the lake after I catch a dragon nymph in a nymph net, just to be sure of dimensions. Hey, the fish don�t seem to mind if you don�t trim it as long as it�s about the same size as the natural.

Have you noticed how much your skills are improving? It�s easy if you practice a little. Have fun with damsel and dragon nymphs this week. Next week we shift gears again. (Shhhh, it�s a secret.) You�ll need to have that dry fly hackle then.
See ya next week. ~ Al Campbell |
-------------
TasunkaWitko - Chinook, Montana
Helfen, Wehren, Heilen
Die Wahrheit wird euch frei machen
|
Posted By: TasunkaWitko
Date Posted: 20 August 2009 at 11:41
|
Tailwater and Spring Creek Favorites
By Al Campbell

If you live in an area that has spring creeks or tailwaters, you likely live in an area that has scuds. You also are likely to have a lot of midges in the streams, especially in fall, winter and spring. Unless you�re a dry fly purist, you�ll want to have a few of these goodies in you fly box.
Before we start on the flies, it would be a good idea to discuss dubbing a minute. Dubbing is what we call the stuff you twist around the thread to make fly bodies. We�ve already used some pre-packaged dubbing, but we haven�t created any of our own. It�s easy to create your own dubbing though. All you need is a coffee grinder or a blender and some fur or yarn. You might also find a little good dubbing in your clothes dryer screen after you wash a throw rug or wool coat or sweater. Just remember, cotton is not a good type of dubbing.
If you set out to make your own dubbing, first you need some raw materials. Macram� yarn, sparkle type knitting yarns, animal under furs, carpet yarns, poly yarn, dacron, antron and rayon all make good dubbing materials. For fine dubbing, the under fur of some animals is a good choice. Mink, beaver, muskrat, opossum and rabbit fit this category. For coarse dubbing, yarns (especially the course type), short hairs from the ears, feet and face of certain animals, antron, krystal flash and wool are good sources.
Experiment a little and you�ll open up a whole new arena of materials you can use in your tying. A good example of what I�m talking about is the scud pattern we�ll tie this week. The dubbing is a coarse macram� yarn I cut into short pieces (about 1/4 to 1/2 inch) and toss in the blender and mix with sparkle yarn from the fabric store. I keep adding yarns until I have the right color and texture blend for what I want to tie. Stop by a few yard sales for an old blender and some macram� or knitting yarns and give it a try.
On to this week�s flies.
Scuds are not flies but rather crustaceans of the amphipod family. Their closest relatives are beach fleas you might find on the coast somewhere, but they belong to the broad family of crustaceans that includes crayfish, lobsters, sowbugs, crabs and shrimp. They are often called freshwater shrimp because they resemble shrimp in many ways. If you care to count, (the fish never do) they have seven pairs of legs and swim with a short, jerky sideways motion.
Scuds are important to the fisherman because they provide a large part of the fish�s diet in waters where they are abundant. In some cases, the fish feed almost exclusively on scuds. Since that�s the case, scuds should be one of the patterns in your fly box.

|
List of materials:
 Hook: Scud hook - Tiemco 2487, 2457; Eagle Claw L055, L056; Mustad 80250BR; Daichi 1130. Sizes 12 to 20.
Back: Scud back, Body stretch, plastic bag, latex glove, or any similar material.
Dubbing: Any commercial or homemade coarse dubbing, color to match the natural in your area (most range from olive or tan to bright orange or pink, but some are so light they look gray).
Rib - Copper or gold wire.
Thread - 3/0 or 6/0, color to match dubbing color.
Hook: Scud hook - Tiemco 2487, 2457; Eagle Claw L055, L056; Mustad 80250BR; Daichi 1130. Sizes 12 to 20.
Back: Scud back, Body stretch, plastic bag, latex glove, or any similar material.
Dubbing: Any commercial or homemade coarse dubbing, color to match the natural in your area (most range from olive or tan to bright orange or pink, but some are so light they look gray).
Rib - Copper or gold wire.
Thread - 3/0 or 6/0, color to match dubbing color.
Tying steps:
1. Start the thread and tie down the back material around the bend of the hook. (If you use plastic bags or latex gloves, cut the strips to about 1/4 inch wide.)

Tie the ribbing wire to the same point as the back material.

3. Dub a body of coarse dubbing. (This is one time you don�t need to twist the dubbing too tight around the thread.)

|
|
4. Stretch the back material over the dubbing, tie off behind the hook eye and trim. Be sure to keep the back on top of the fly.

5. Wrap the ribbing wire around the body to form even segments. Tie off the wire and trim it behind the hook eye. Build a head with the thread, whip finish and trim.

6. Use a needle to pick out some of the dubbing from the underside of the fly. (This will form the legs of the scud.)

7. Trim the legs even with the hook point.

8. Cement the head. I like to cement the body too, by soaking cement up under the back material from the sides.

|
|
You�ll find other scud patterns in books and magazines, and in the �fly of the week� archives here on FAOL. If you fish spring creeks, tailwaters or lakes that are fed by these sources, you need a few scud patterns in your fly box.
Another insect that�s common to these types of water is the midge. We looked at a midge emerger a couple of weeks ago. Another form of the life cycle of midges is the larva. This small worm-like larva is often called a blood worm because it is often blood red in color. In certain waters and at certain times of the year, fish feed almost exclusively on this tiny larva.
Many flies have been designed to imitate the midge larva; the most famous of these is the brassie. The lace larva is another. I�d like to say I designed this fly, and I may have (I�ve been tying this one for 15 years now), but it is so easy, it�s likely others have tied some version of it before me. No matter who tied the first one, it�s the best midge larva imitation I�ve used; a consistent producer on the Bighorn River and in South Dakota tailwaters.
List of materials:

Hook: Dry fly or nymph - Tiemco 100, 200; Mustad 94840, 80050BR; Eagle Claw L061B, L052; Daichi 1190, 1270. Sizes 16 to 24.

Body: Small clear tubing (midge Larva-Lace, small V-Rib, small Liqui-Lace, Anglers Choice Body Stuff or any similar stretchy, small tubing or lace).
Thread: 6/0, 8/0 or 10/0 (I like Gudebrod for its strength). Color to match the natural in your water, usually red, orange, olive, gray or black. It�s a good idea to tie a variety of colors and sizes. The thread color will give the fly its color.
Collar: Coarse sparkle dubbing, color to match the thread.
Tying steps:
1. Start thread and tie down lace to the hook bend. Be sure to cover the hook and lace with thread, it�s what gives the fly its color.

|
|
2. Wrap the lace tightly to just behind the hook eye.

3. Tie off and trim.

4. Dub a collar of coarse dubbing. Don�t make it too big, just enough to fill in over the thread that tied the lace off.

|
|
5. Whip finish, trim thread and cement.

In rivers or streams, fish this fly near the bottom by adding lead putty or a small split shot to your leader near the tippet knot. In lakes, fish it near weed beds suspended below a strike indicator.
Midges are so plentiful, even the largest trout will feed on them. To most, it seems strange that any large fish would zero in on such a small meal, but if you�ve ever eaten popcorn shrimp you know how small things can add up to a mighty big meal. And so it is with midges; they are so plentiful, they add up to a large meal and are the mainstay of many fish throughout the year.

See ya next week. ~ Al Campbell |
-------------
TasunkaWitko - Chinook, Montana
Helfen, Wehren, Heilen
Die Wahrheit wird euch frei machen
|
|